Sales Programs Tasks
How to Add a Sales Program
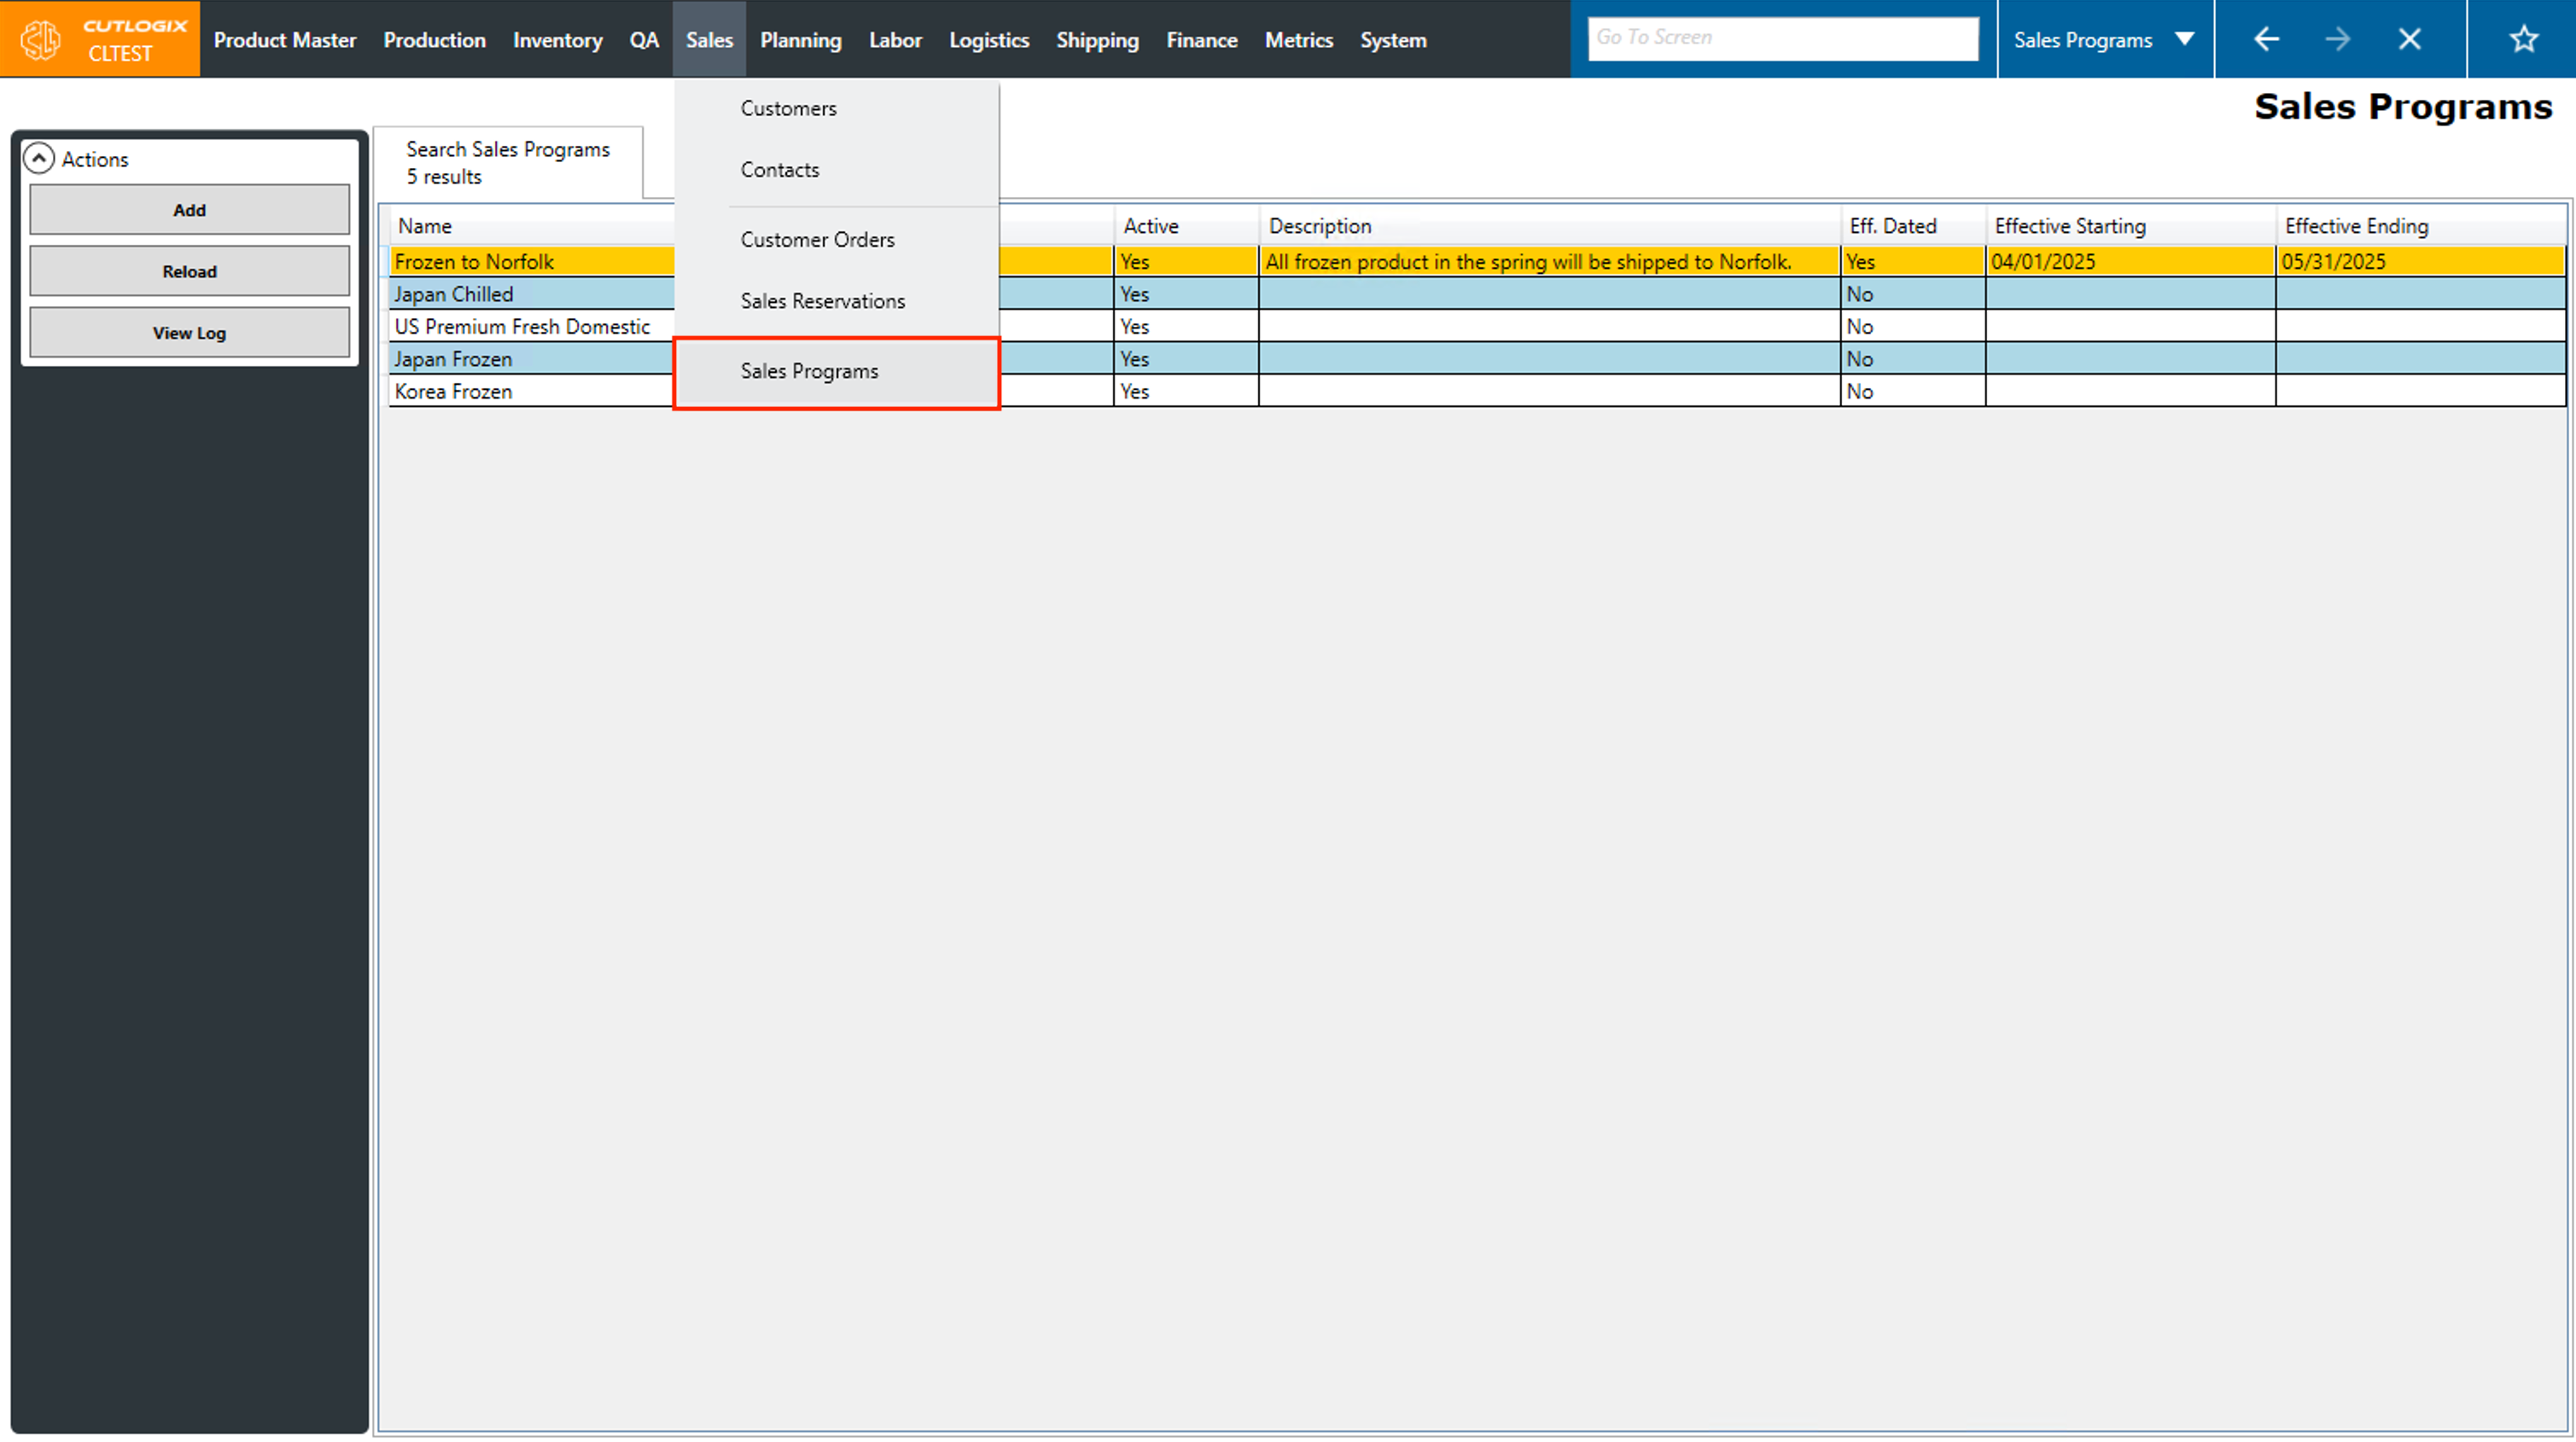
DemoStep 1: Navigate to Sales → Sales Programs.
Step 2: Click the add button in the Actions sidepod. This will bring up a details tab for the new sales program.

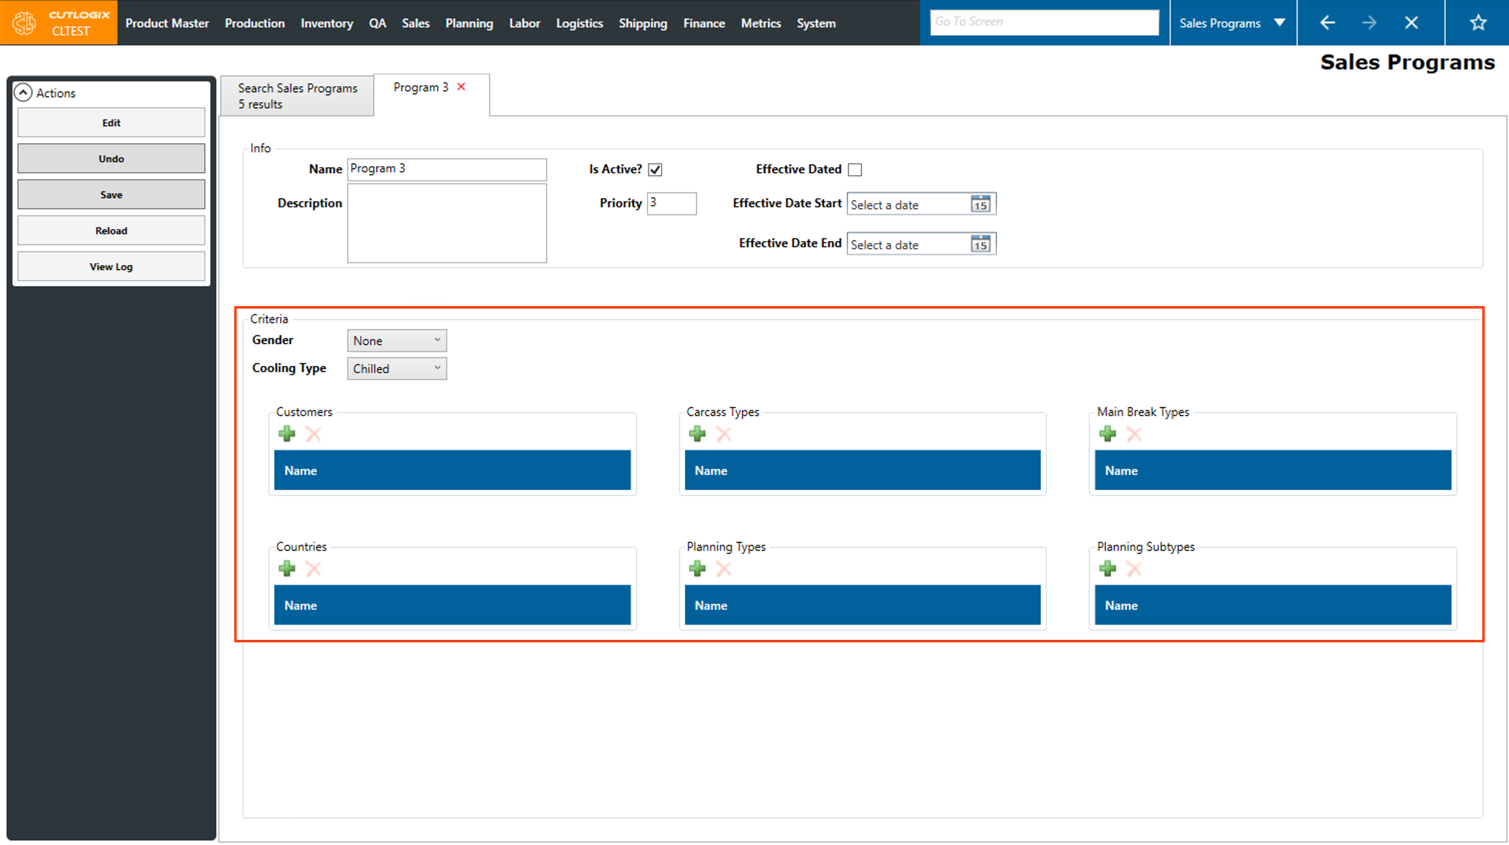
Step 3: Enter a name for the sales program and enter a priority for it.
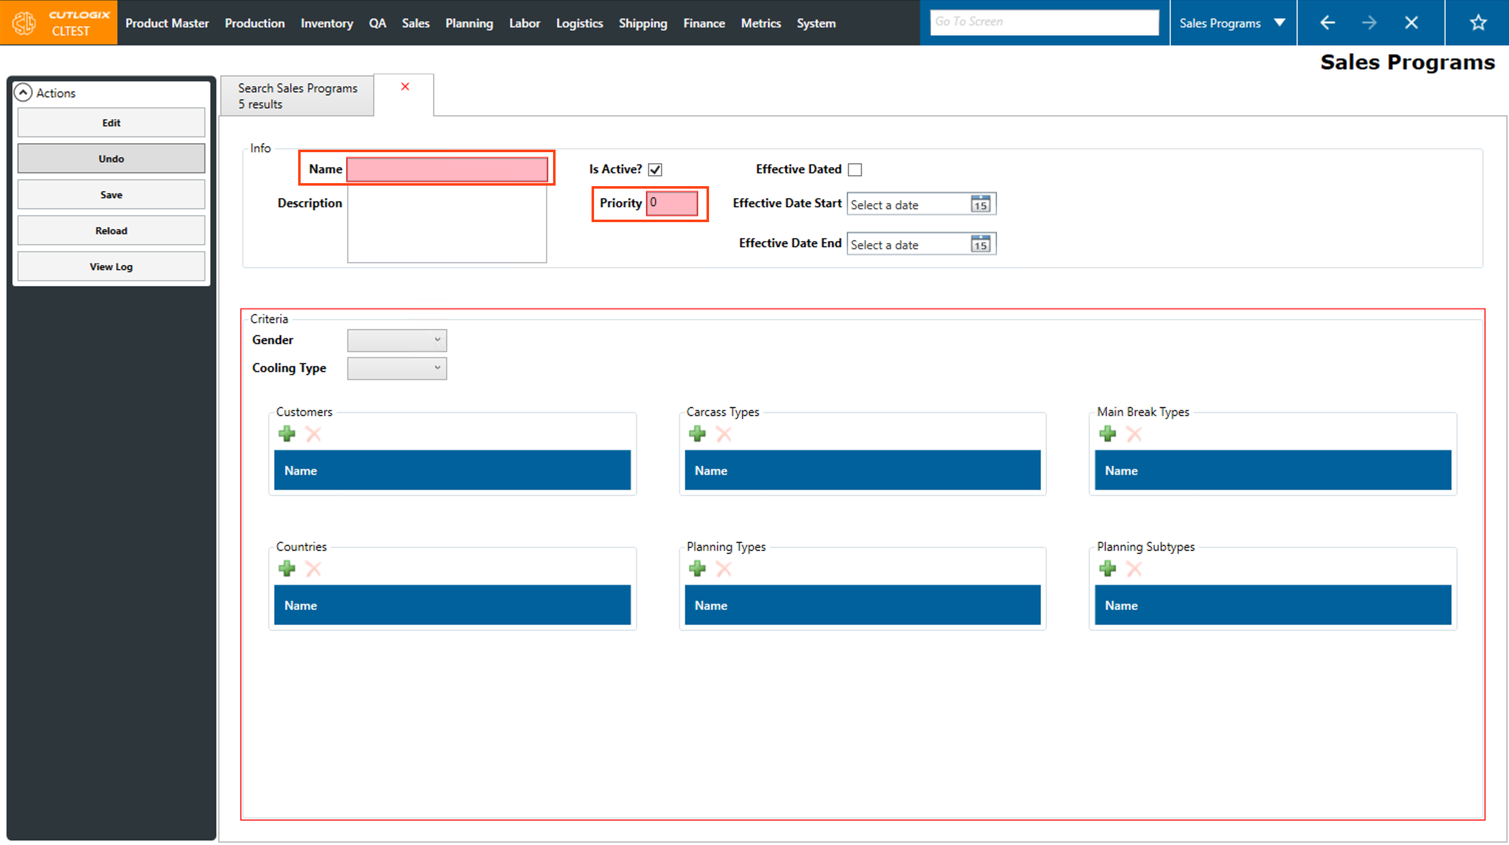
Step 4: Then you must fill out at least one set of criteria in order to enable the save button. This means that at least one of the following must be true:
• Gender is not equal to ‘None’.
• Cooling type is not set to 'None'.
OR one of the criteria has an entry. To add an entry, click the green + button under the criteria that you want to add:
• Customers: The customers being sold to as part of this sales program.
• Carcass Types: The diet types included in this sales program.
• Main Break Types: The type of main break used to process the product for this sales program.
• Countries: The countries being sold to as part of this sales program.
• Planning Types: The planning types, as defined in the planning module, that are included in this sales program. Planning type typically refers to a type of primal (ham, belly, shoulder, etc).
• Planning Subtypes: The planning sub-types, as defined in the planning module, that are included in this sales program. Planning sub-type typically refers to a type of sub-primal (i.e. a cut specification derived from further processing of a primal cut).

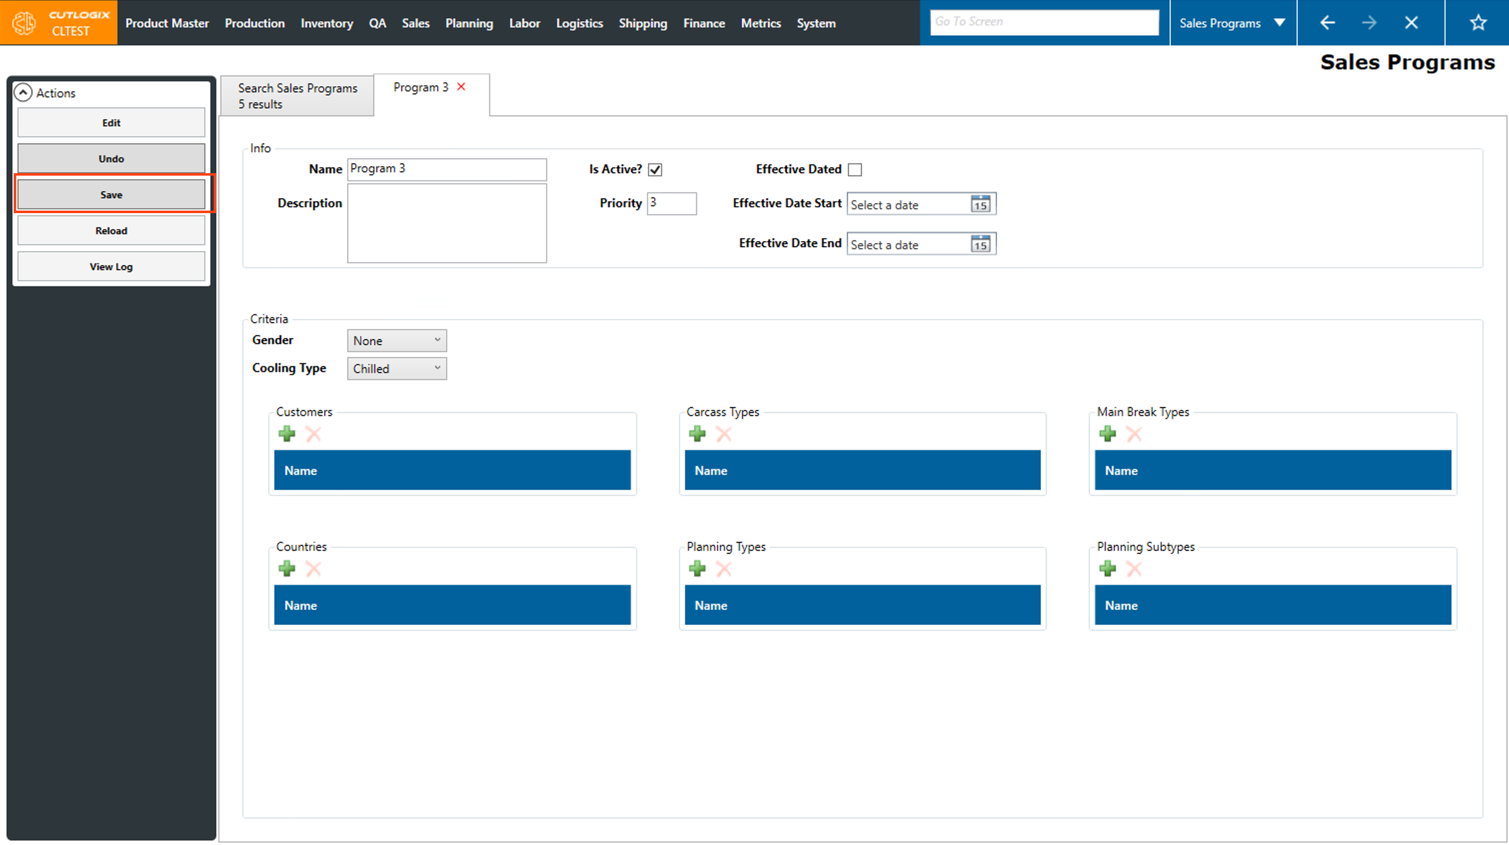
Step 4: Once the "Save" button is enabled, click on it to save the new sales program. If a user no longer wishes to save the sales program then they can hit the undo button in the actions sidepod.

How to Edit Sales Programs
DemoStep 1: Navigate to Sales → Sales Programs.
Step 2: Double-click on the entry you want to edit. This will bring up the details tab for that sales program.

Step 3: Click the ‘Edit’ button in the Actions sidepod. This will enable editing the various fields in the details tab.
Step 4: Make the desired changes to the Sales Program while ensuring that all required fields are still properly filled out. Doing so will keep the ‘Save’ button enabled. Click the ‘Save’ button to save your changes. The list outlines the criteria that must be met for the ‘Save’ button to be enabled.
• Gender is not equal to ‘None’.
• Cooling type is not set to 'None'.
OR one of the criteria has an entry. To add an entry, click the green + button under the criteria that you want to add:
• Customers: The customers being sold to as part of this sales program.
• Carcass Types: The diet types included in this sales program.
• Main Break Types: The type of main break used to process the product for this sales program.
• Countries: The countries being sold to as part of this sales program.
• Planning Types: The planning types, as defined in the planning module, that are included in this sales program. Planning type typically refers to a type of primal (ham, belly, shoulder, etc).
• Planning Subtypes: The planning sub-types, as defined in the planning module, that are included in this sales program. Planning sub-type typically refers to a type of sub-primal (i.e. a cut specification derived from further processing of a primal cut).
Step 5: If you do not wish to keep any of the changes you have made during the current editing session then click the ‘Undo’ button to roll them back.
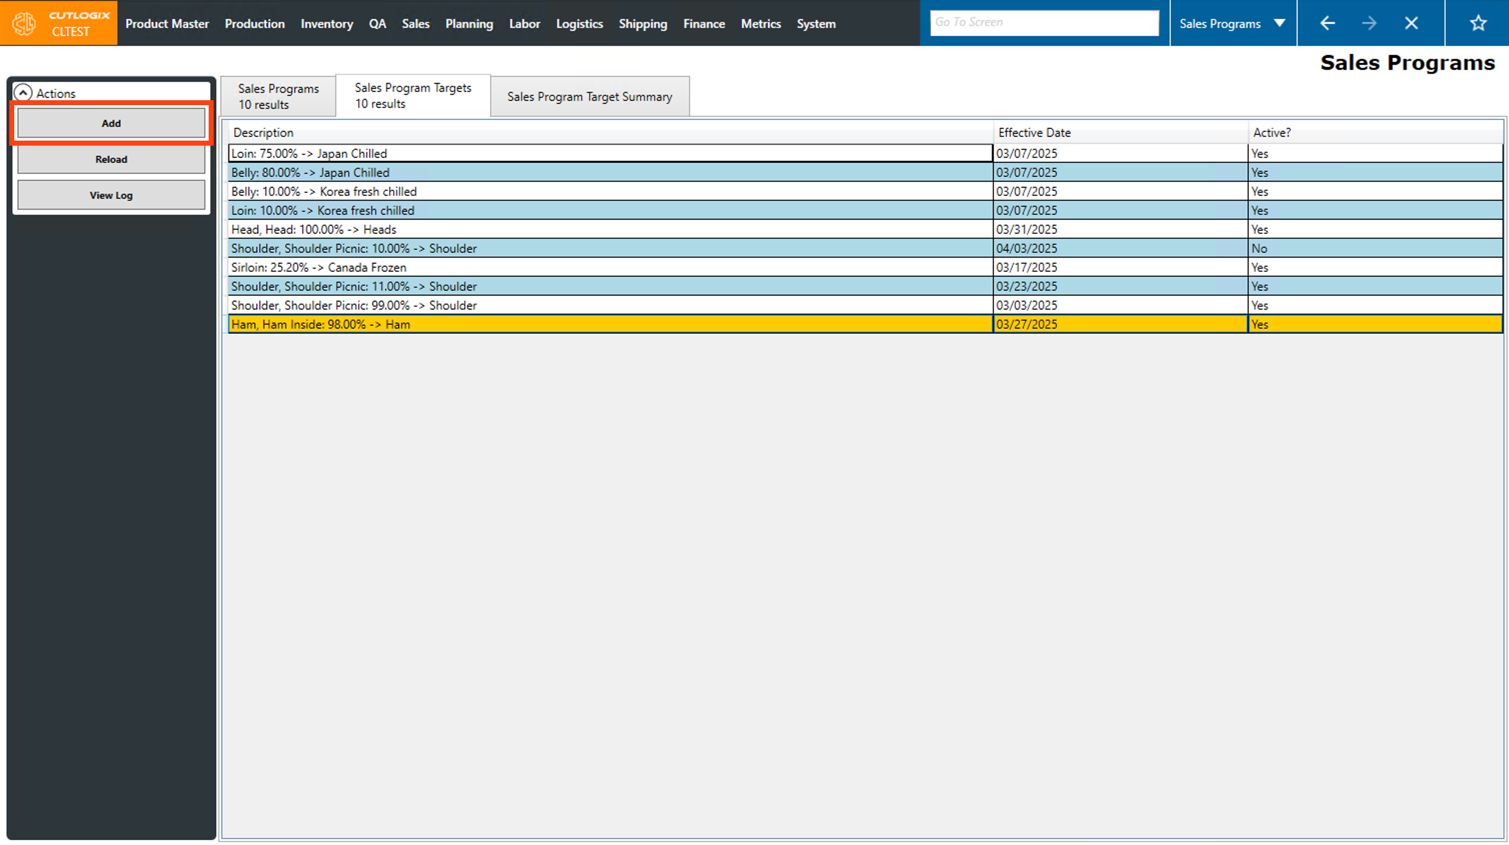
How to Add Sales Program Targets
DemoStep 1: Navigate to Sales → Sales Programs.
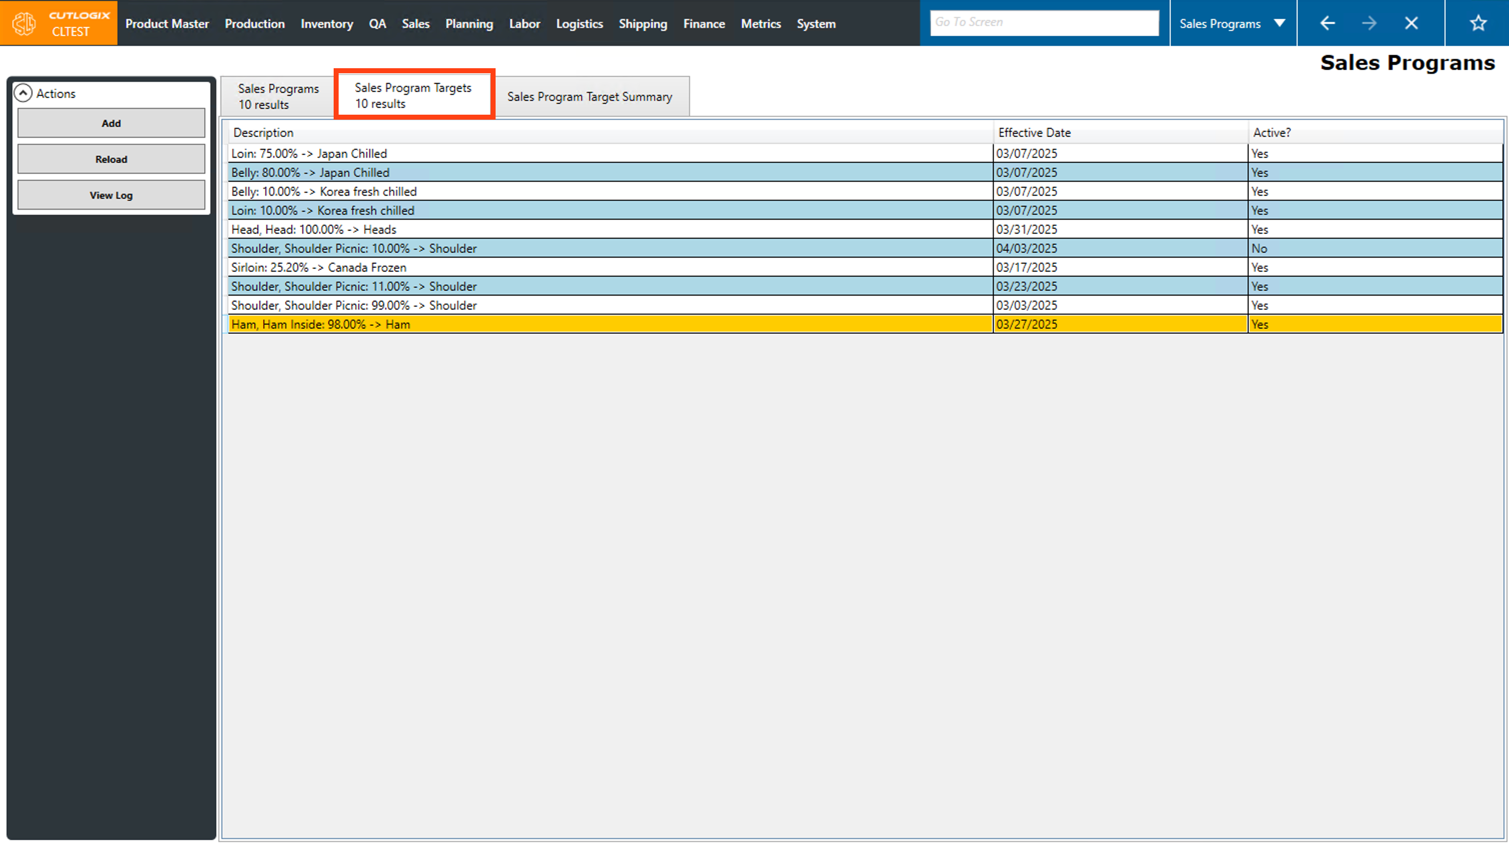
Step 2: Click on the "Sales Program Targets" tab.
Step 3: Click on the "Add" button in the Actions Panel.
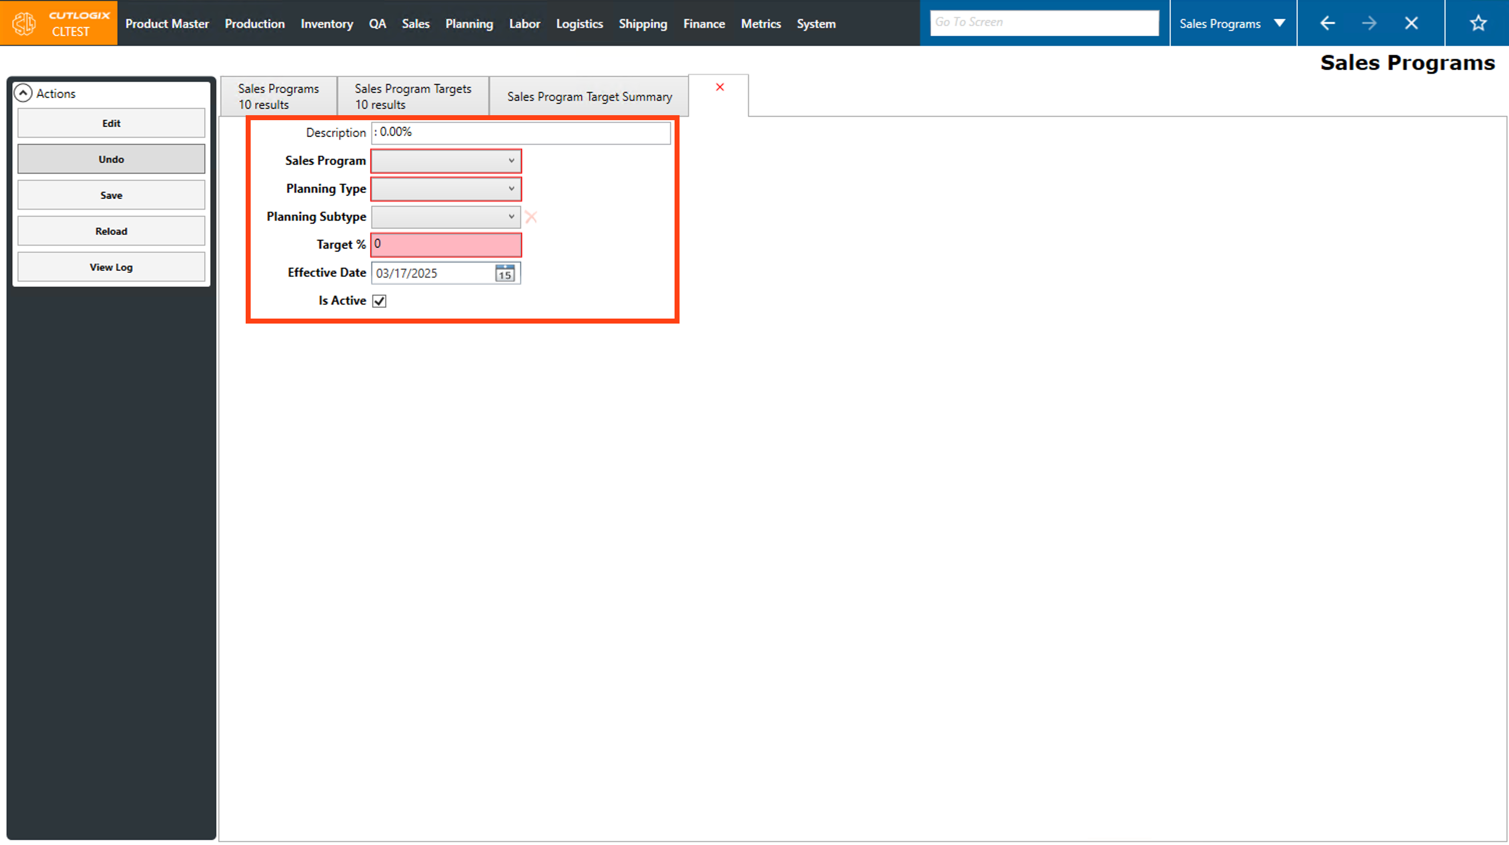
Step 4: A new tab will open for the new sales program target, where you can input information about it. Fields that are highlighted in red are required and must be entered before the target can be saved, they are as follows:
• Sales Program: Select the sales program that the target is for from the dropdown list.
• Planning Type: Select the planning type that the sales program target is for from the dropdown list. (If there is a planning type set on the selected sales program, the planning type selected here must match that one).
• Planning Subtype: Select the planning subtype from the dropdown list that the sales program target is for. (If there is a planning subtype set on the selected sales program, the planning subtype selected here must match that one)
• Target %: Enter the target percentage of sales for the selected planning type that should fall under the selected sales program. (The total percentage for a selected planning type cannot exceed 100%)
• Effective Date: Select the effective date for the sales program target.
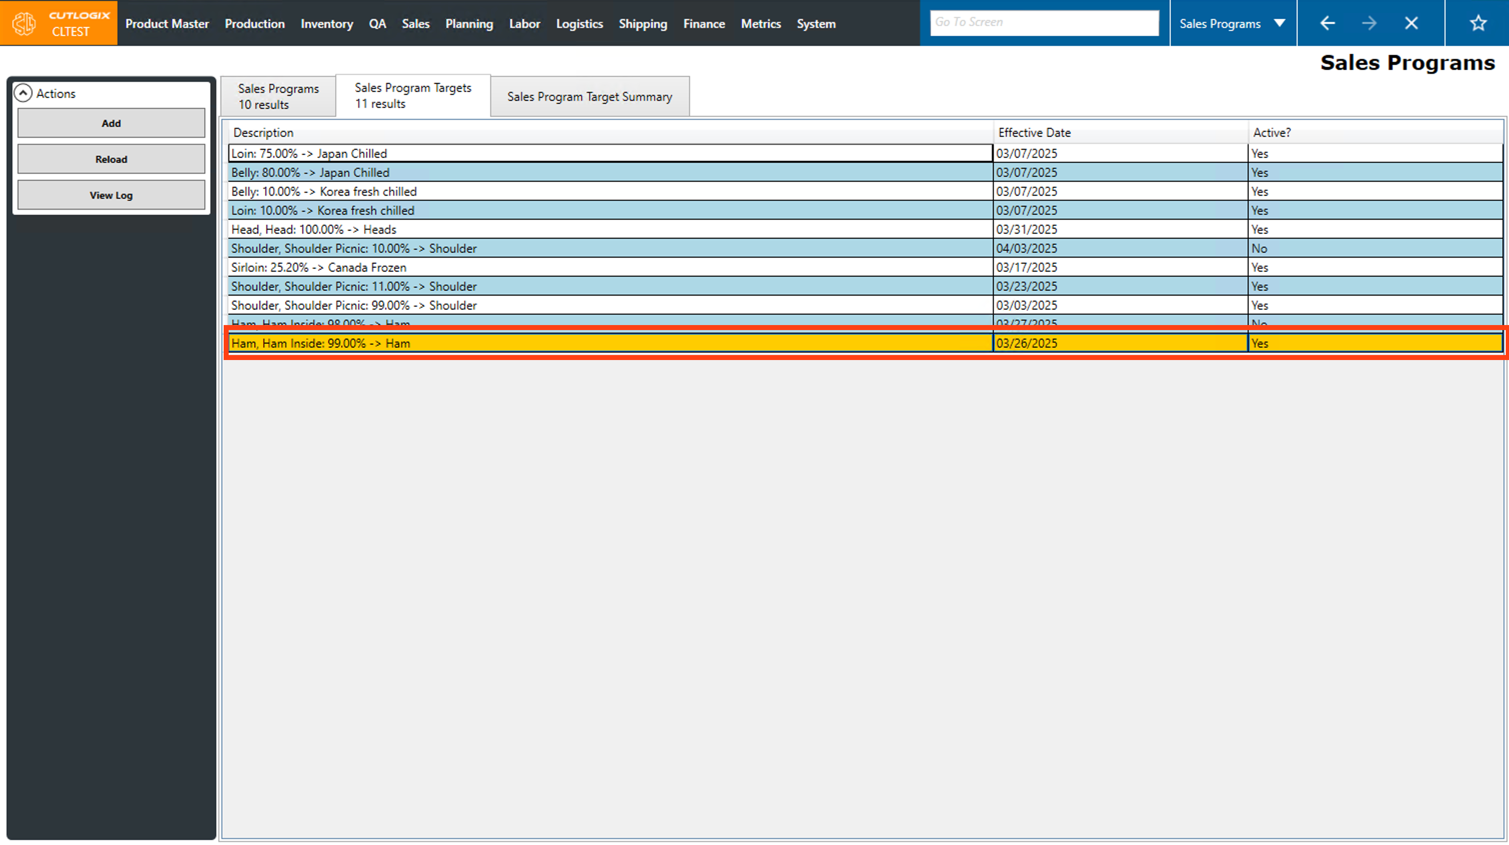
Step 5: Once all the required fields have been entered, click the "Save" button in the Actions Panel to save the new sales program target.

How to Edit Sales Program Targets
DemoStep 1: Navigate to Sales → Sales Programs.
Step 2: Click on the "Sales Program Targets" tab.
Step 3: Double-click on the sales program target that you want to edit.
Step 4: A new tab will open and display the pre-filled info about the selected sales program target.
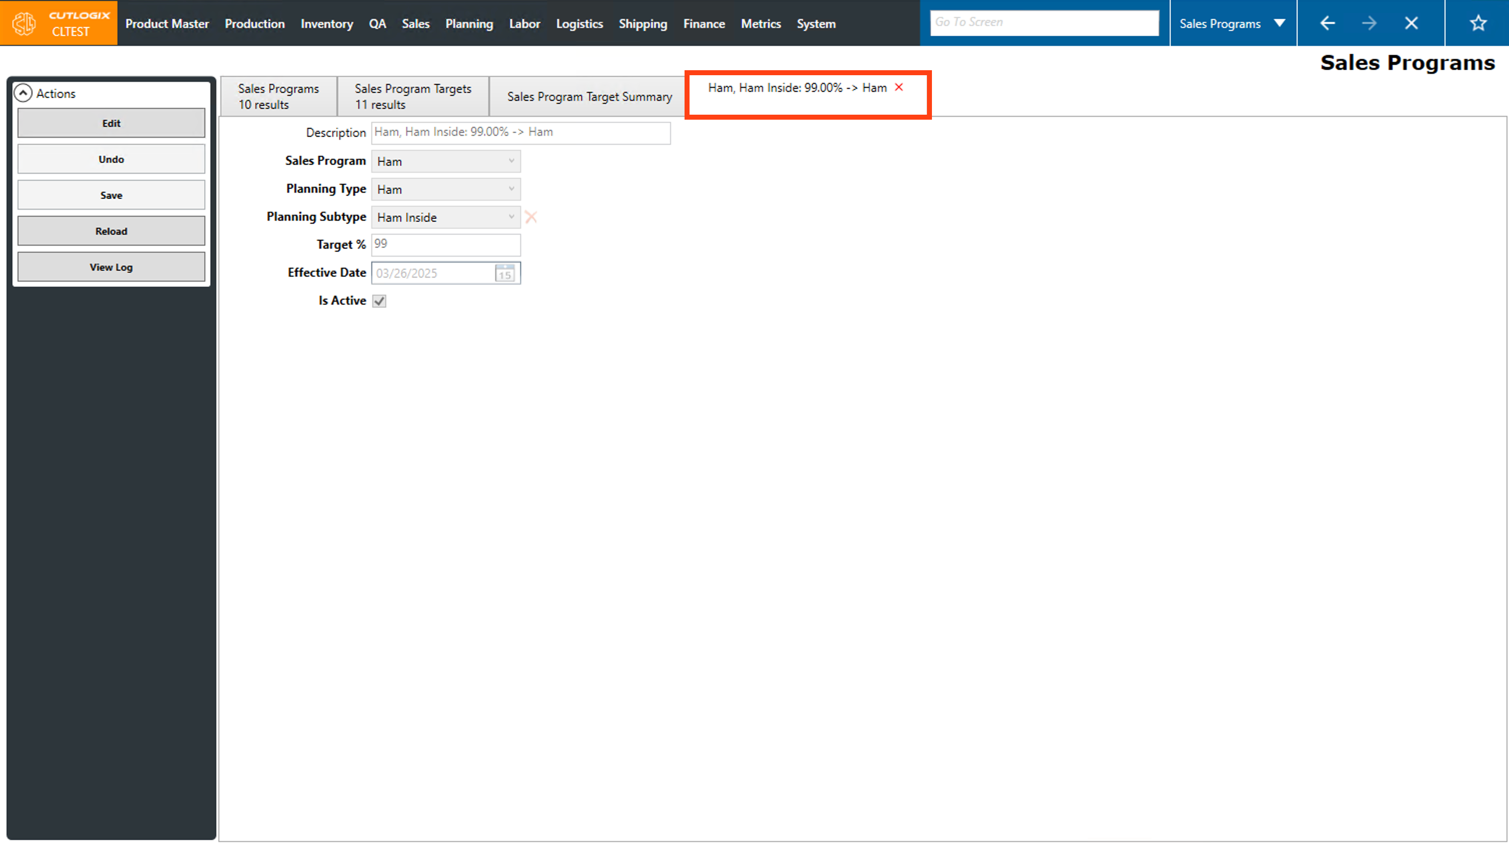
Step 5: Click on the "Edit" button in the Actions Panel.
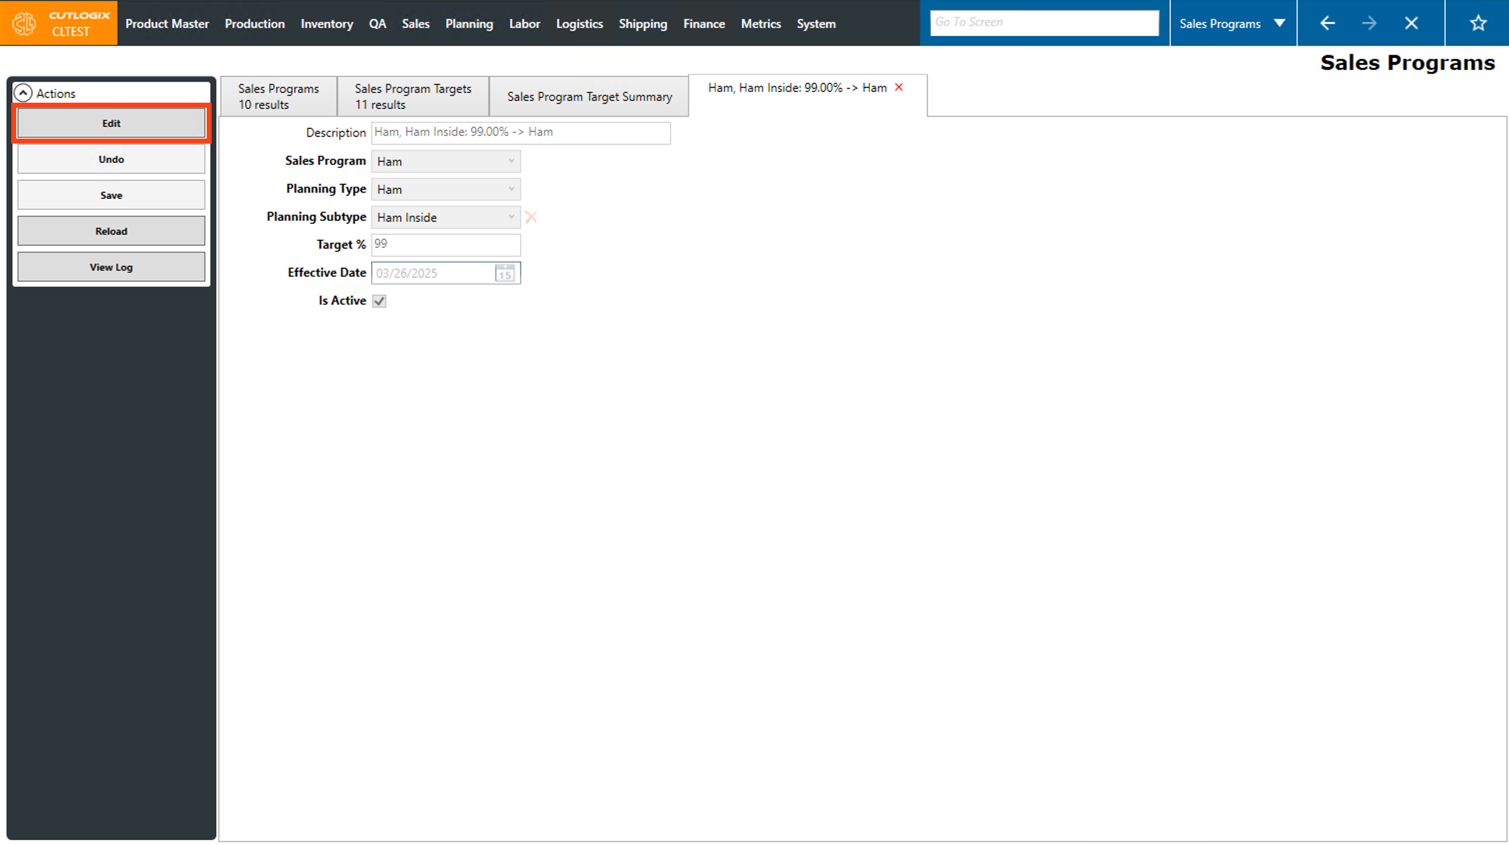
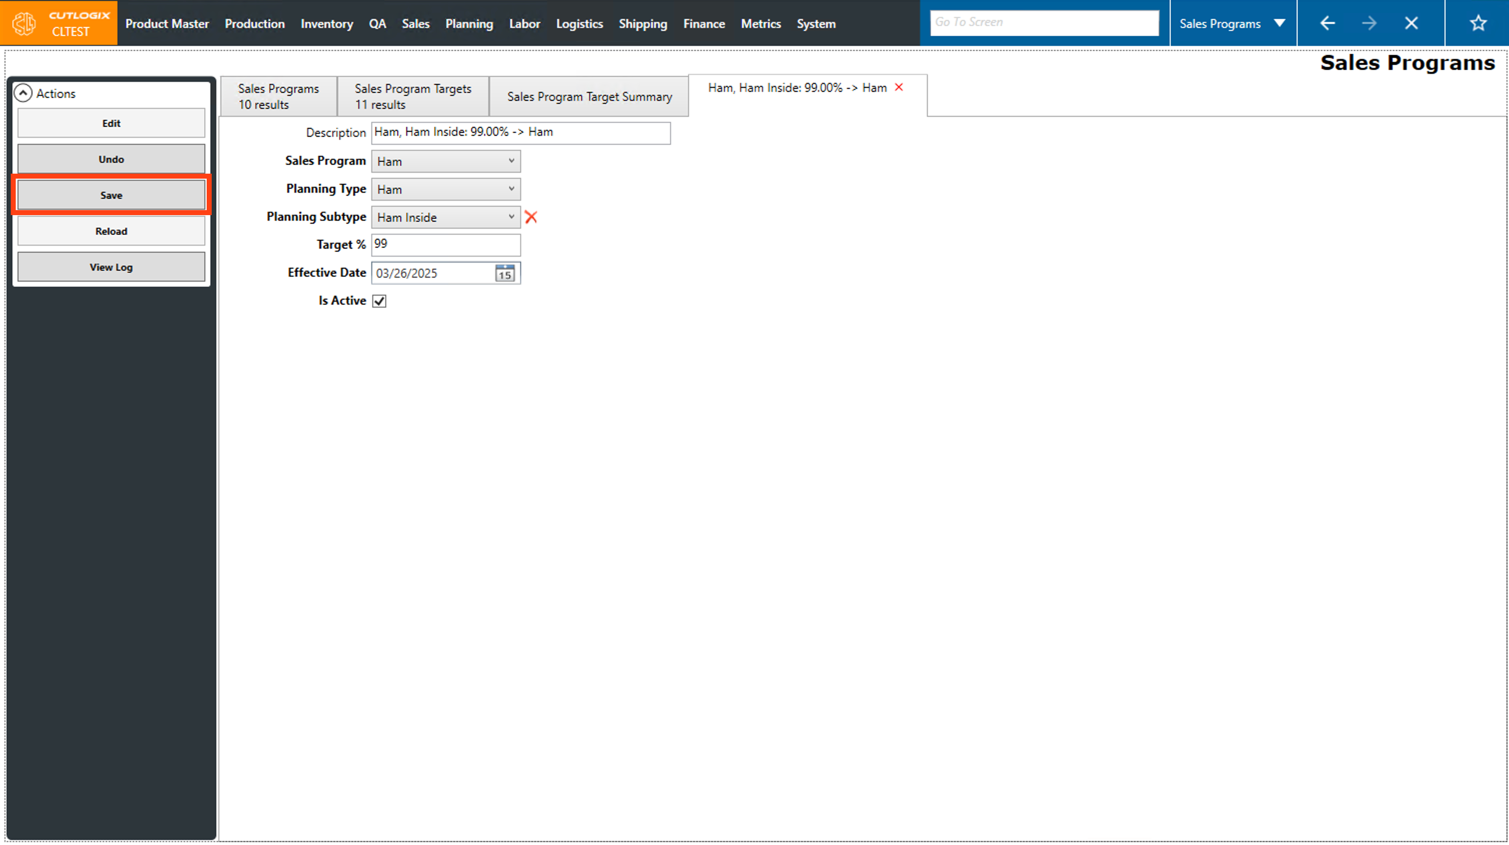
Step 6: The fields will now be editable. Make any necessary changes to the selected sales program target here.

Step 7: Once you're finished making changes, click on the "Save" button in the Actions Panel to save the changes. If you don't want to save the changes, clicking the "Undo" button will discard them.
How to Interpret Sales Program Target Summaries
DemoStep 1: Navigate to Sales → Sales Programs.
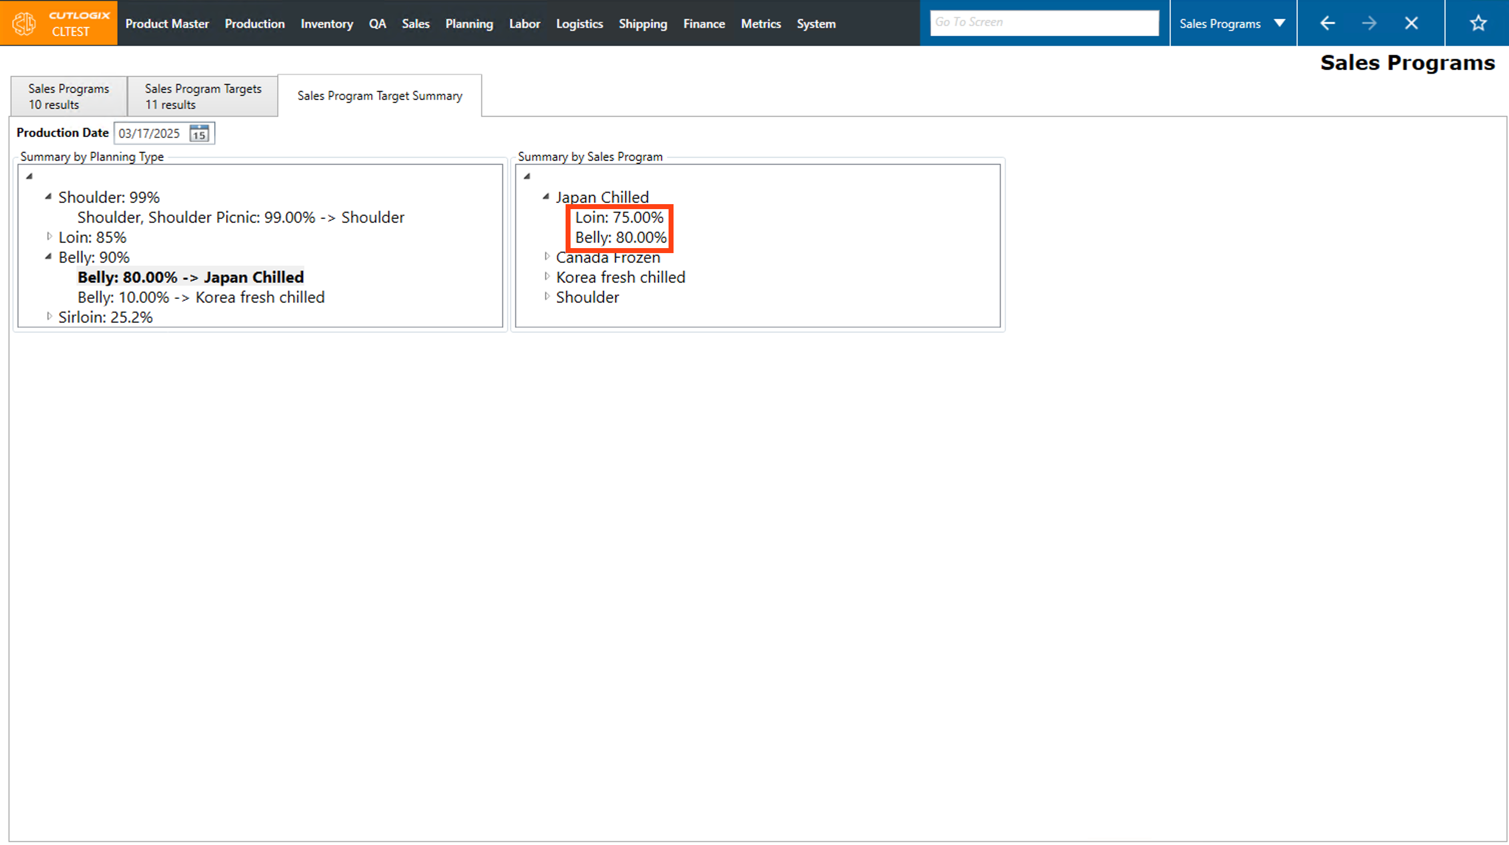
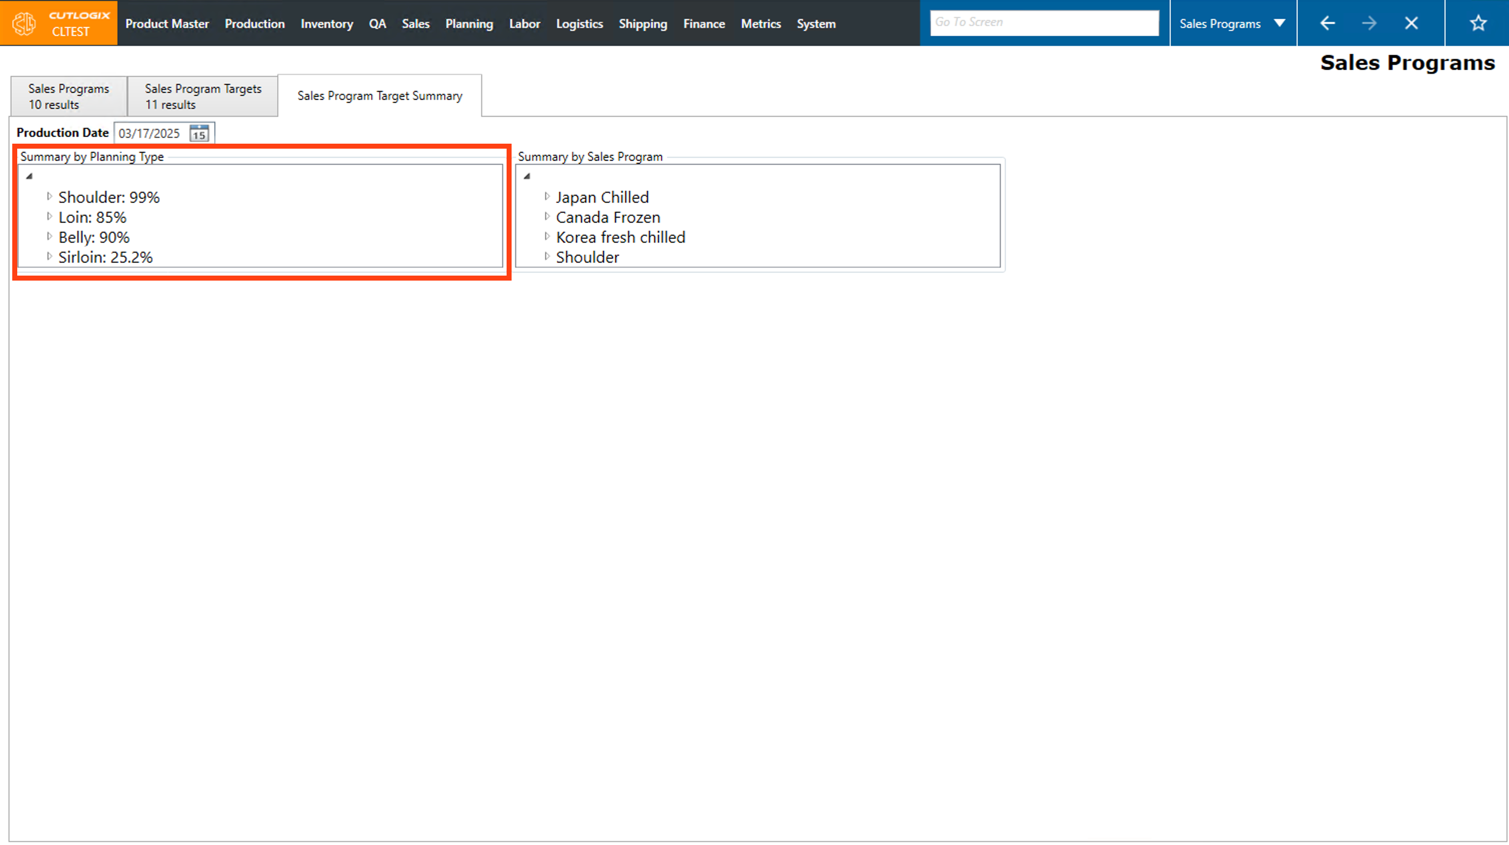
Step 2: Click on the "Sales Program Target Summary" tab.
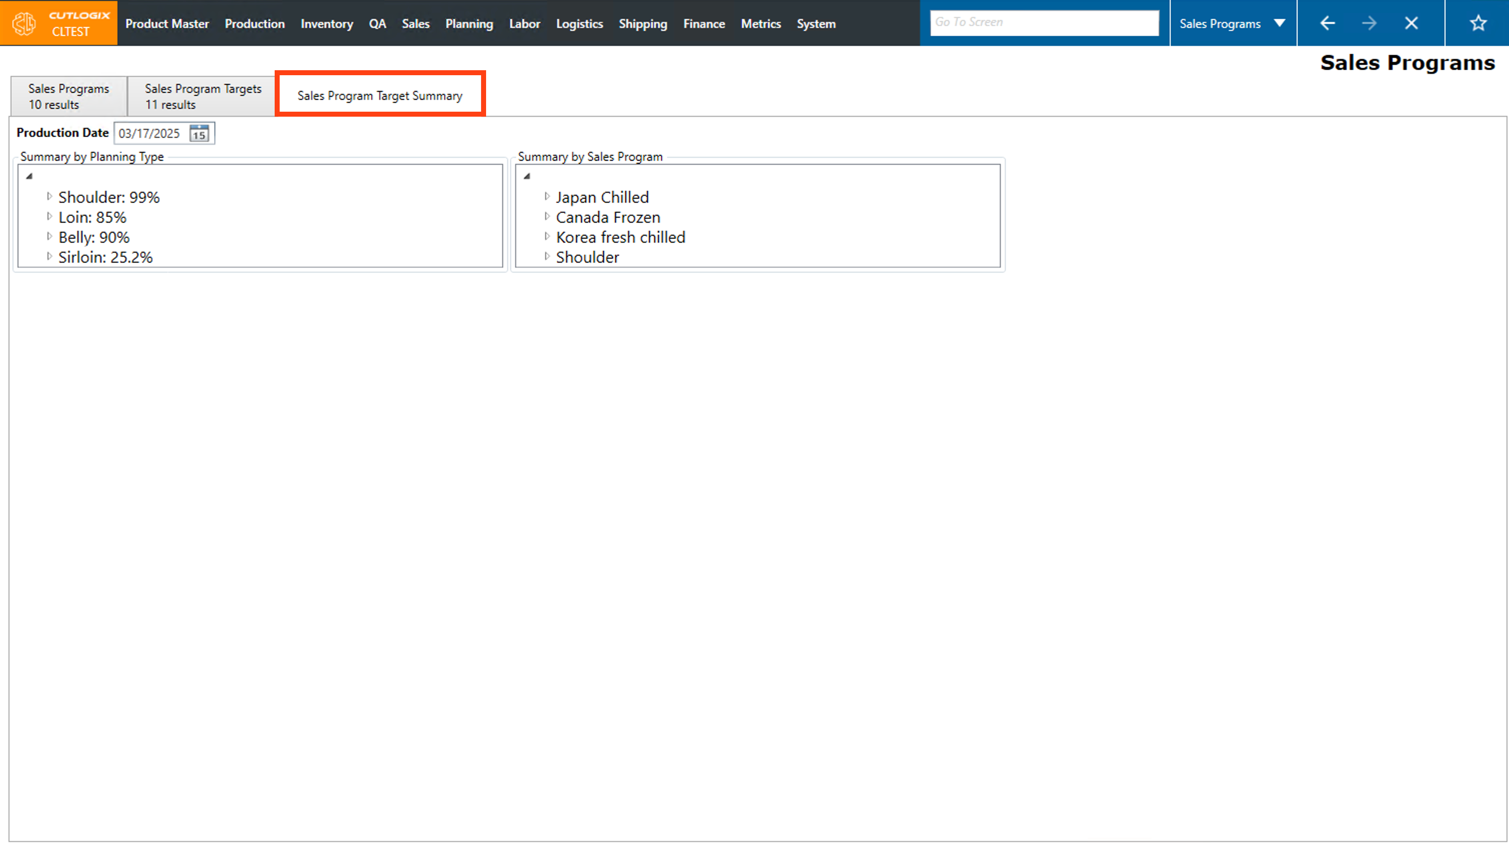
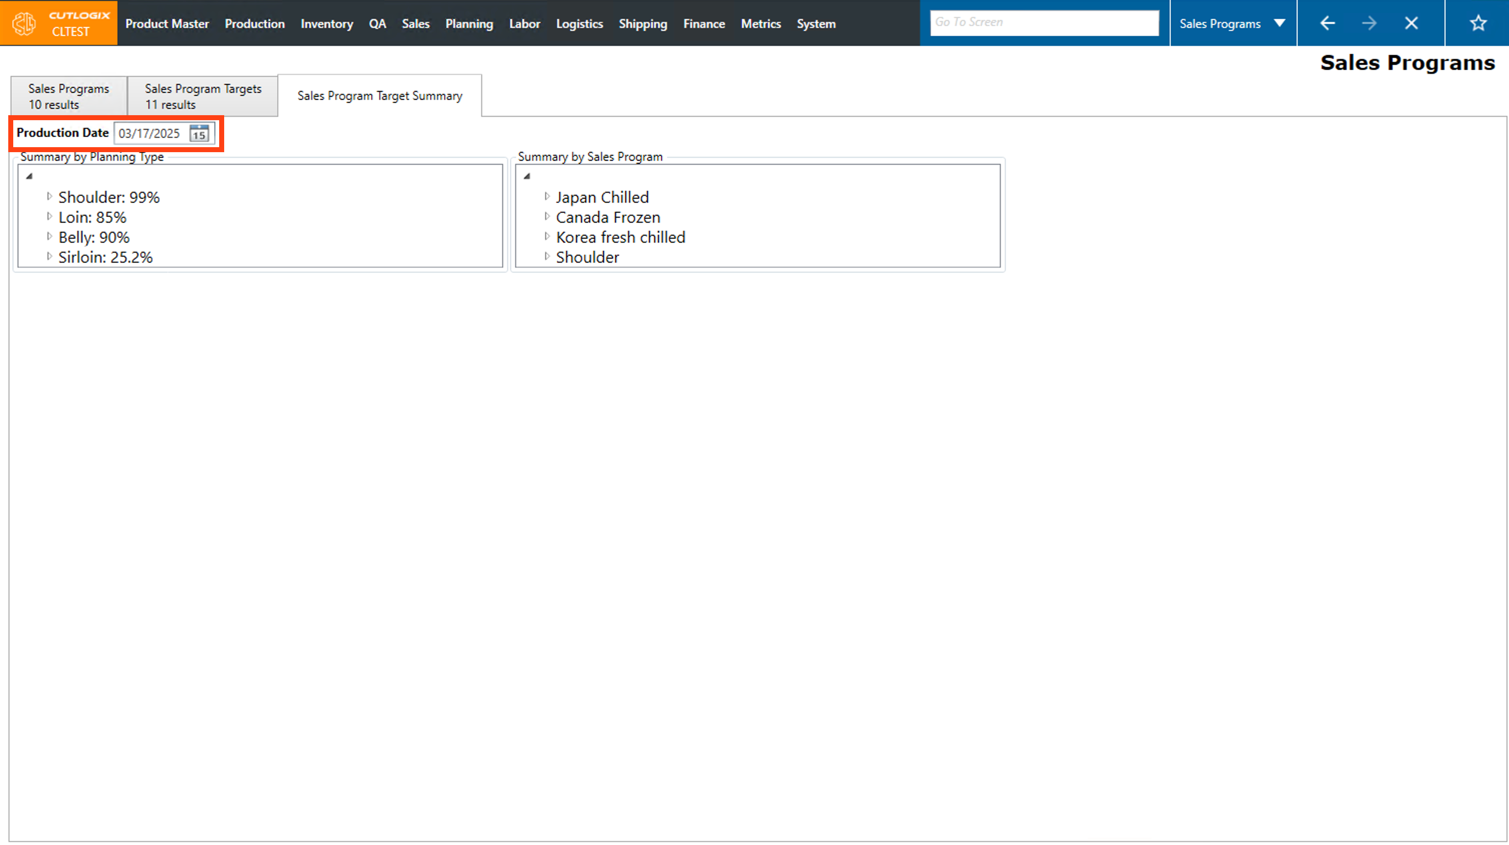
Step 3: The page will open and the production date will be set to the current day. Two sections will appear below where you can view summary data.
Step 4: The "Summary by Planning Type" initially displays a list of main planning types (excluding Sundry and Offal). Next to each planning type, a percentage will appear that represents the total amount of that planning type that is allocated to sales program targets.
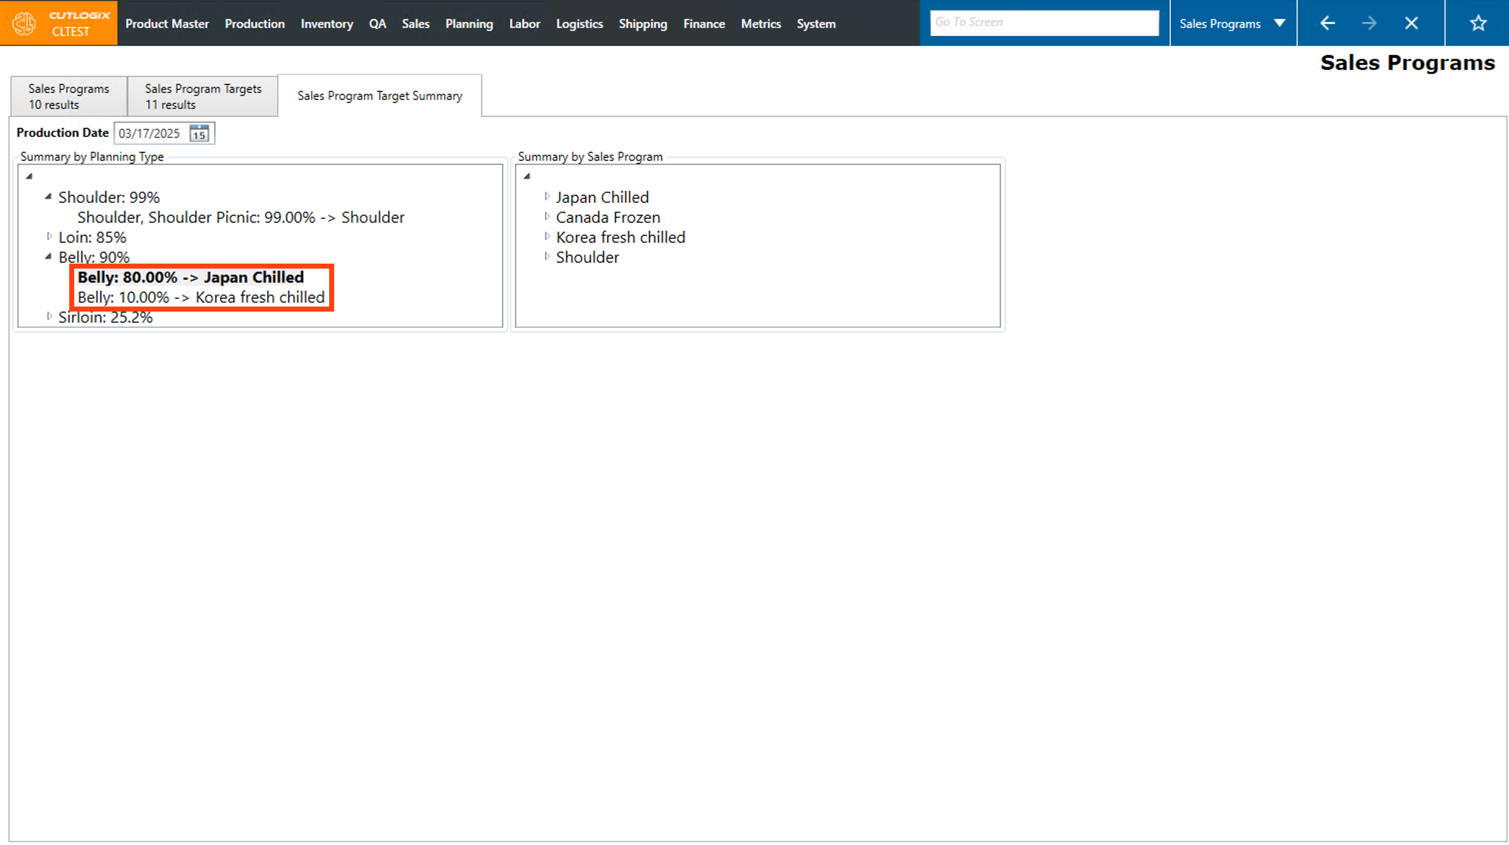
Step 5: Clicking on the arrow beside a planning type will expand the tree view. Below the planning type, the sales program targets for the planning type will appear. Next to them, the total percentage of the selected planning type that's allocated to them will appear.
Step 6: The "Summary by Sales Program" initially displays a list of your active sales programs.
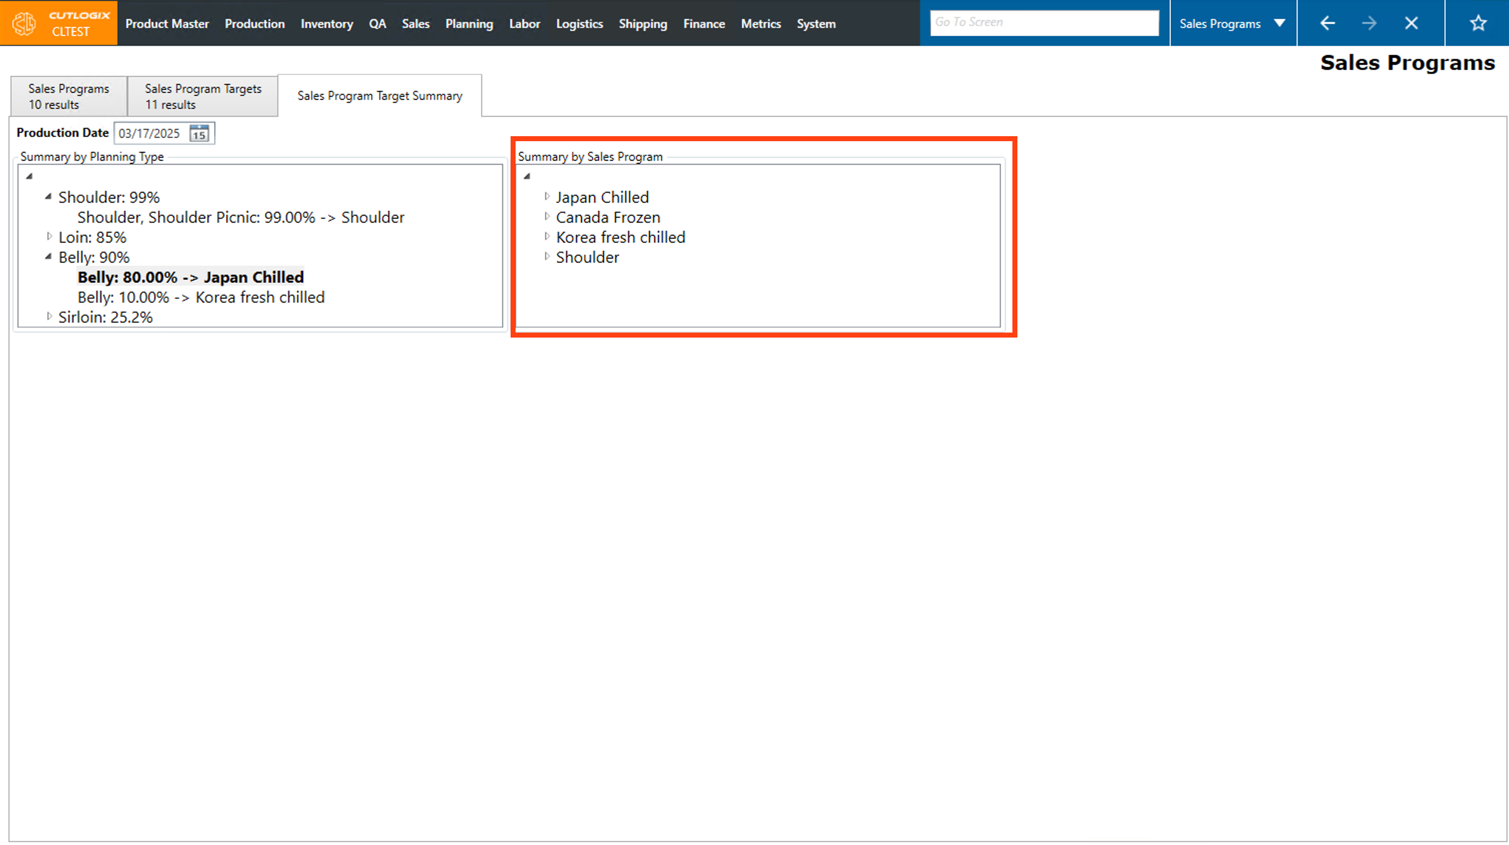
Step 7: Clicking the arrow beside a sales program will expand the tree view to show all the planning types that have sales targets for that sales program. The percentage beside the planning type indicates the amount of that planning type that is allocated to the selected sales program.