Production Default Tasks
How to Add Production Defaults
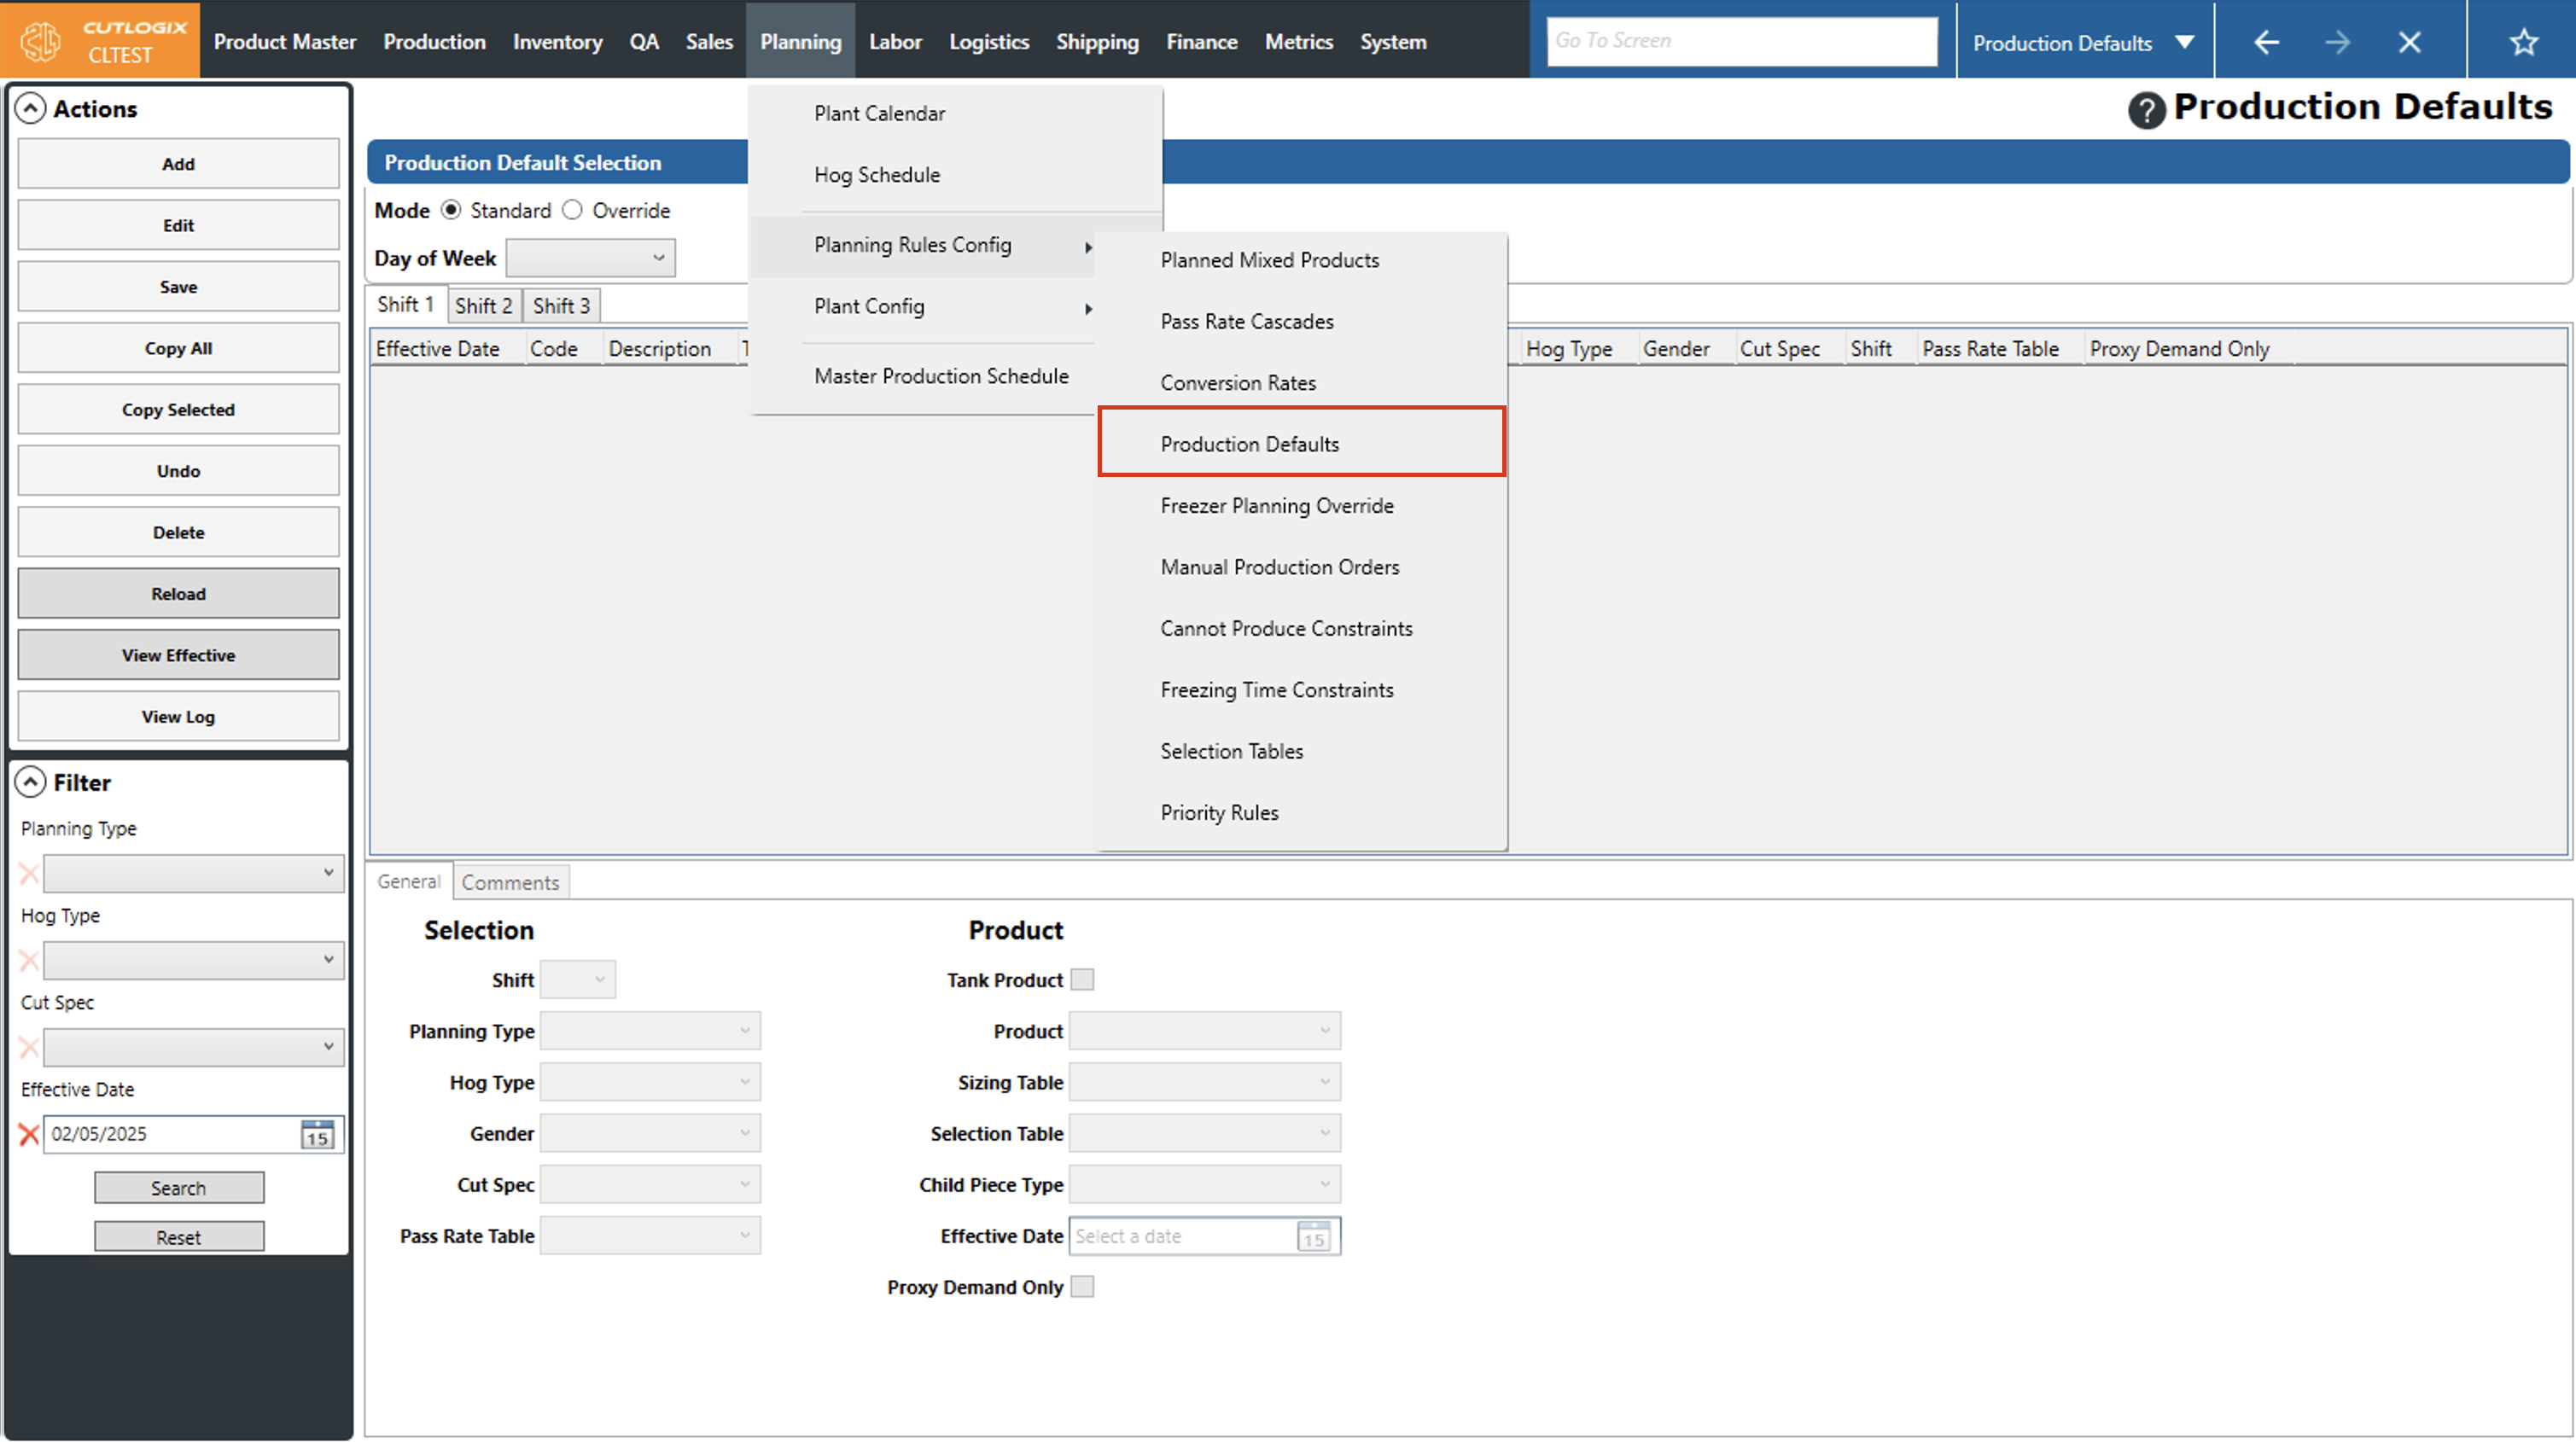
DemoStep 1: Navigate to the "Production Defaults" page (Under the Planning menu → Planning Rules Config → Production Defaults). Select the day of the week that you want to add a production default for from the "Day of Week" dropdown list and choose the corresponding shift tab that you want to add the default to.
Step 2: Select the day of the week that you want to add a production default for from the "Day of Week" dropdown list and choose the corresponding shift tab that you want to add the default to.

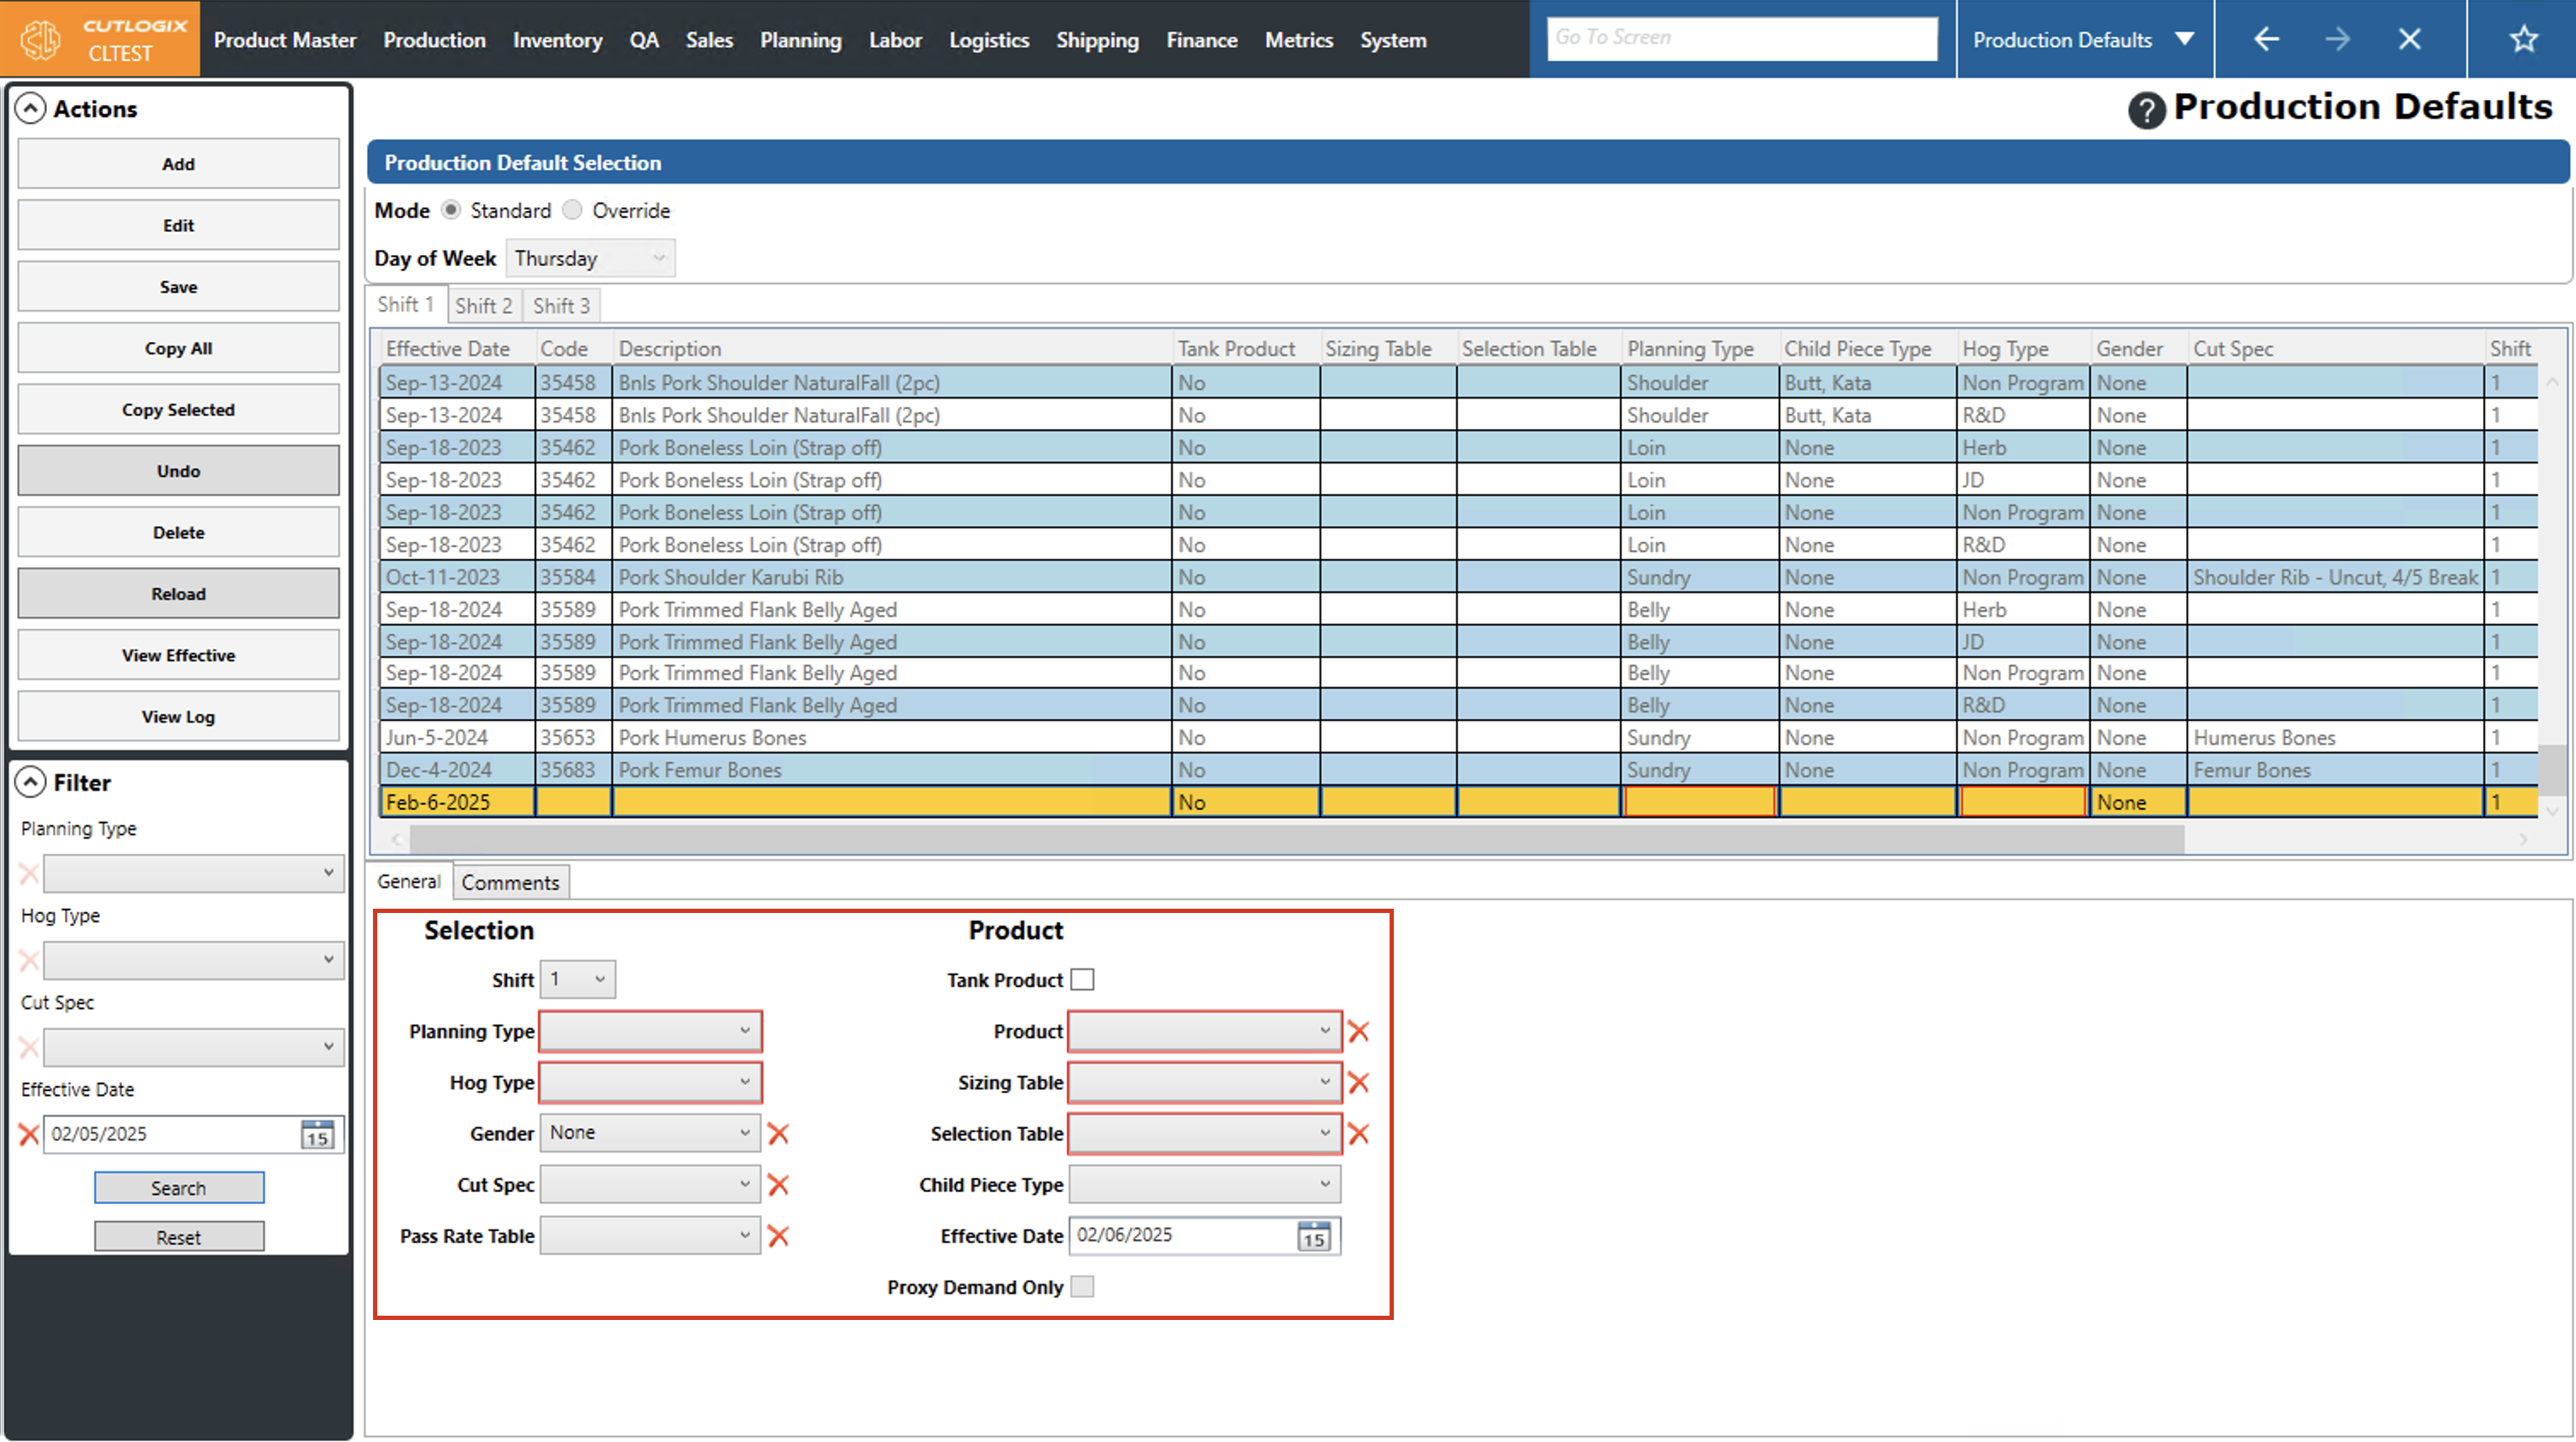
Step 3: Click the "Add" button in the actions panel.

Step 4: Some temporary tabs will appear at the bottom of the page. This is where details about the new production default can be added. Fields highlighted in red are required and must be filled out before the new production default can be saved. The required fields are as follows (Note: Only one of the following fields must be entered: "Product", "Sizing Table" or "Selection Table")
• Planning Type: The planning type that uses this production default.
• Hog Type: The type of hog that uses this production default.
• Product: The product that should be produced for this production default.
• Planning Type: The planning type that uses this production default.
• Hog Type: The type of hog that uses this production default.
• Product: The product that should be produced for this production default.
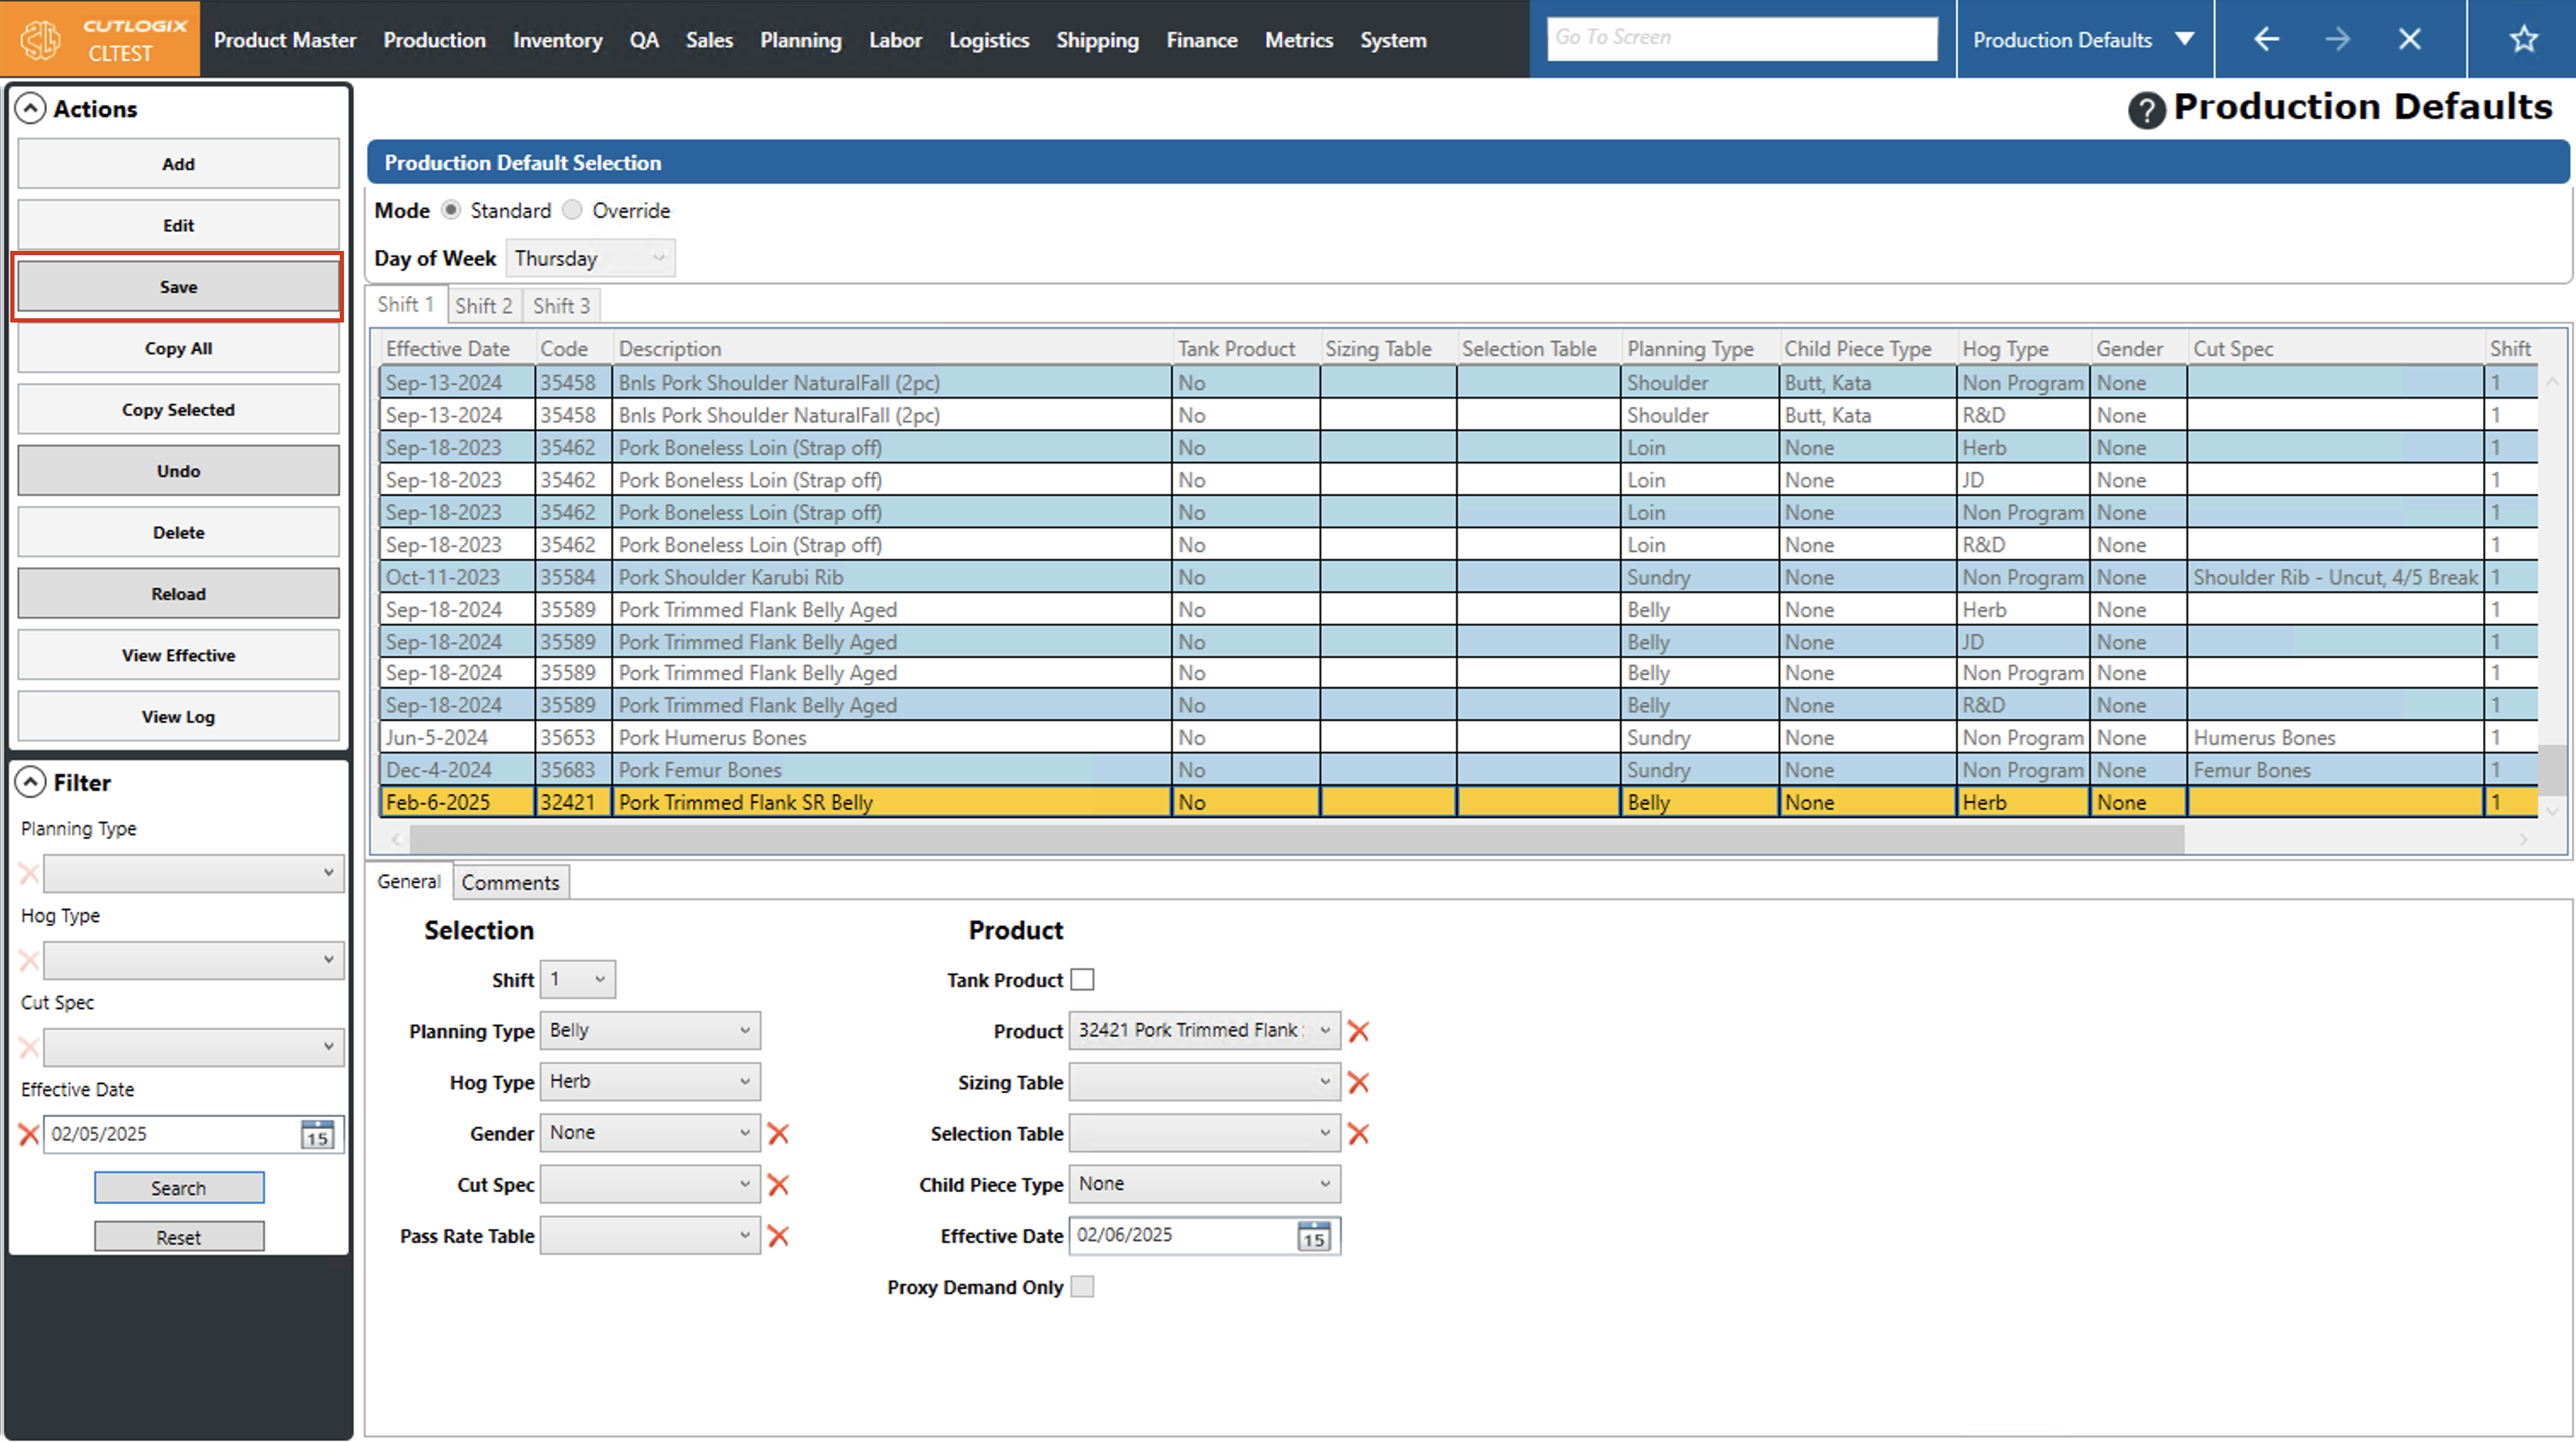
Step 5: Once all the required information has been added to the production default, click "Save" in the Actions Panel to save it. If you don't want to save the new production default, clicking "Undo" in the Actions Panel will discard the production default, and it won't be saved.
How to Edit Production Defaults
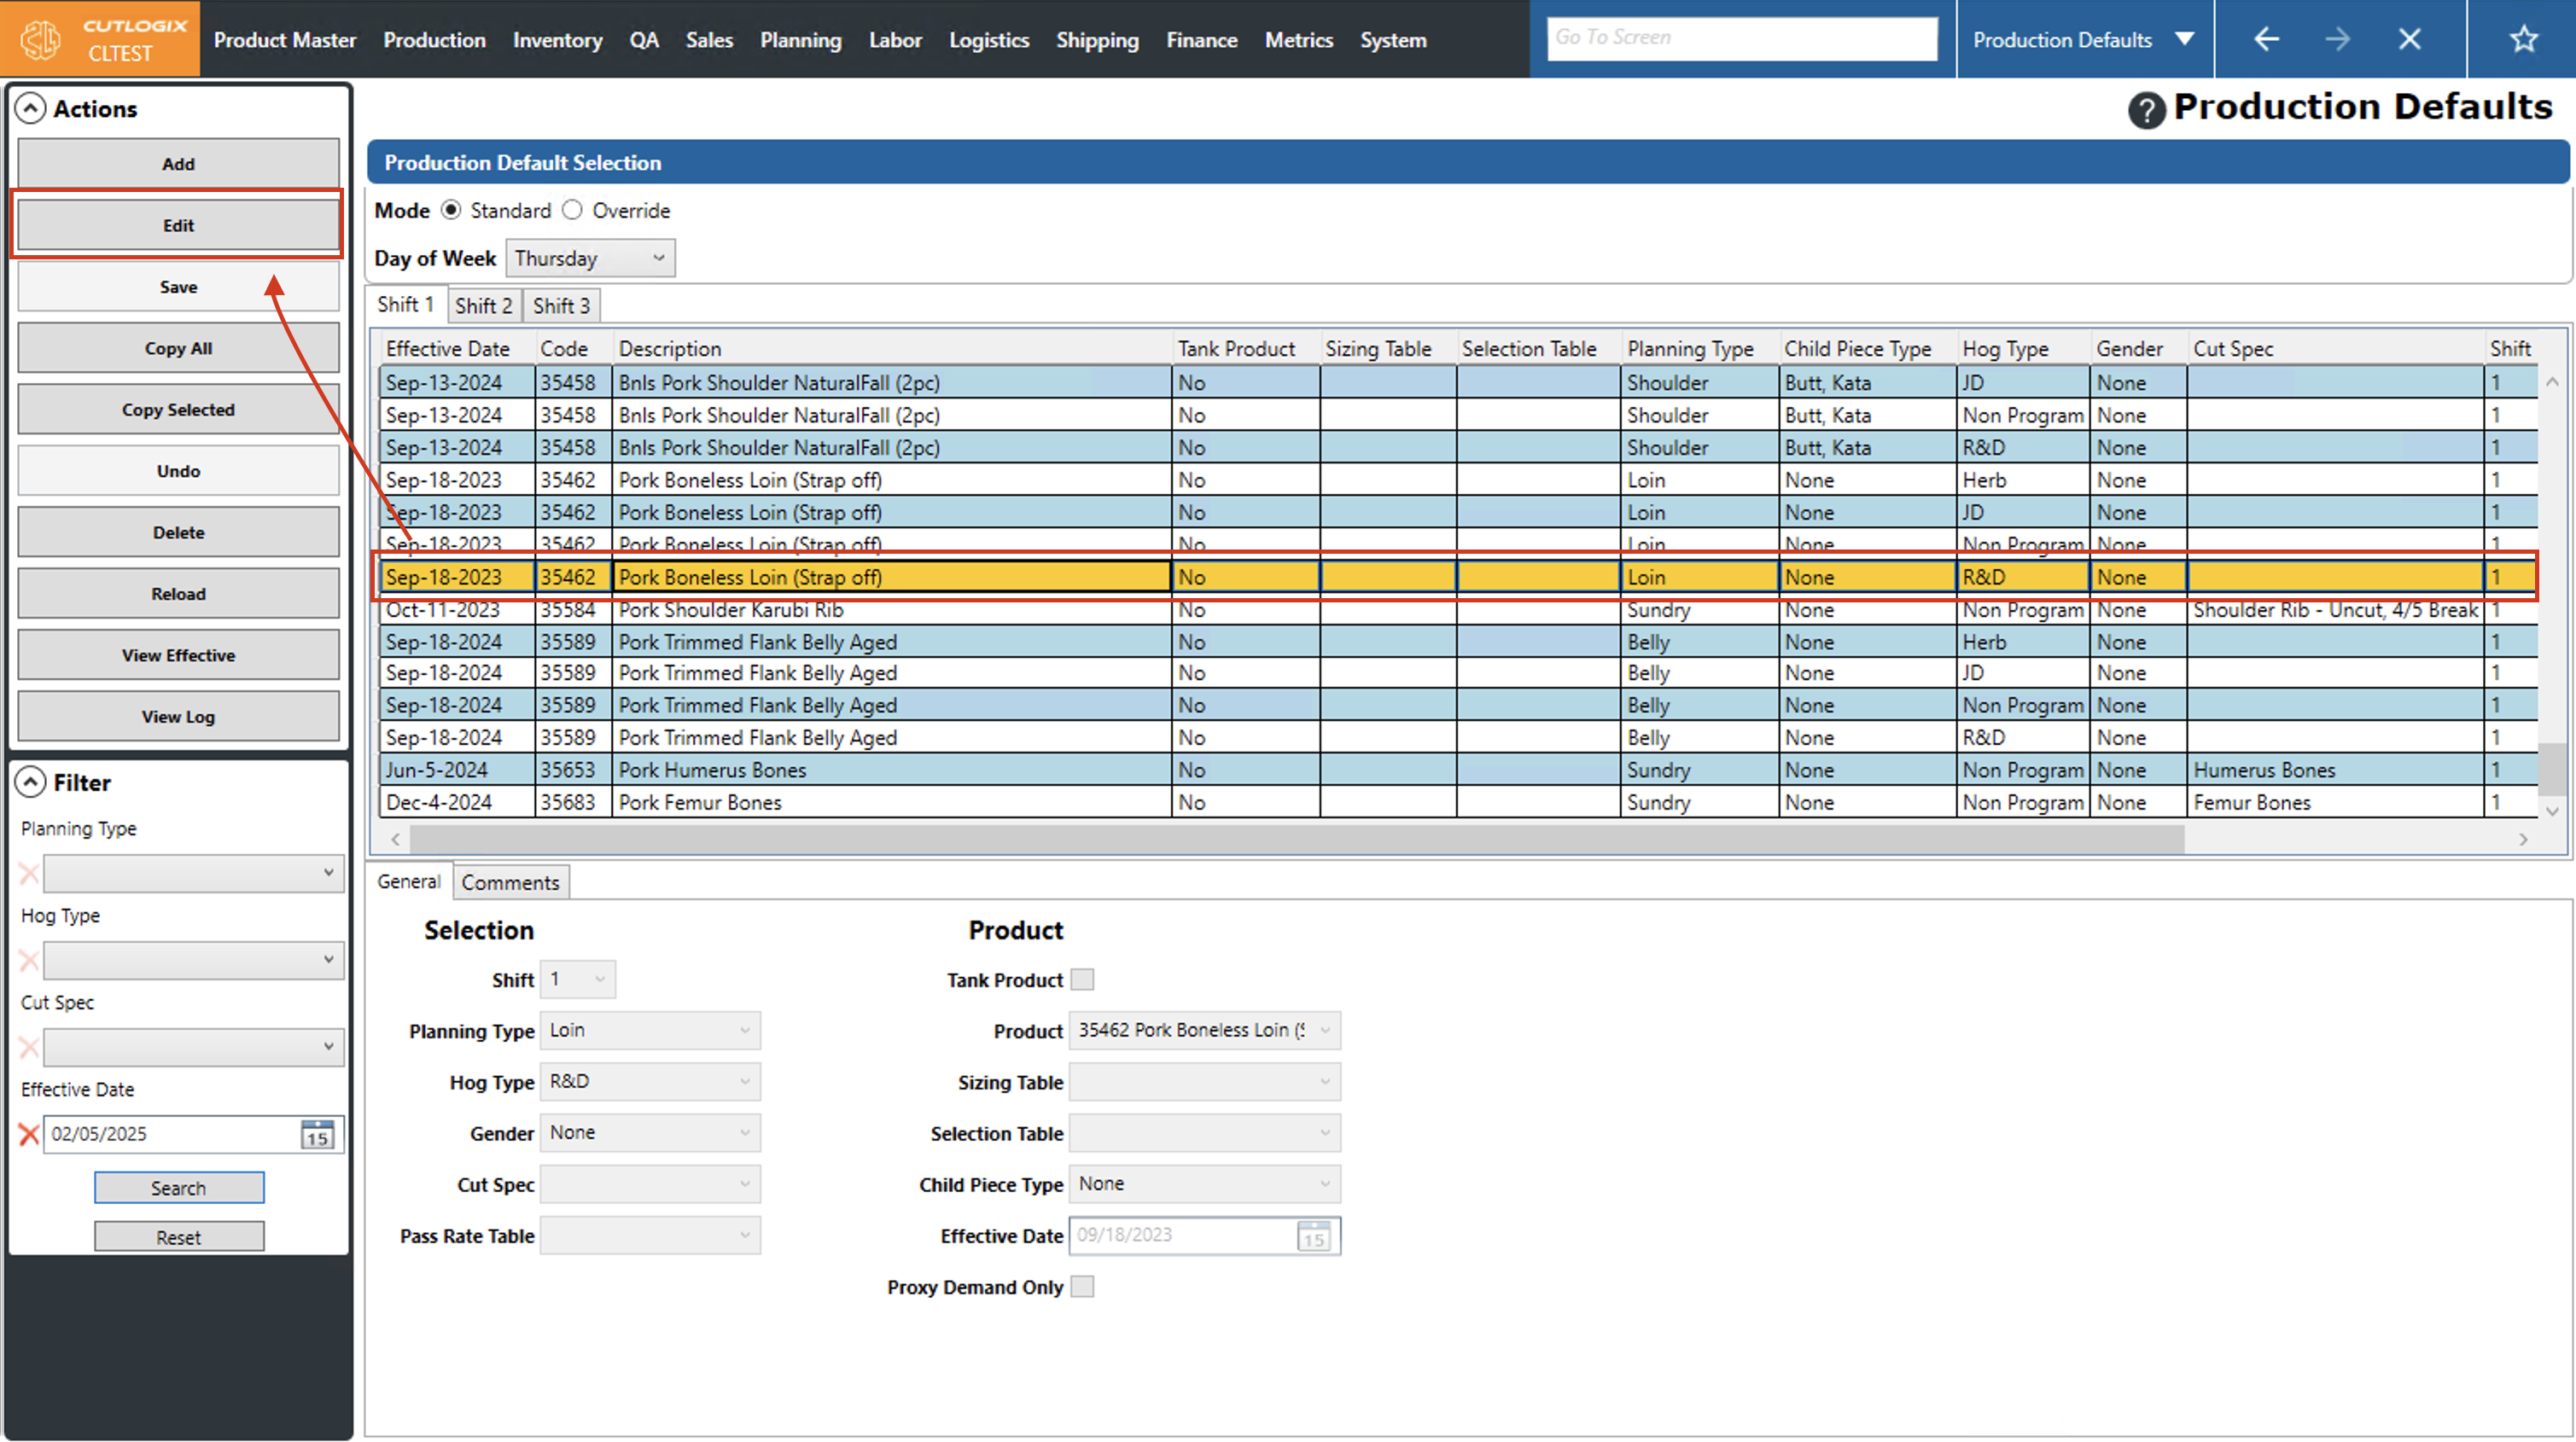
DemoStep 1: Navigate to the "Production Defaults" page (Under the Planning menu → Planning Rules Config → Production Defaults).
Step 2: Select the day of the week that you want to add a production default for from the "Day of Week" dropdown list and choose the corresponding shift tab that you want to add the default to.
Step 3: Click on the production default that you want to modify (it will be highlighted in orange once it's selected), then click the "Edit" button in the Actions Panel.
Step 4: Several fields will appear at the bottom of the page with all the information about the selected production default in them. Here you can make any necessary changes to the production default that are needed.
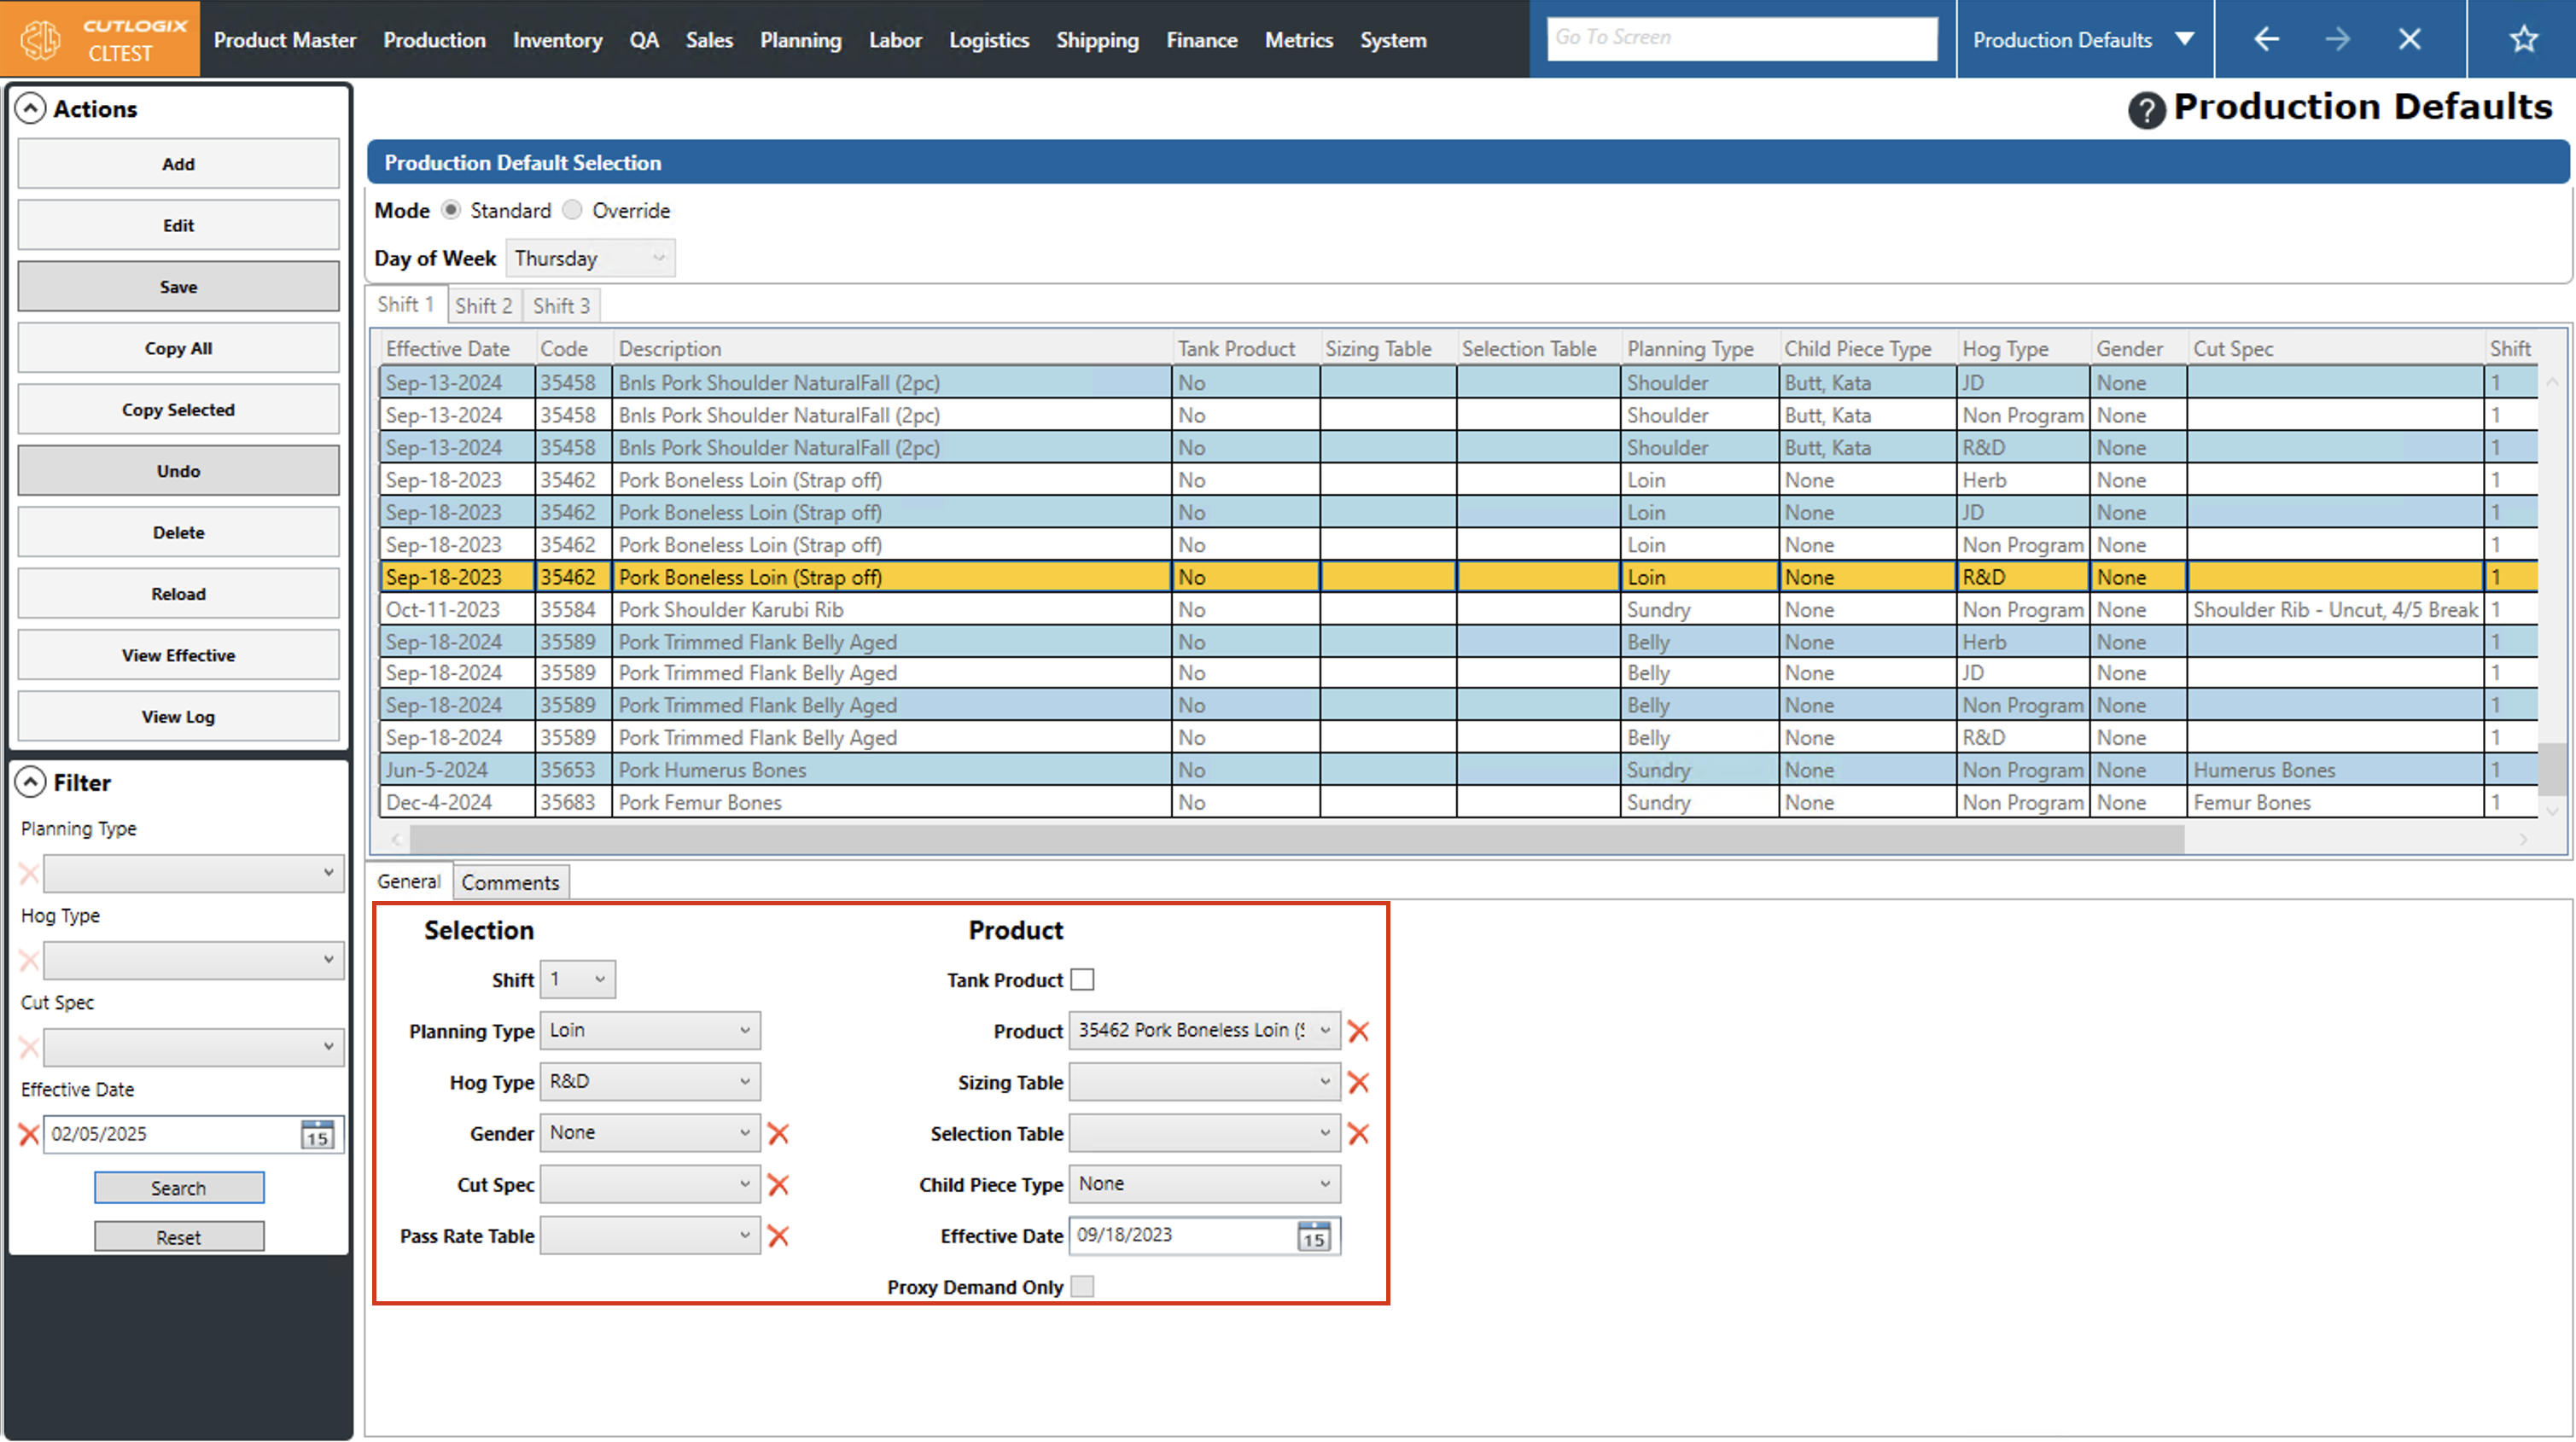
Step 5: Once all the necessary changes have been made, click "Save" in the Actions Panel to save the changes to the production default. If you don't want to save your changes, clicking "Undo" will discard the changes.

How to Copy Production Defaults Between Days
DemoStep 1: Navigate to the "Production Defaults" page (Under the Planning menu → Planning Rules Config → Production Defaults).
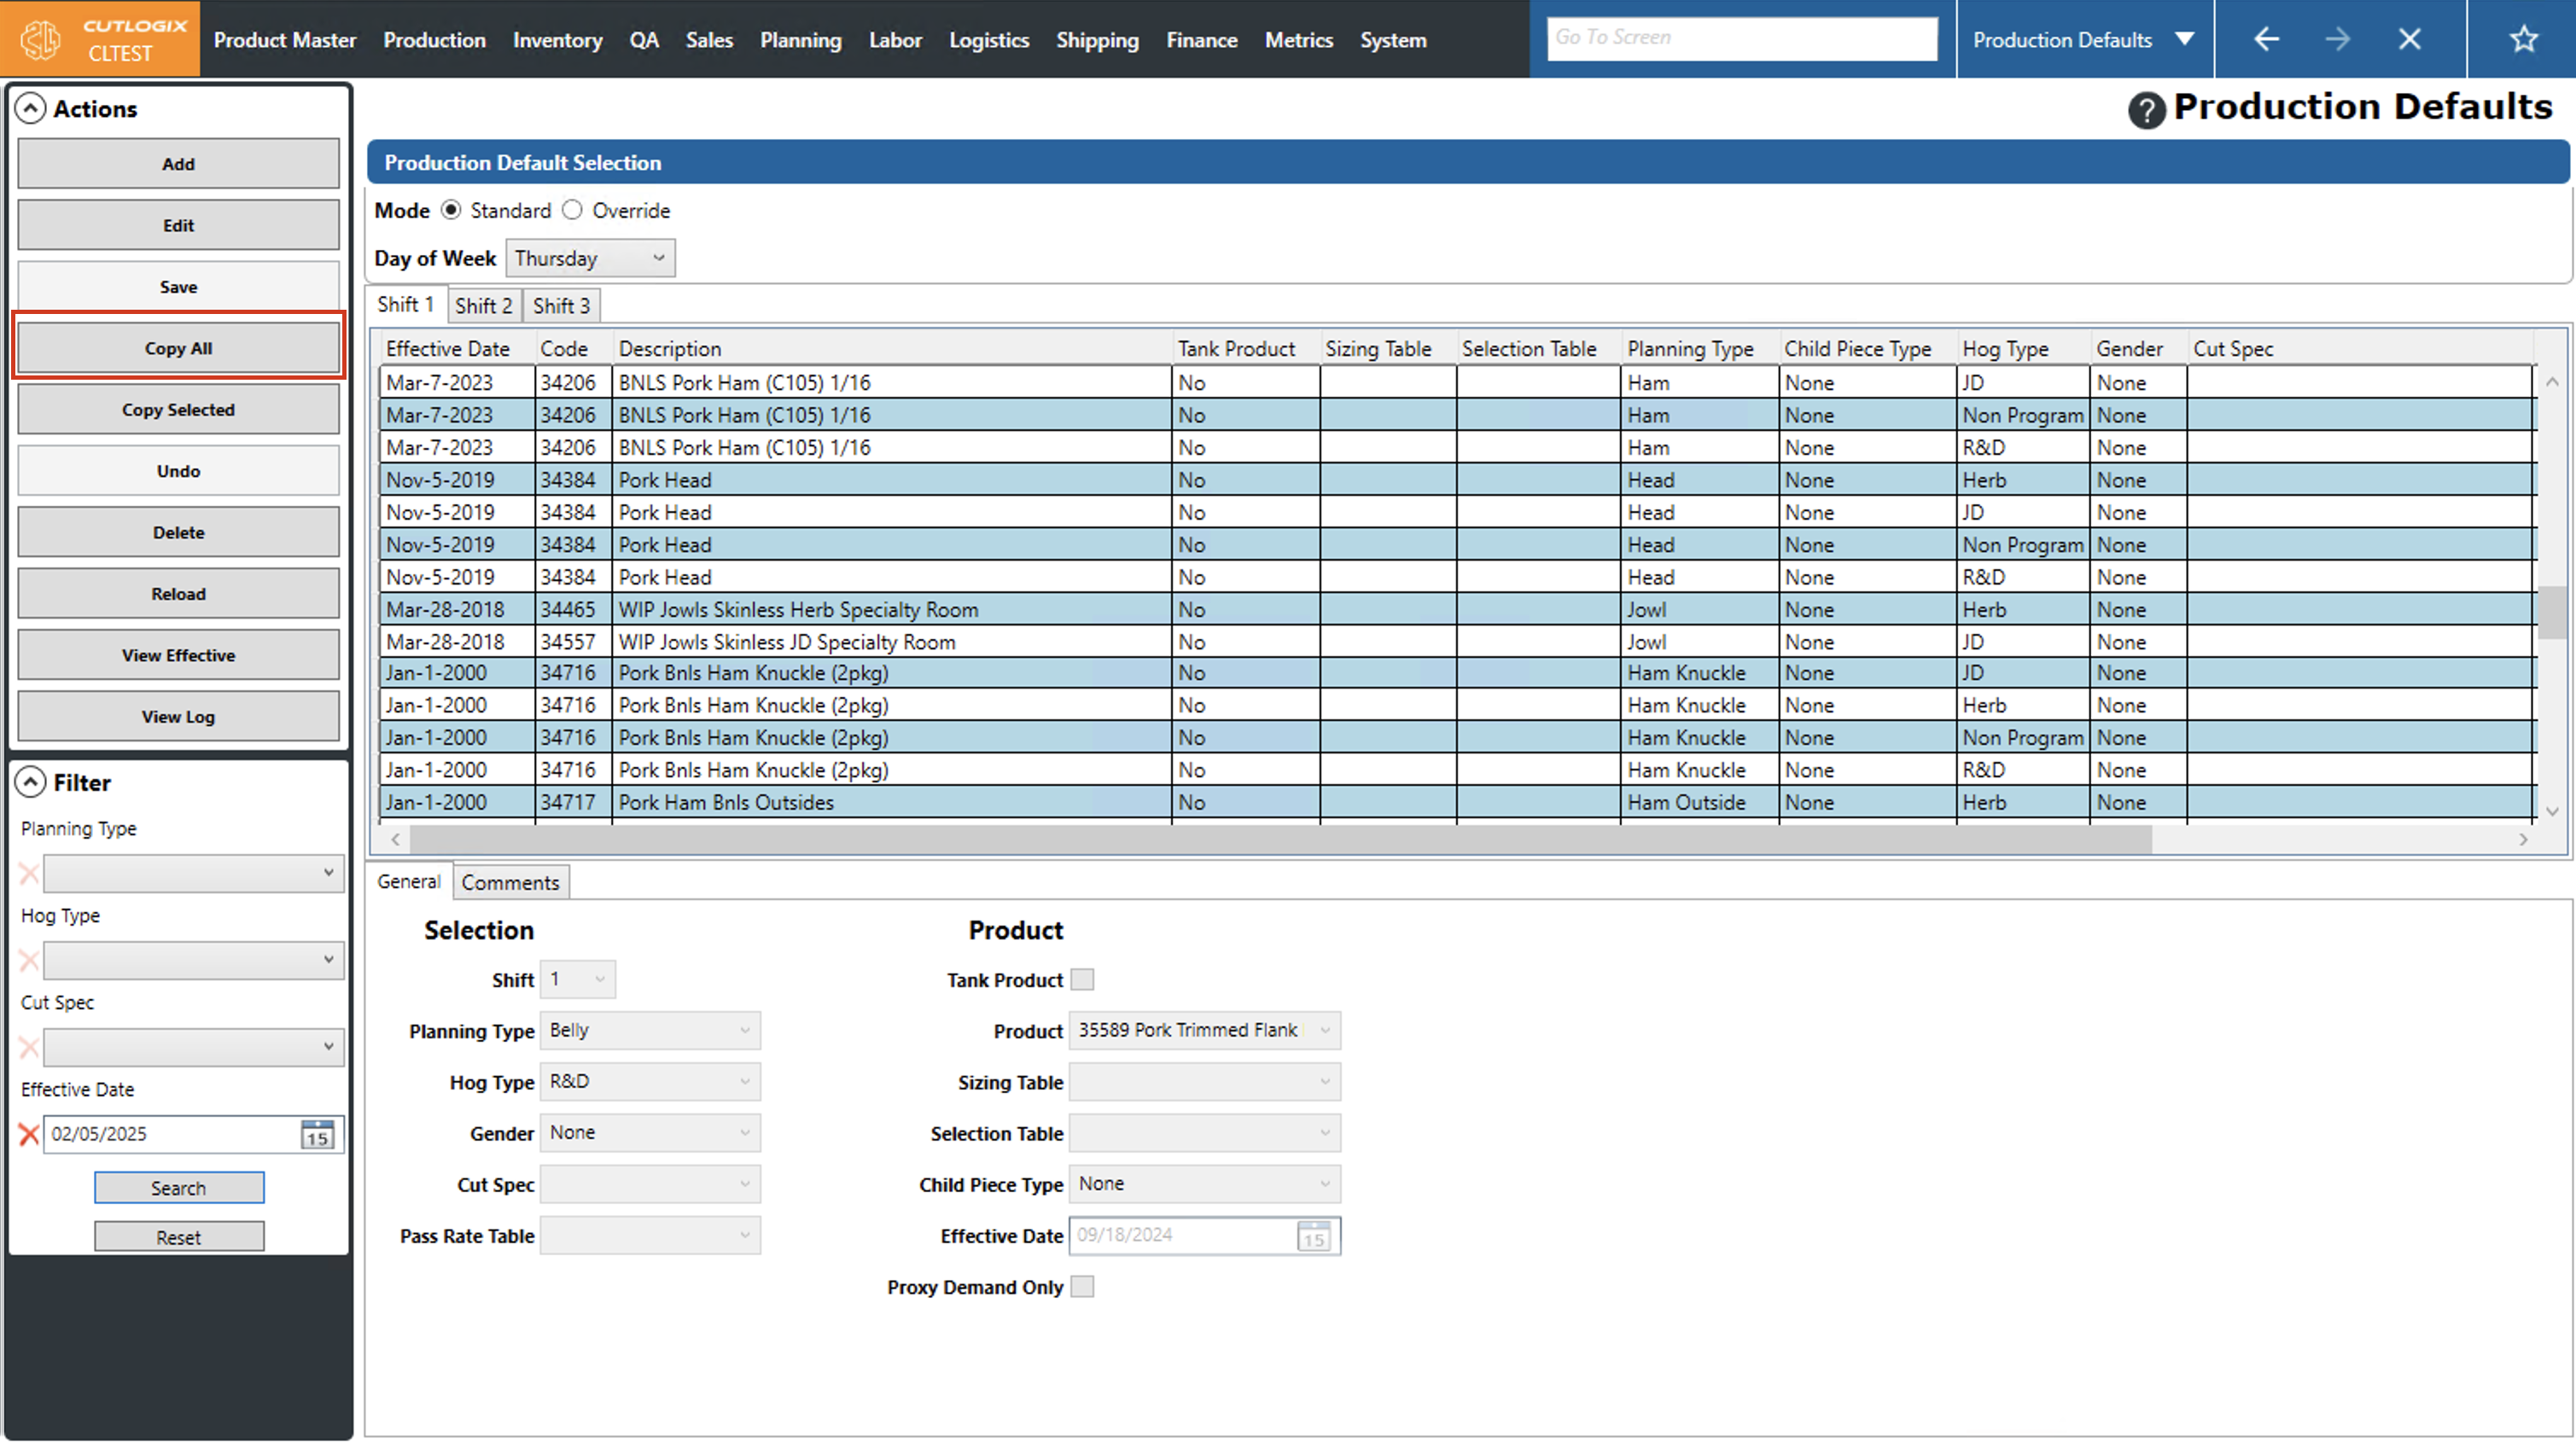
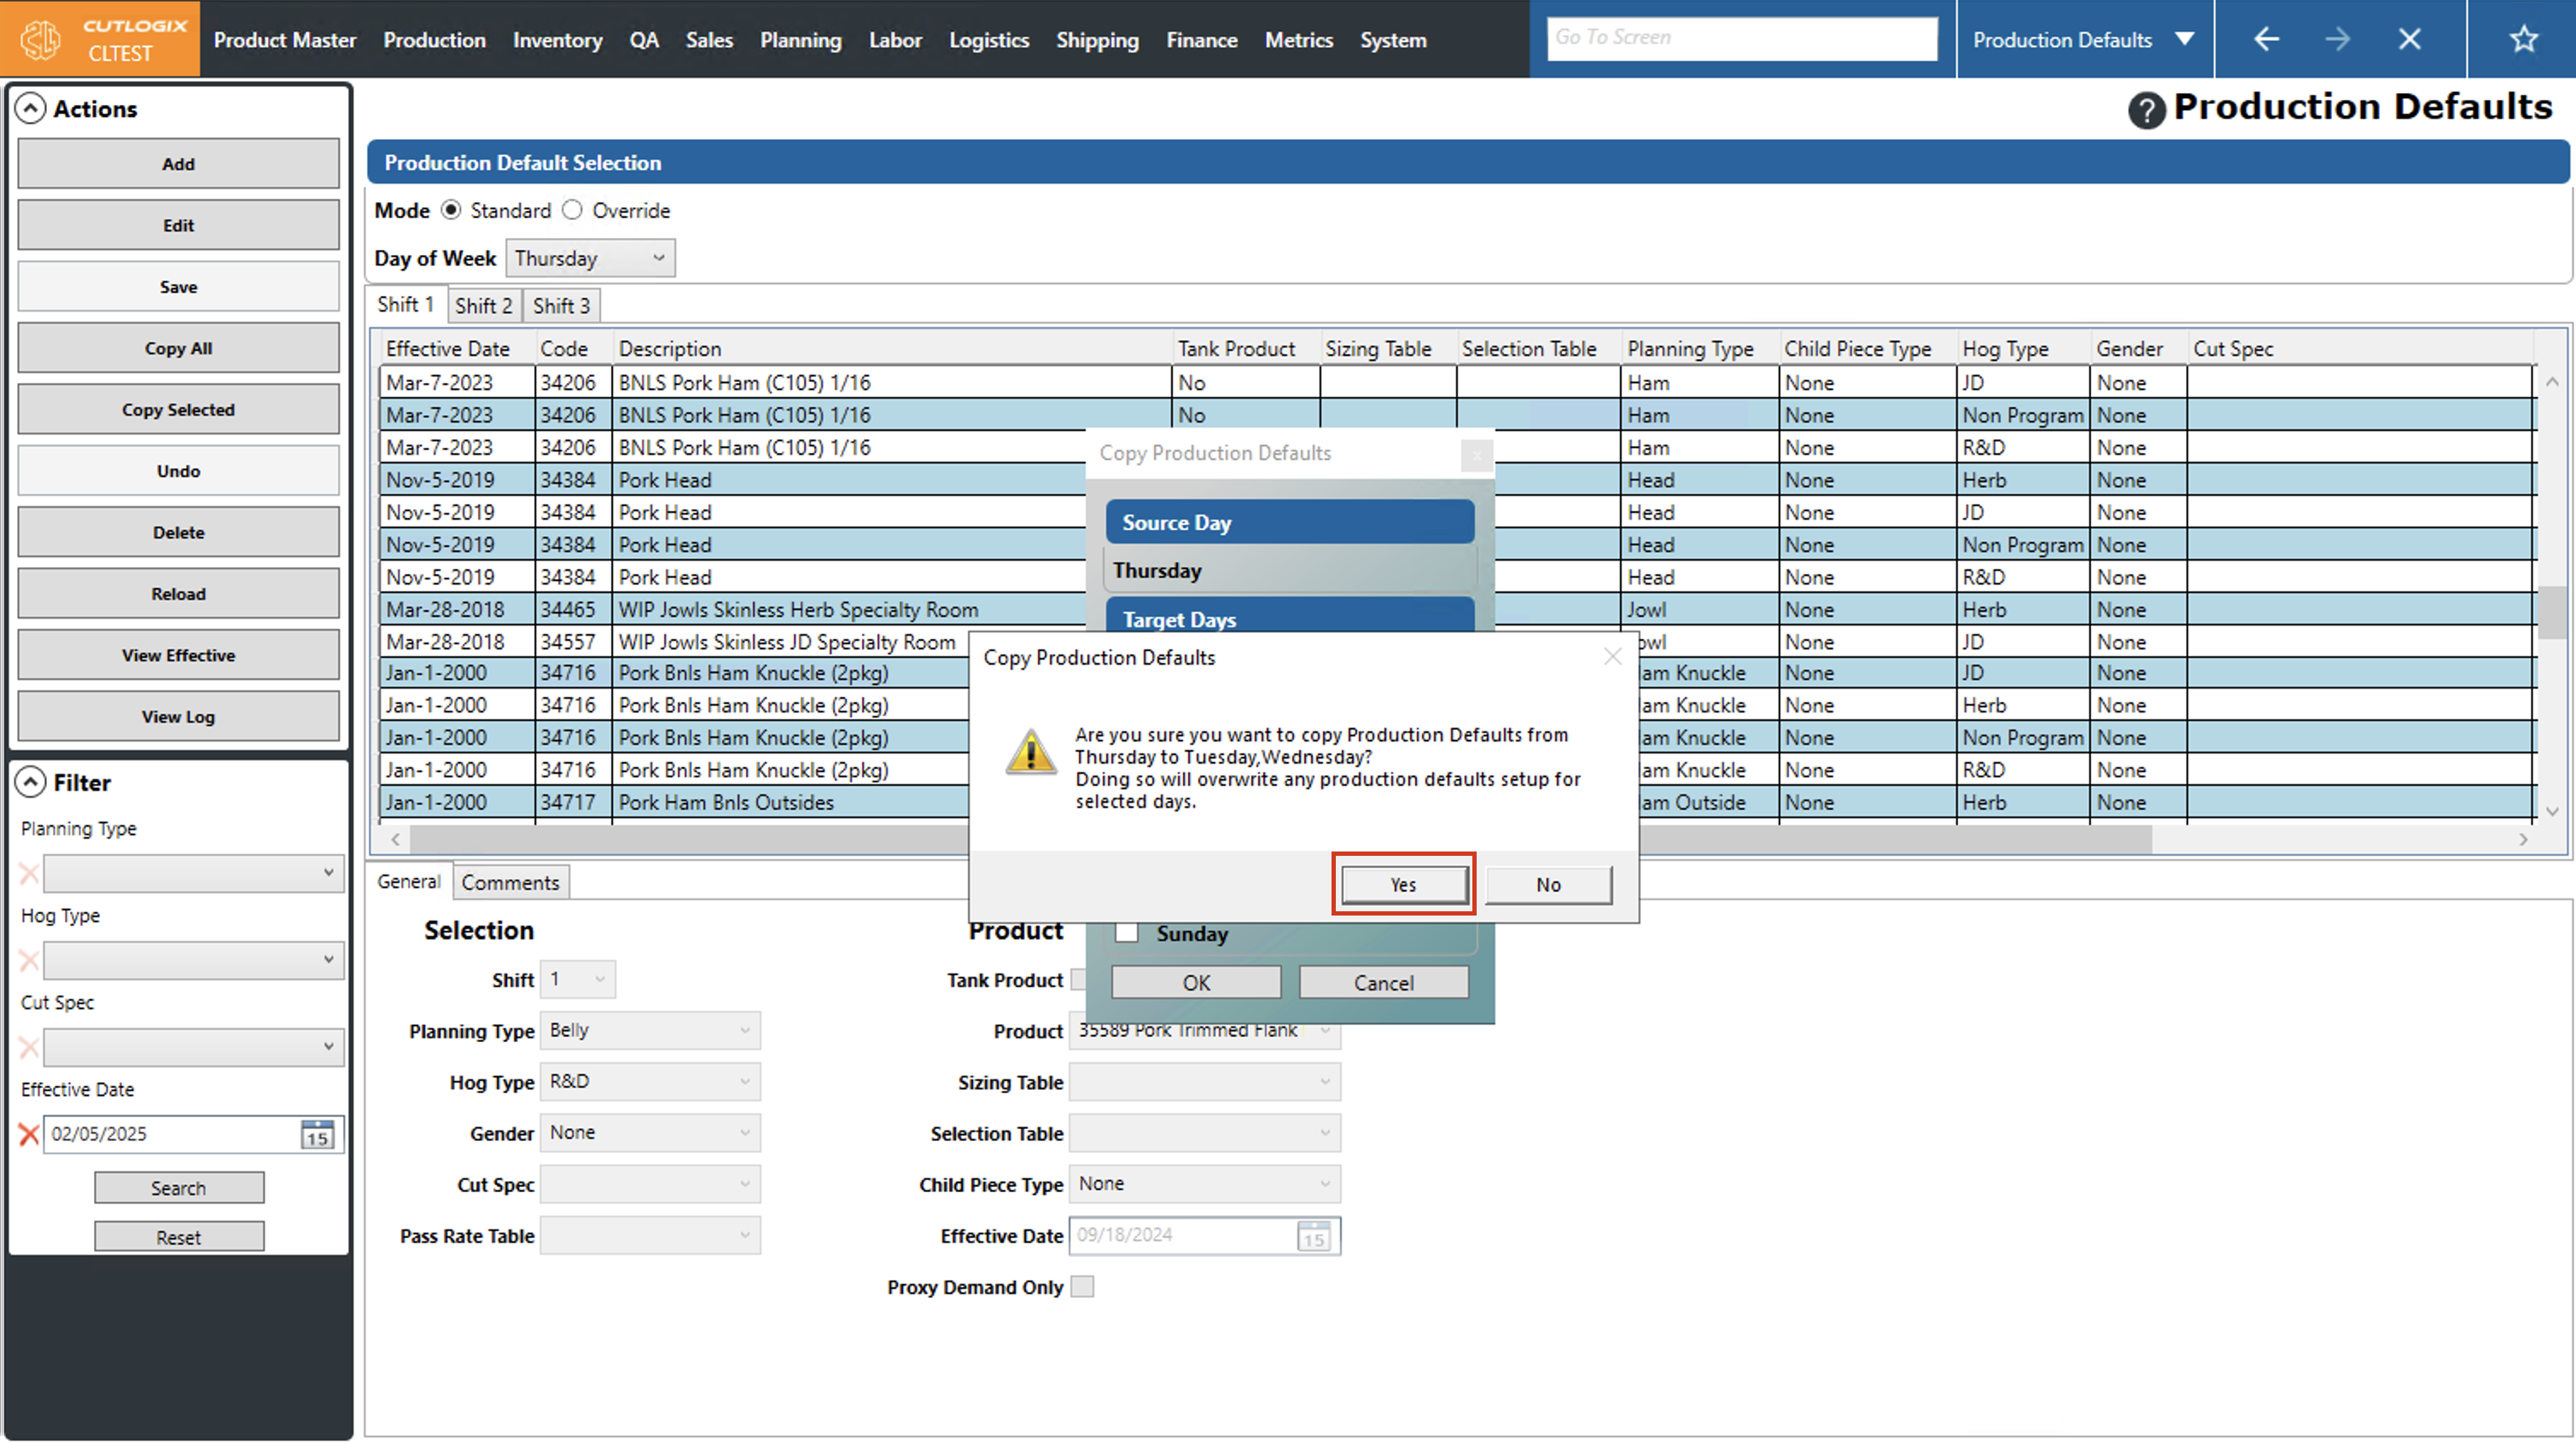
Step 2: Select the day of the week that you want to copy production defaults from by using the "Day of Week" dropdown list and choose the corresponding shift tab that you want to copy defaults from.
Step 3: To copy all defaults from the selected day to other days, click the "Copy All" button in the actions panel. (If you want to copy just the selected production default, proceed to step 6).
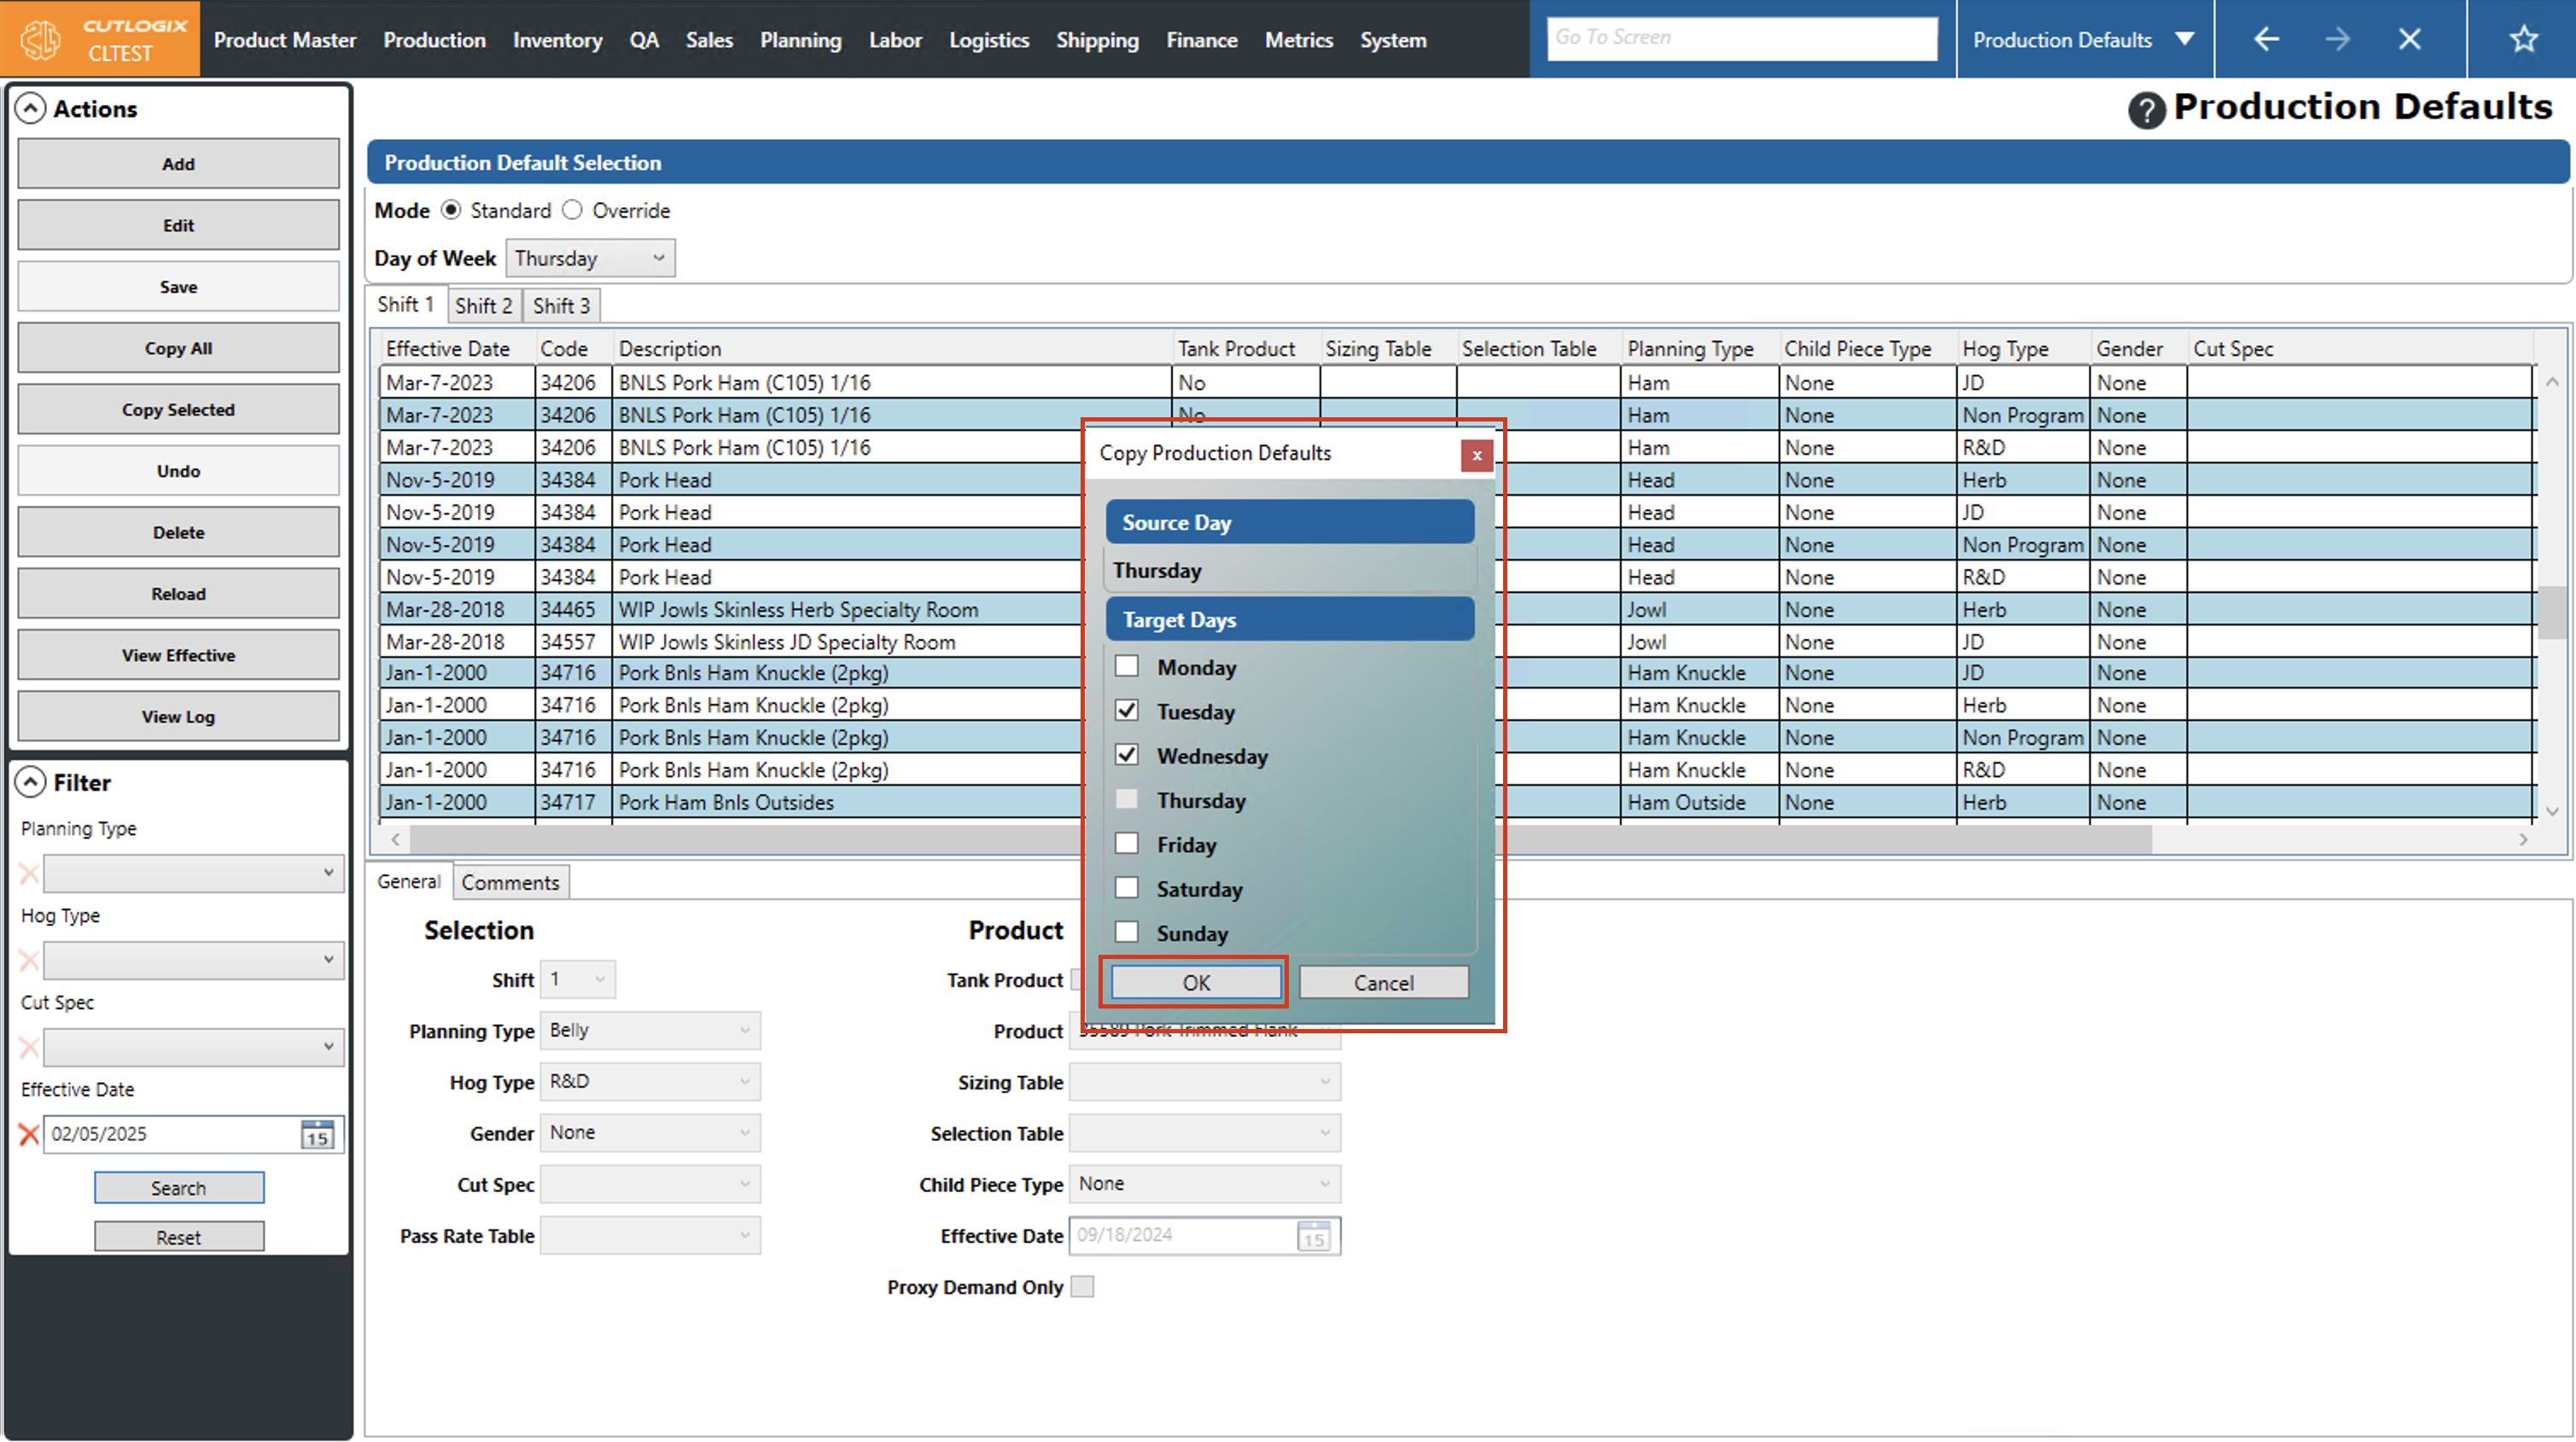
Step 4: A dialog will appear for you to specify which days that you want to copy the production defaults to. Using the checkboxes beside the "Target Days", check off each day that you want to copy the production defaults to, then click "OK" to save your changes. The production defaults will then be copied to each target day that you selected. If you don't want to save your changes, click "Cancel" and the dialog will close without copying any production defaults.
Step 5: A confirmation dialog will appear, asking if you're sure that you want to copy the production defaults from the selected day to the target days. Click "Yes" to continue with copying them. Clicking "No" will exit the copying process and no defaults will be copied.
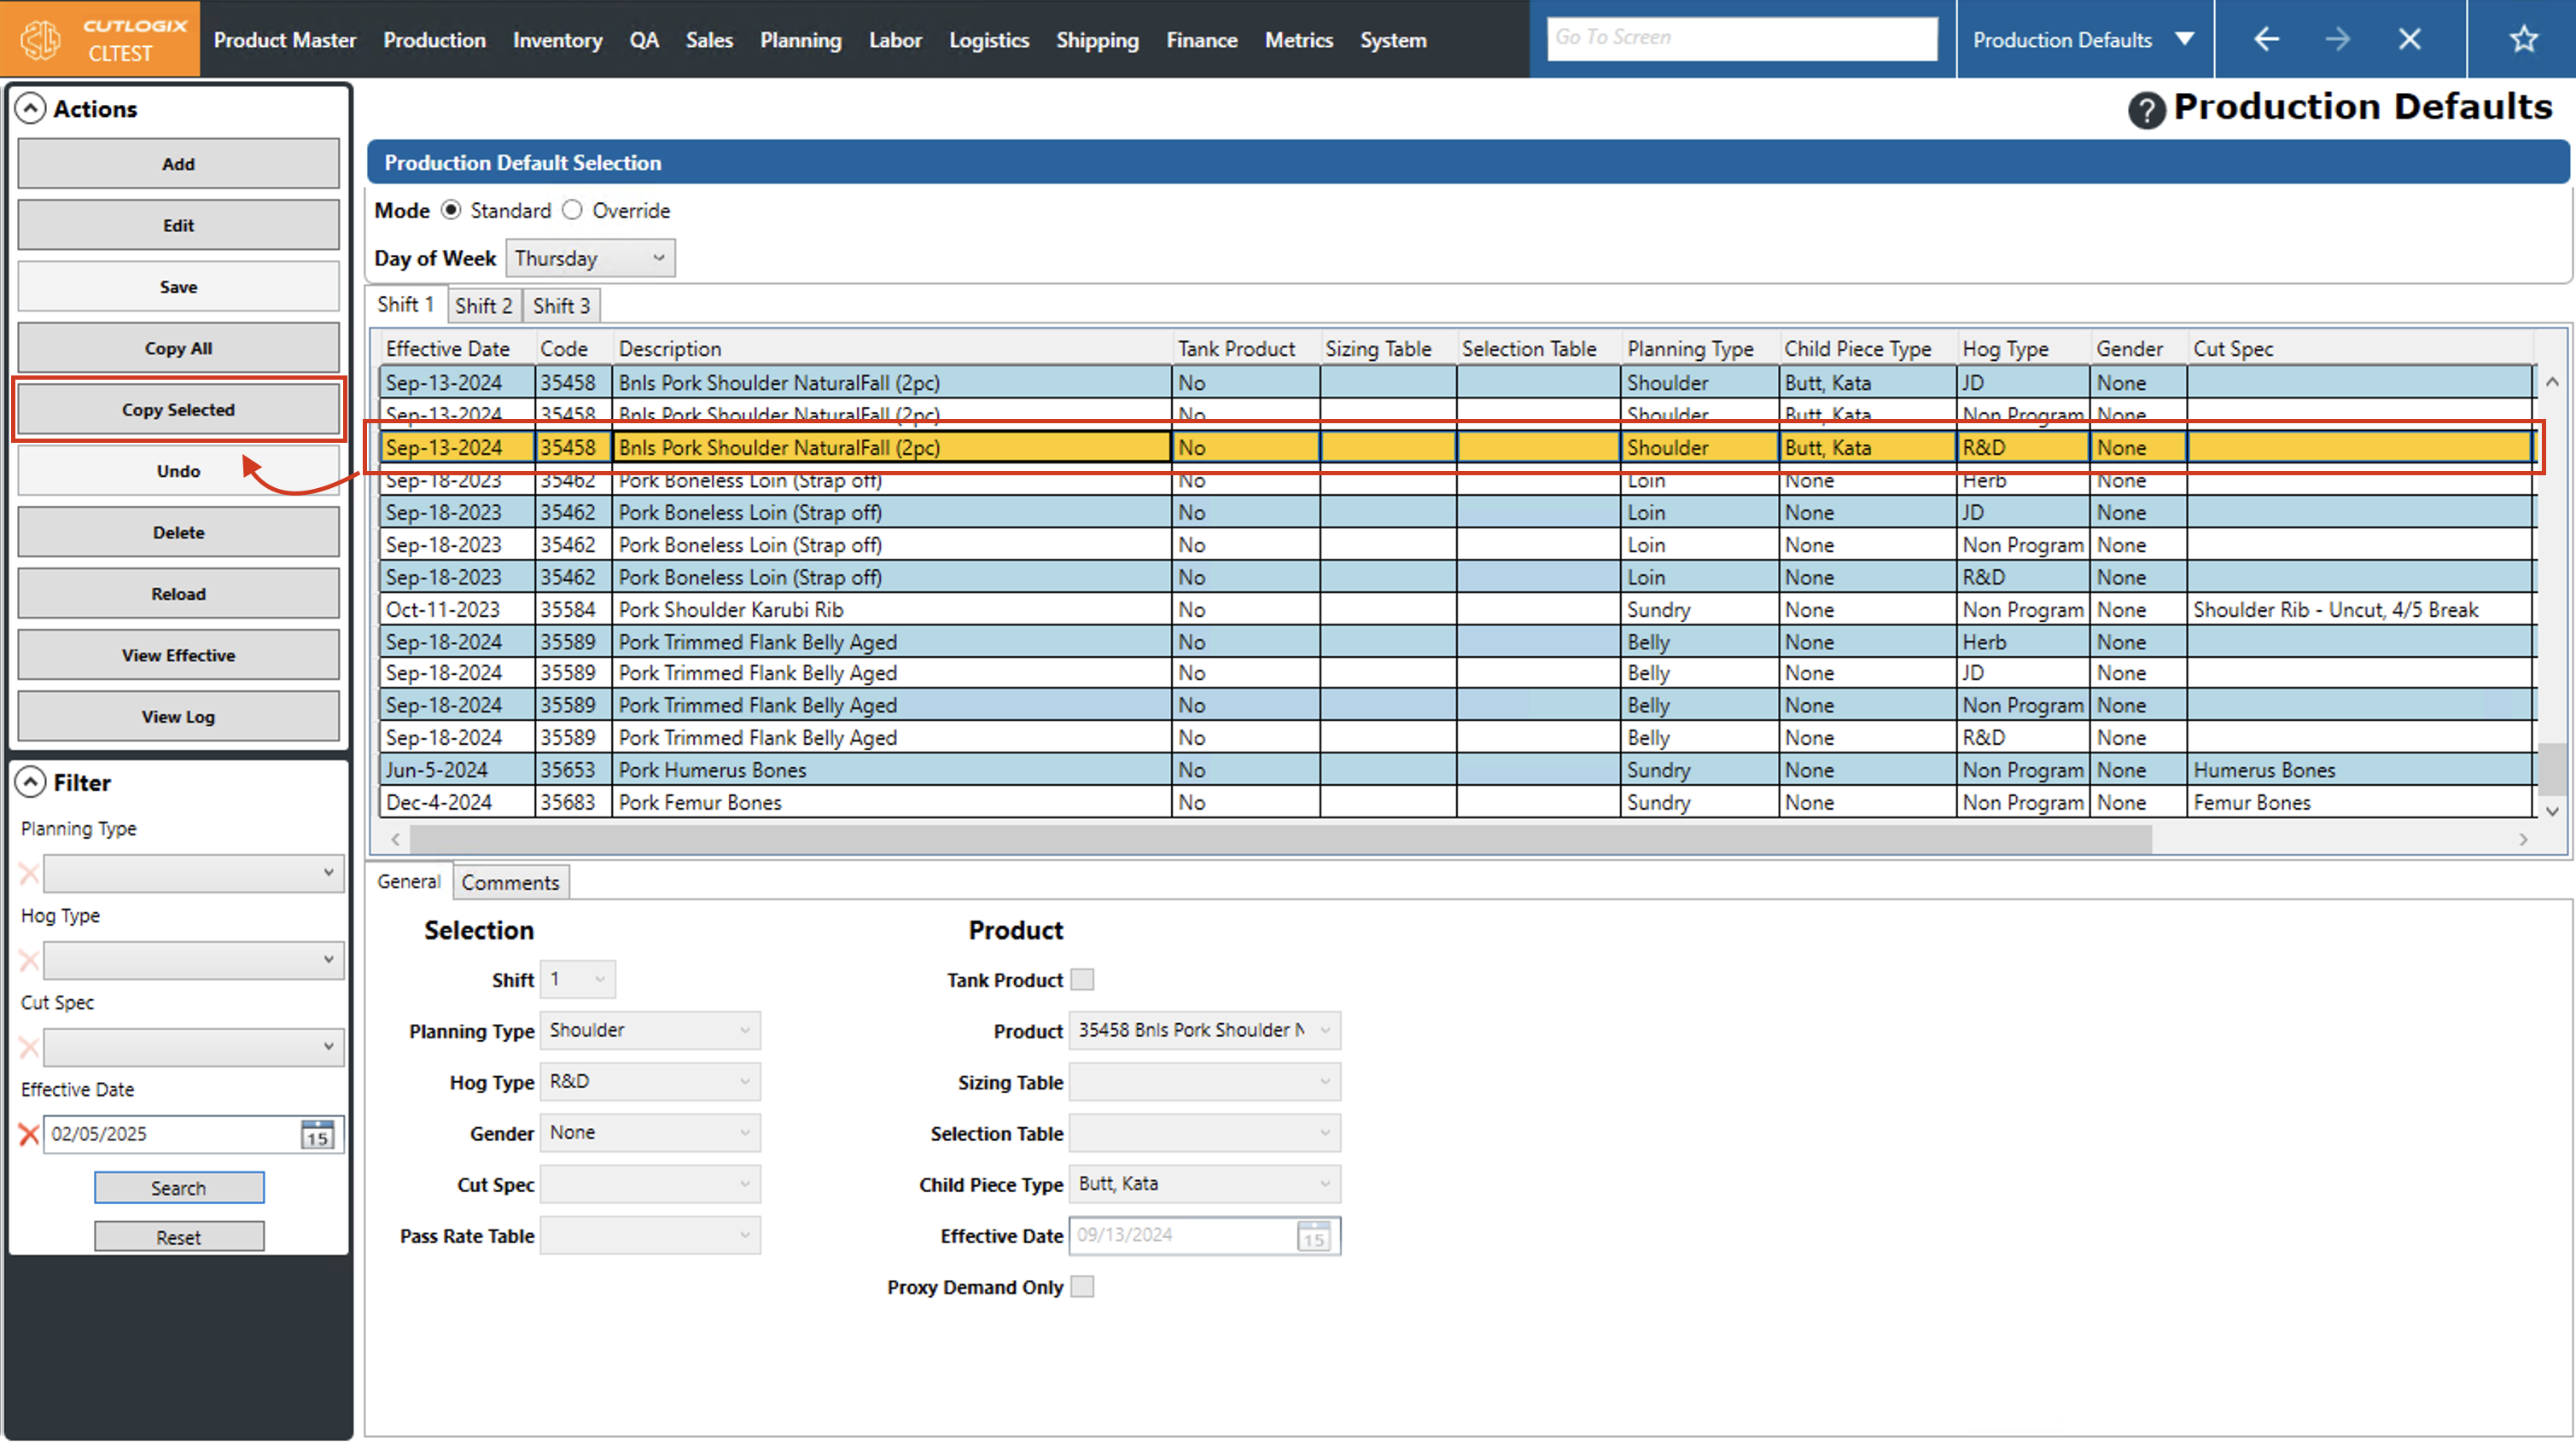
Step 6: To copy a single production default from the selected day and shift to another day and shift, click on the production default that you want to copy (once selected it will be highlighted in orange). Then click on the "Copy Selected" button in the actions panel.
Step 7: A dialog will appear that shows the details of the selected production default (Source Day, Hog Type and Shift) and gives you the option to choose which days, hog types and shifts to copy that default to. Using the checkboxes beside the "Target Days", "Target Hog Types" and "Target Shift" lists, check off the days, hog types and shifts that you want to copy that production default to.
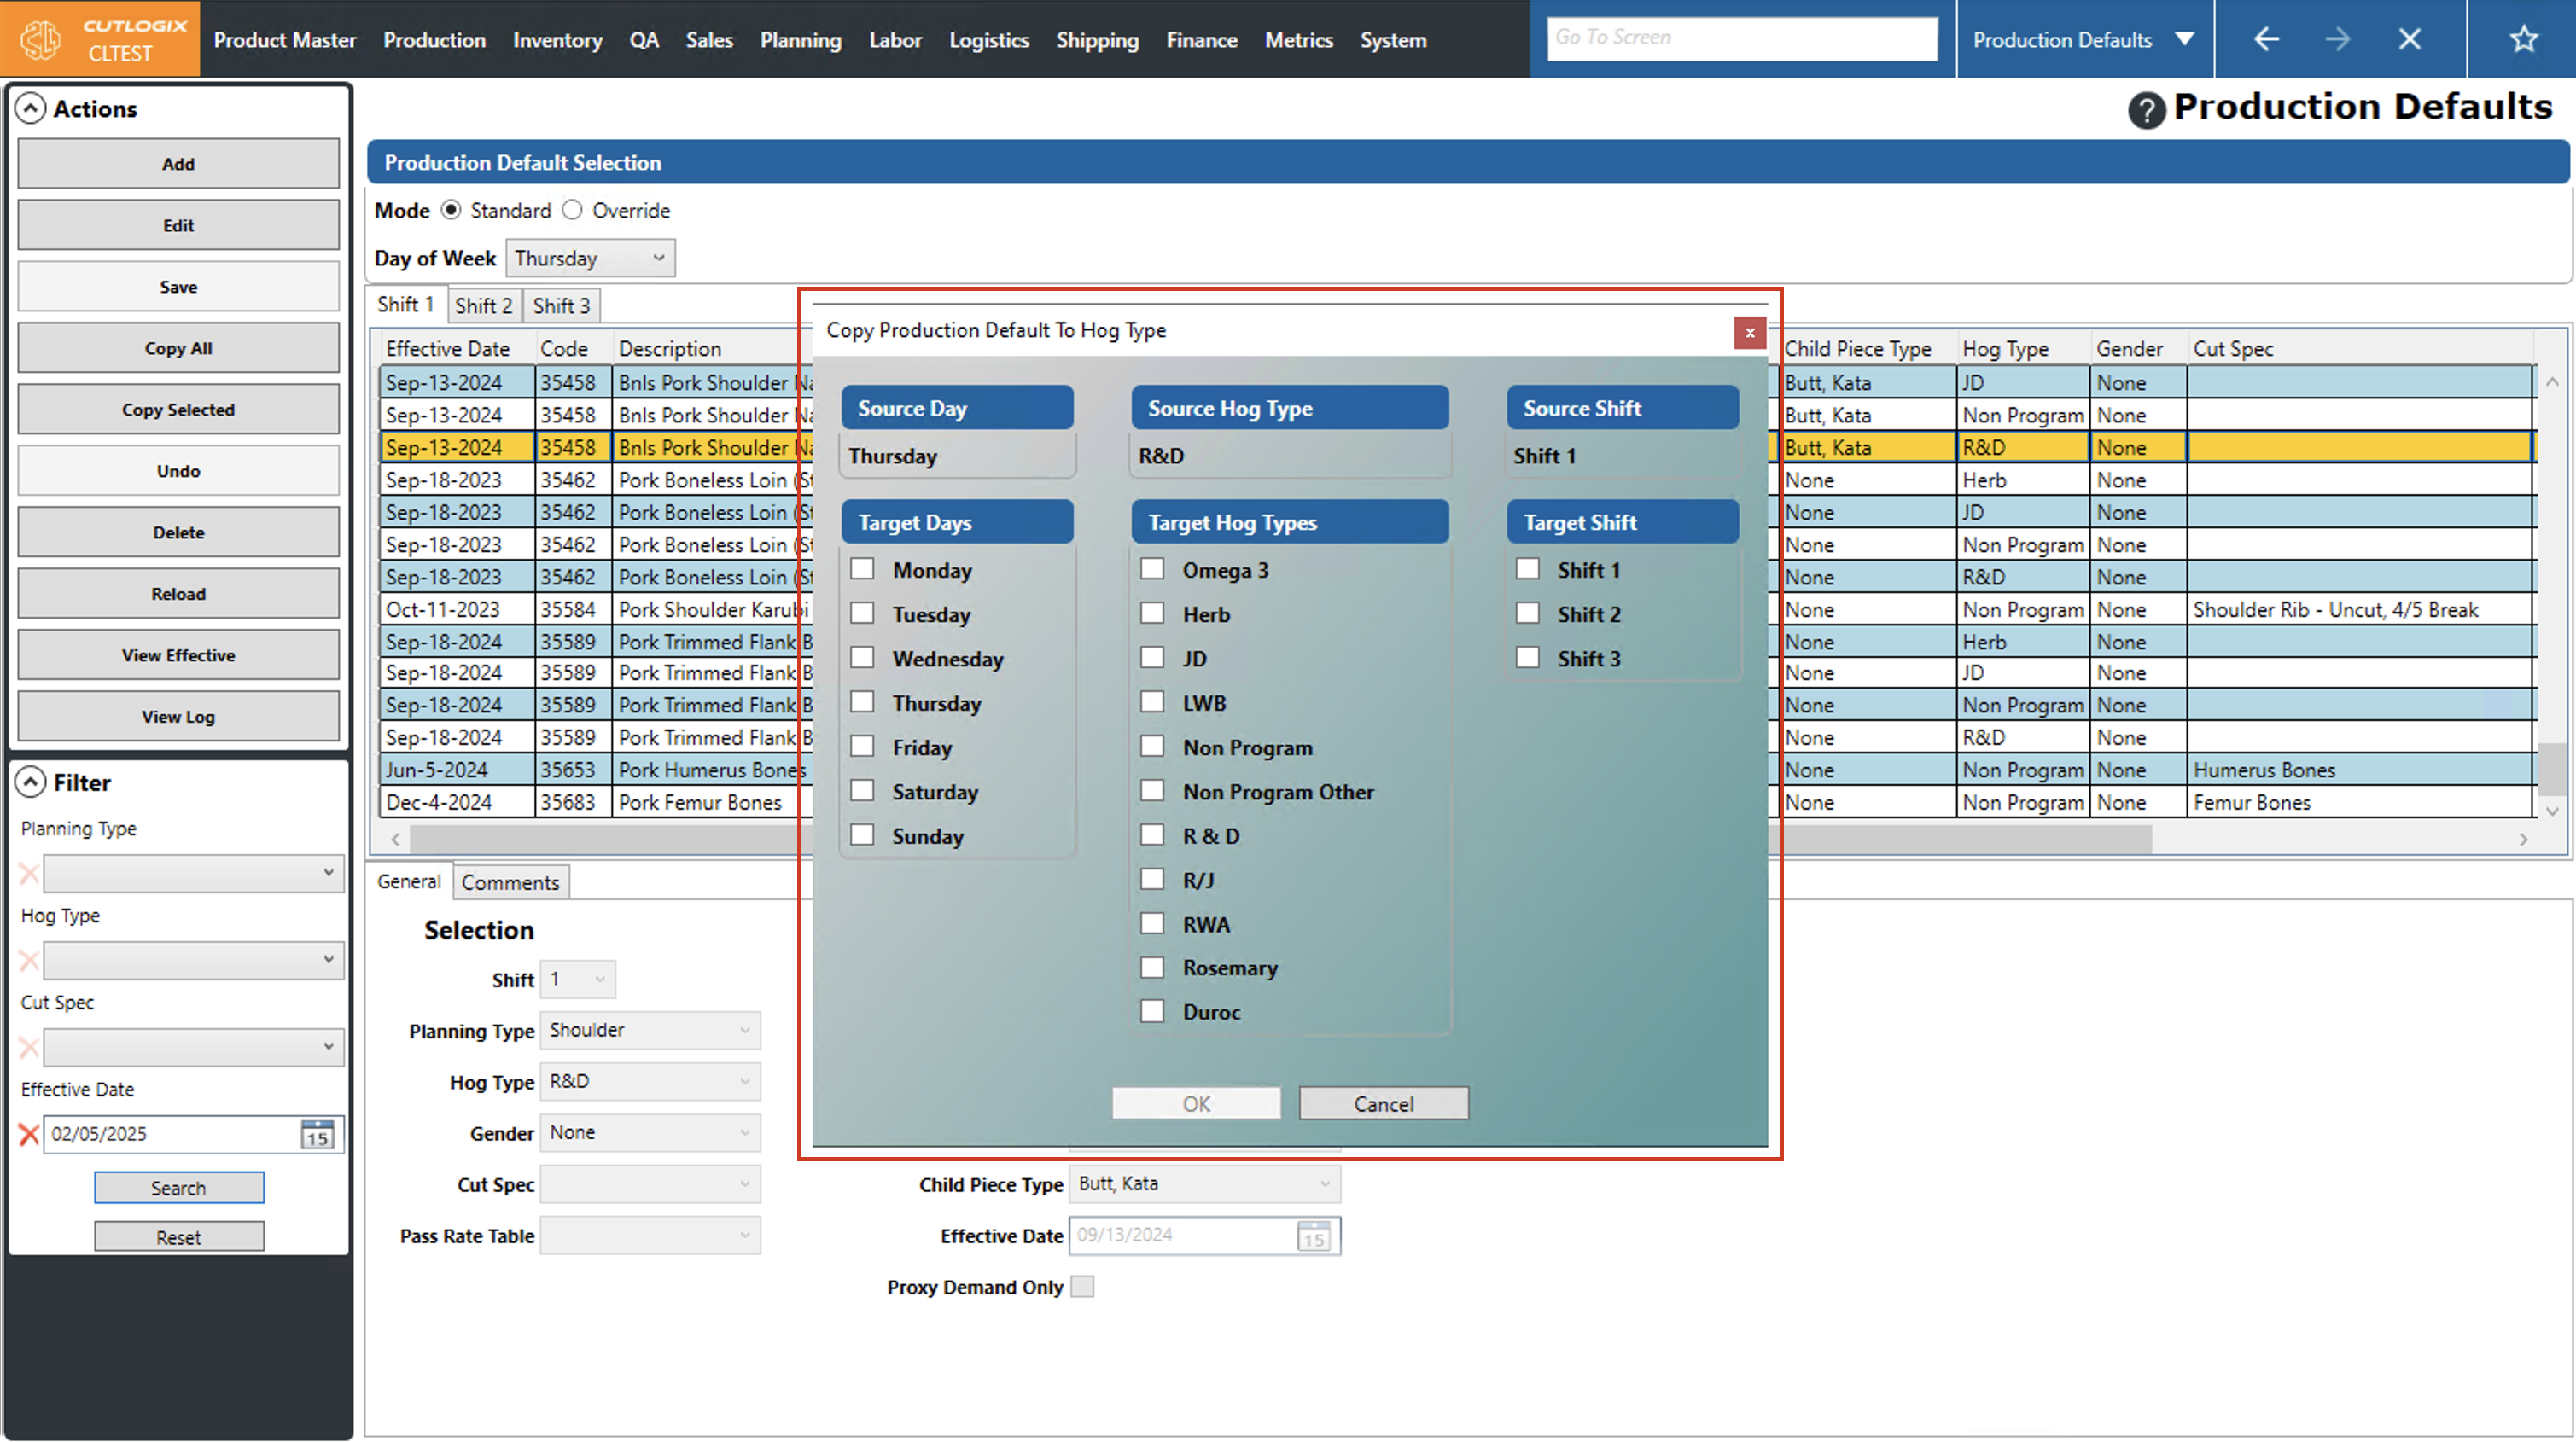
Once you're done, click "OK" to save and complete the copying of the production default. If you don't want to save your changes, click "Cancel" to revert your changes and not copy the production default. After the copying is completed, a message will appear to let you know if it was successful, this can be closed by clicking the "OK" button.

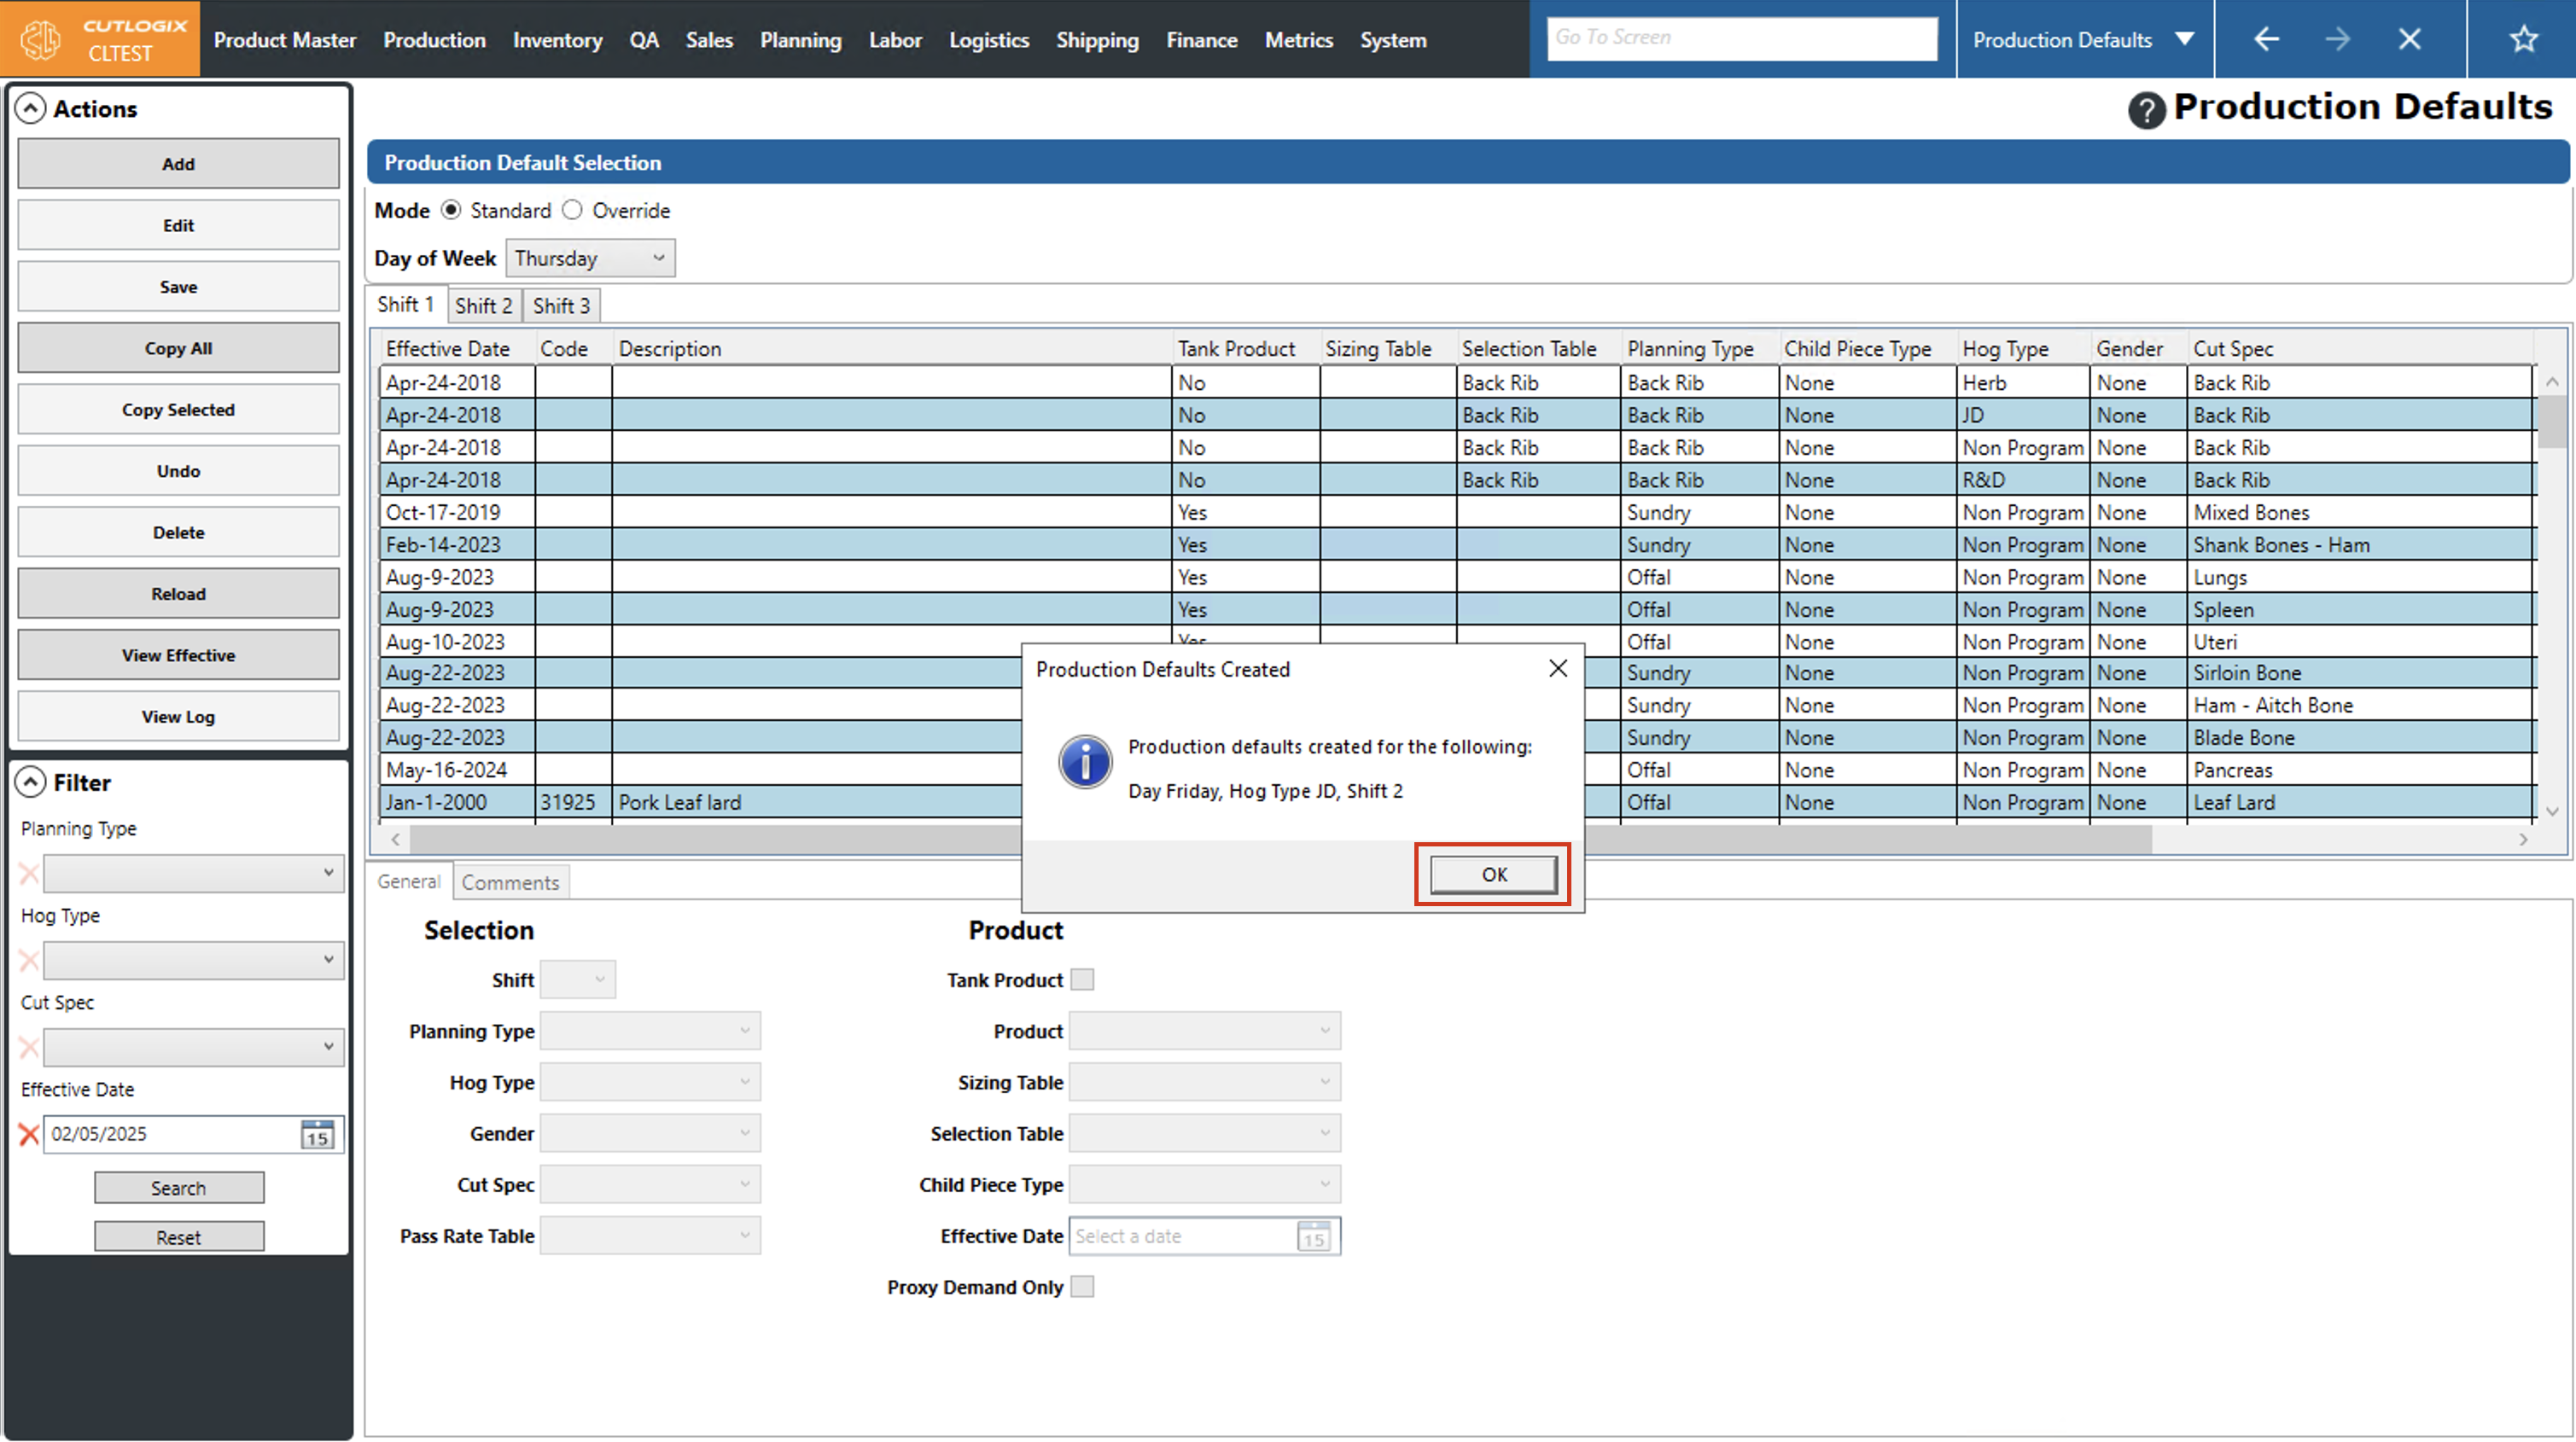
Step 8: A confirmation dialog will appear, letting you know what days, hog types and shifts that production defaults were created for. Clicking "OK" will close this dialog.
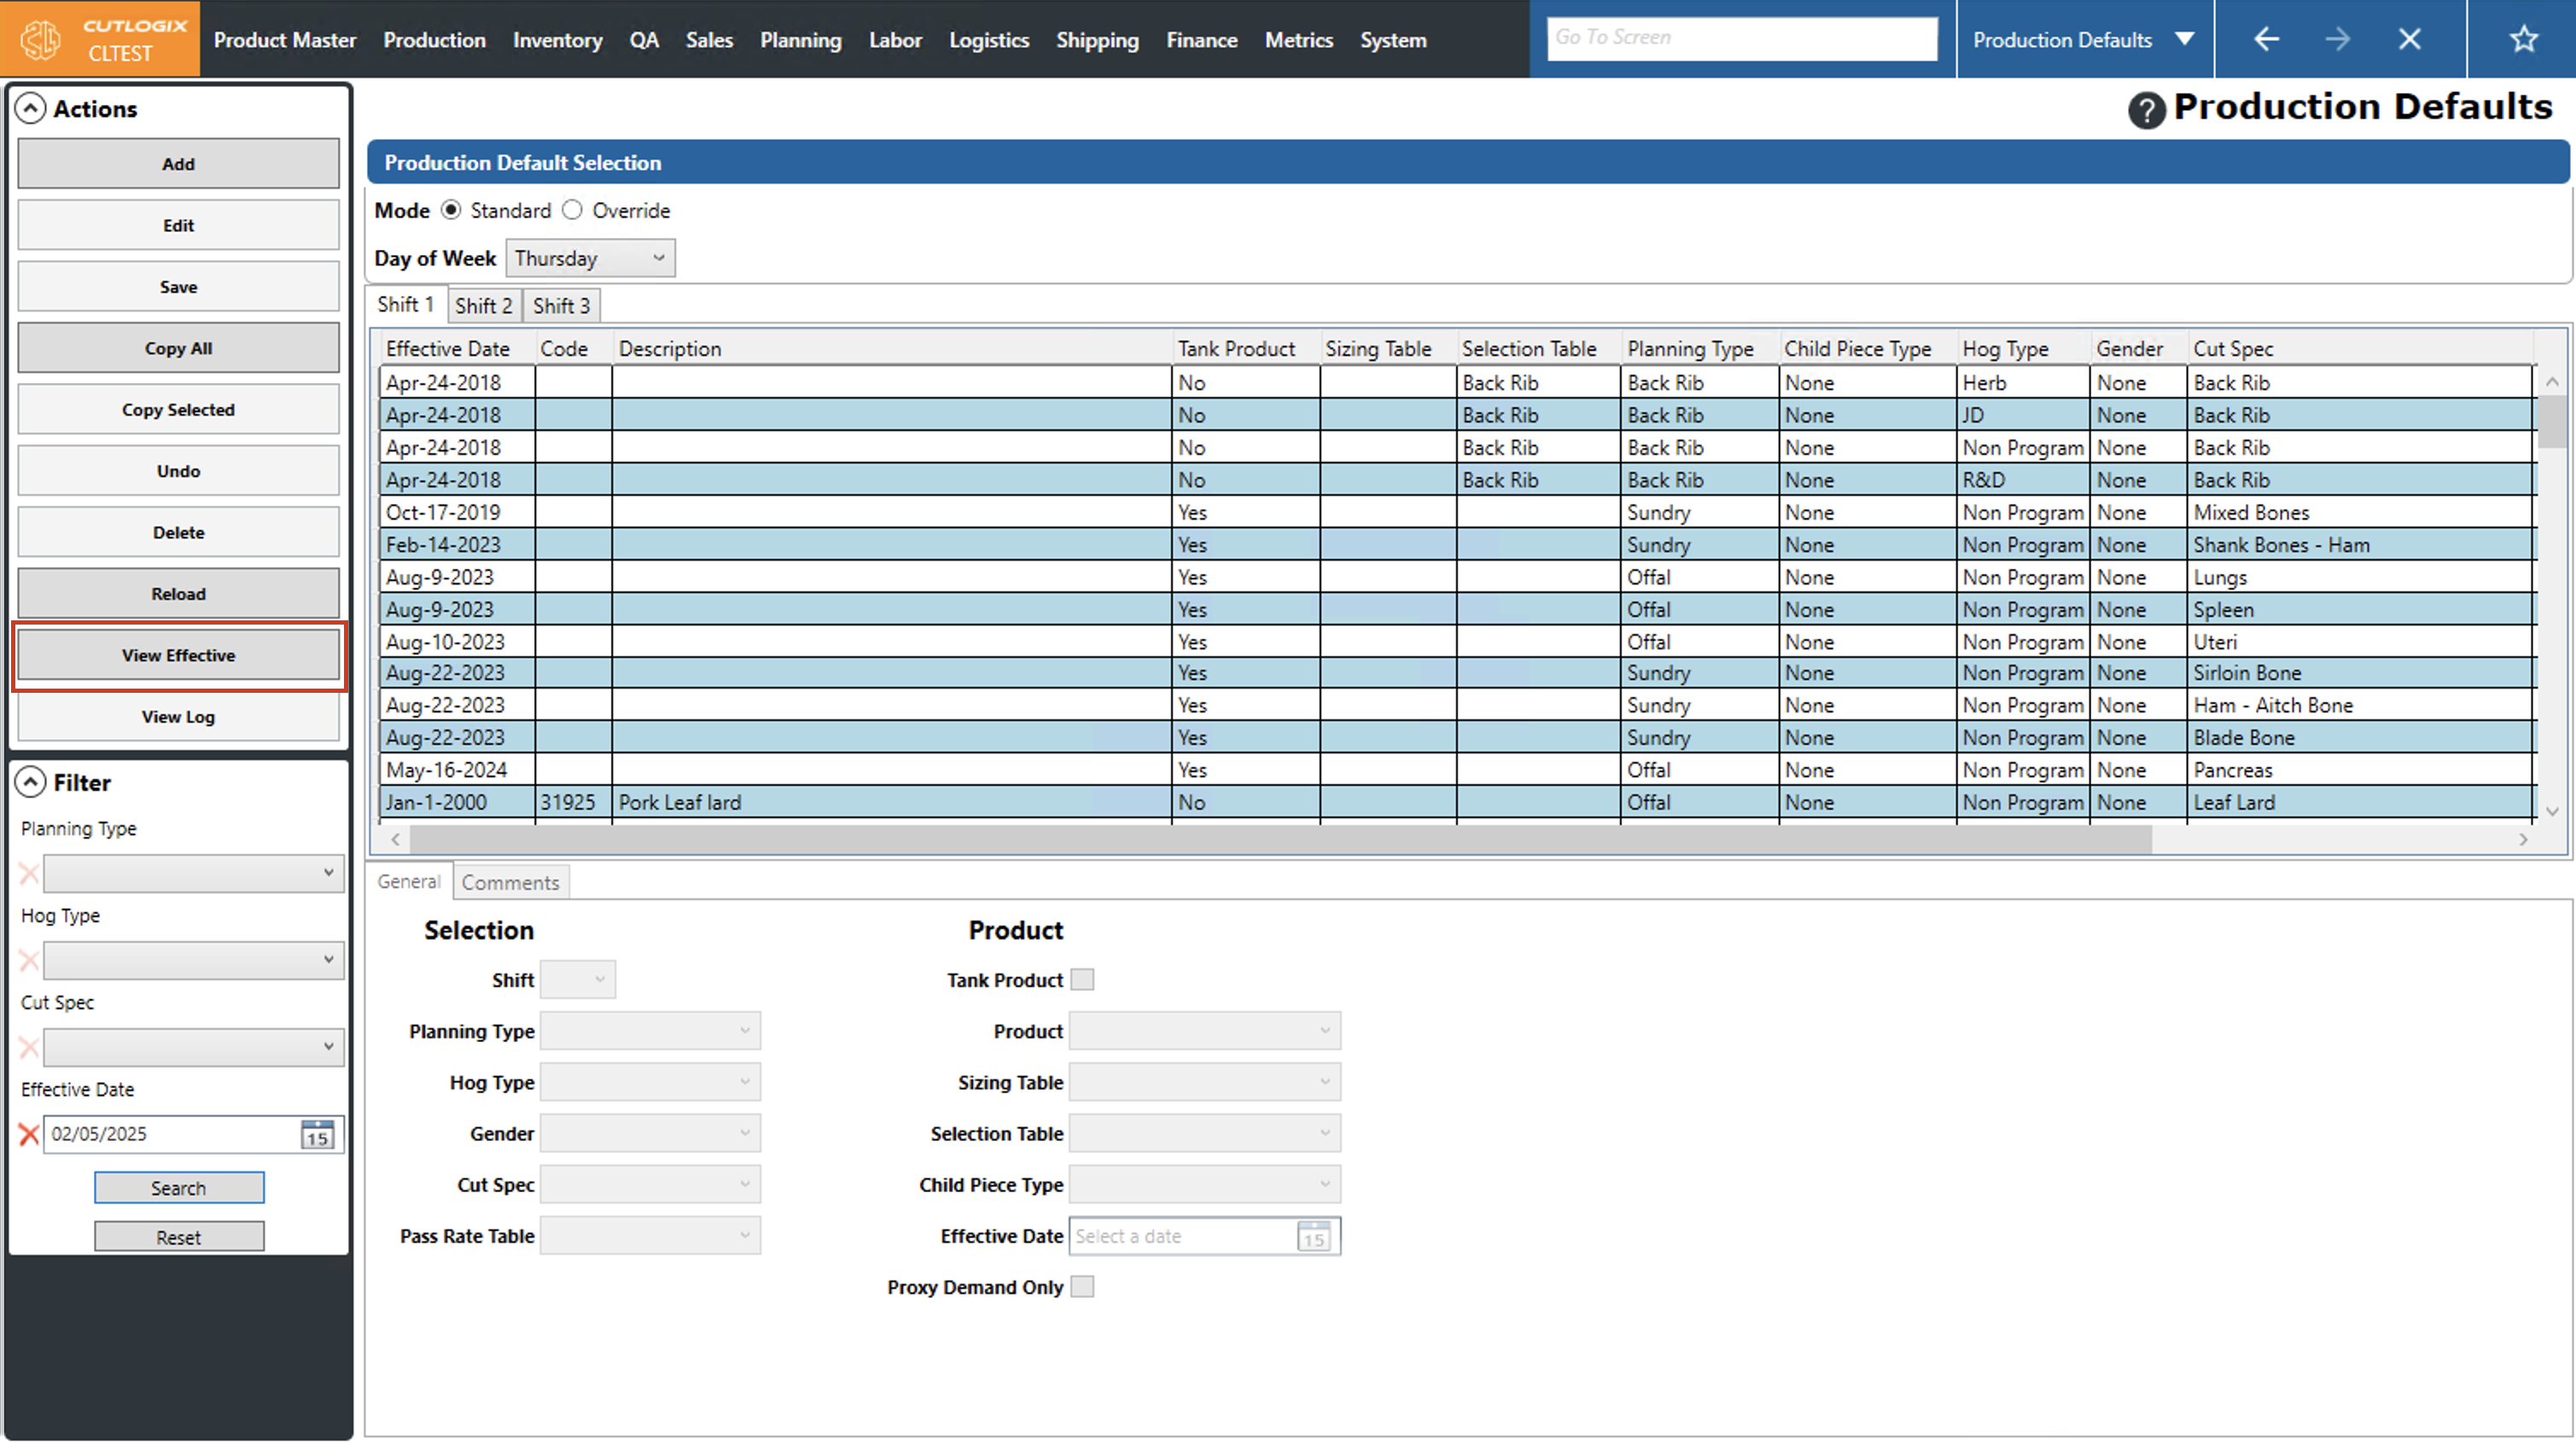
How to View Production Defaults in a Date Range
DemoStep 1: Navigate to the "Production Defaults" page (Under the Planning menu → Planning Rules Config → Production Defaults).
Step 2: Click the "View Effective" button in the actions panel.
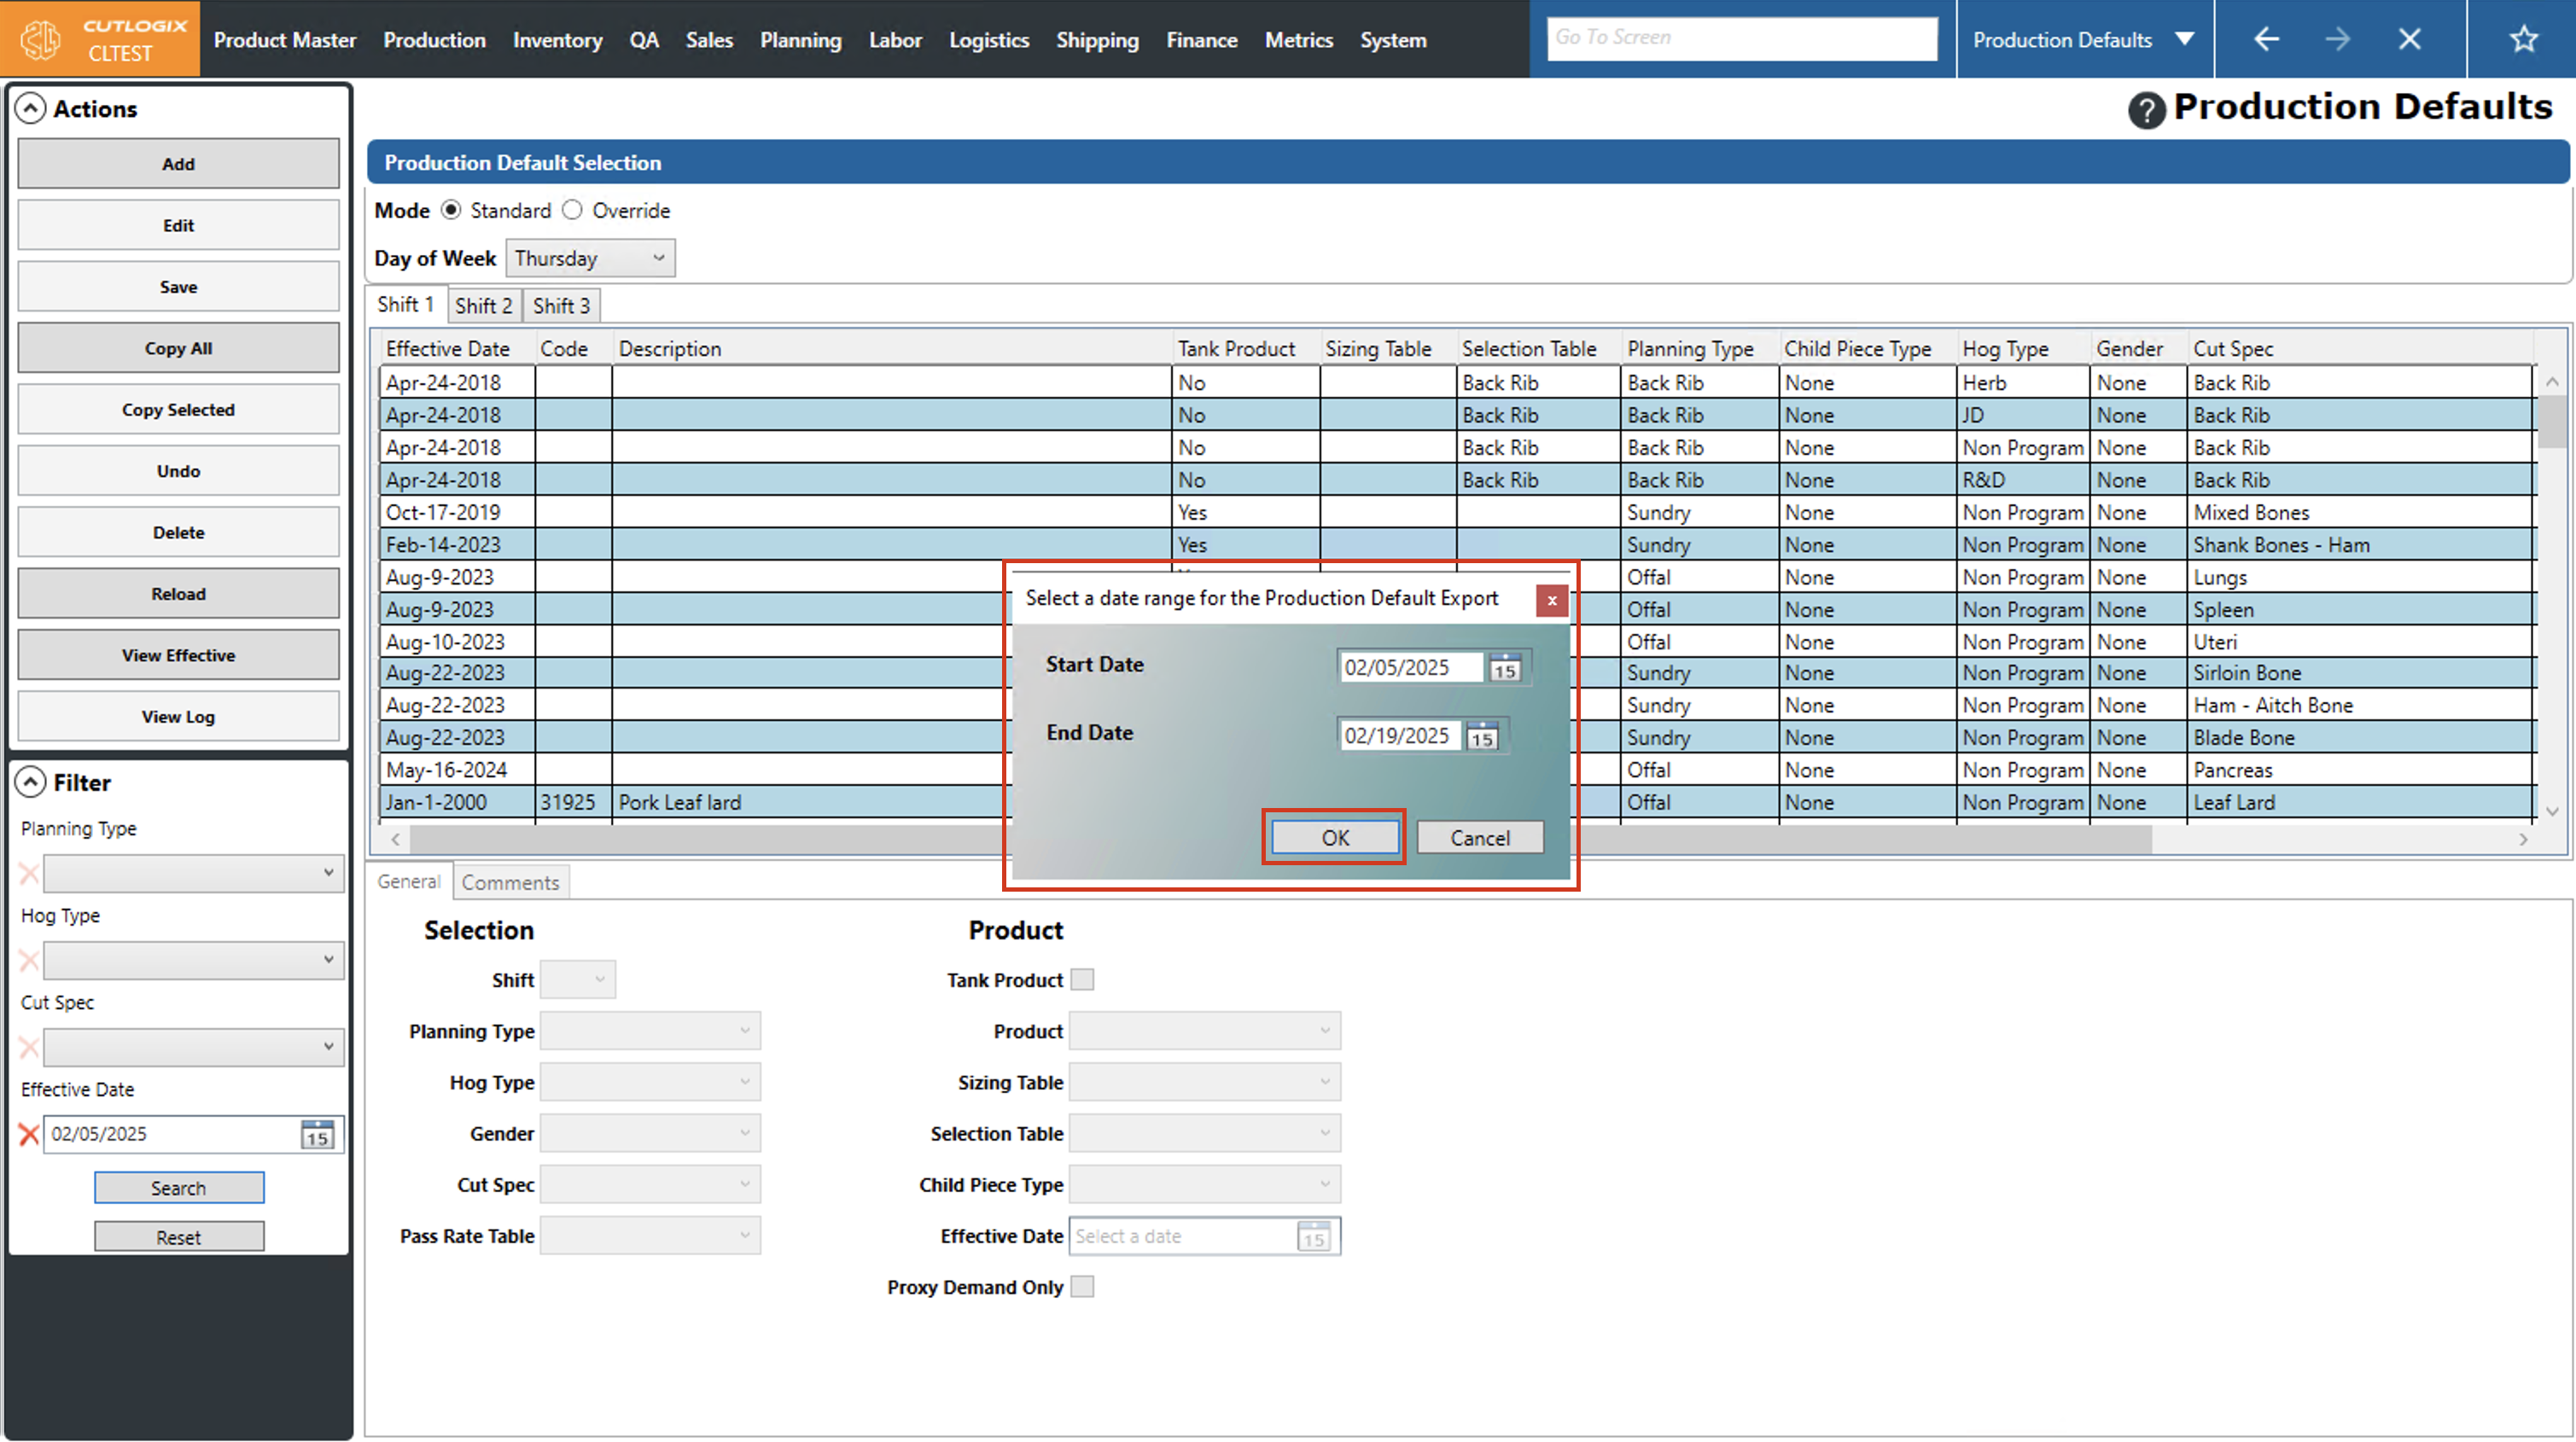
Step 3: A dialog will appear where you can specify the start and end date for the range that you want to view the Production Defaults for. Clicking on the calendar icon in each datepicker will bring up a calendar where you can easily choose the start and end dates that you want to view the defaults for. Once you've selected both a start and end date, click the "OK" button to generate the report. If you want to cancel without generating the report, click on the "Cancel" button, then the dialog will close.
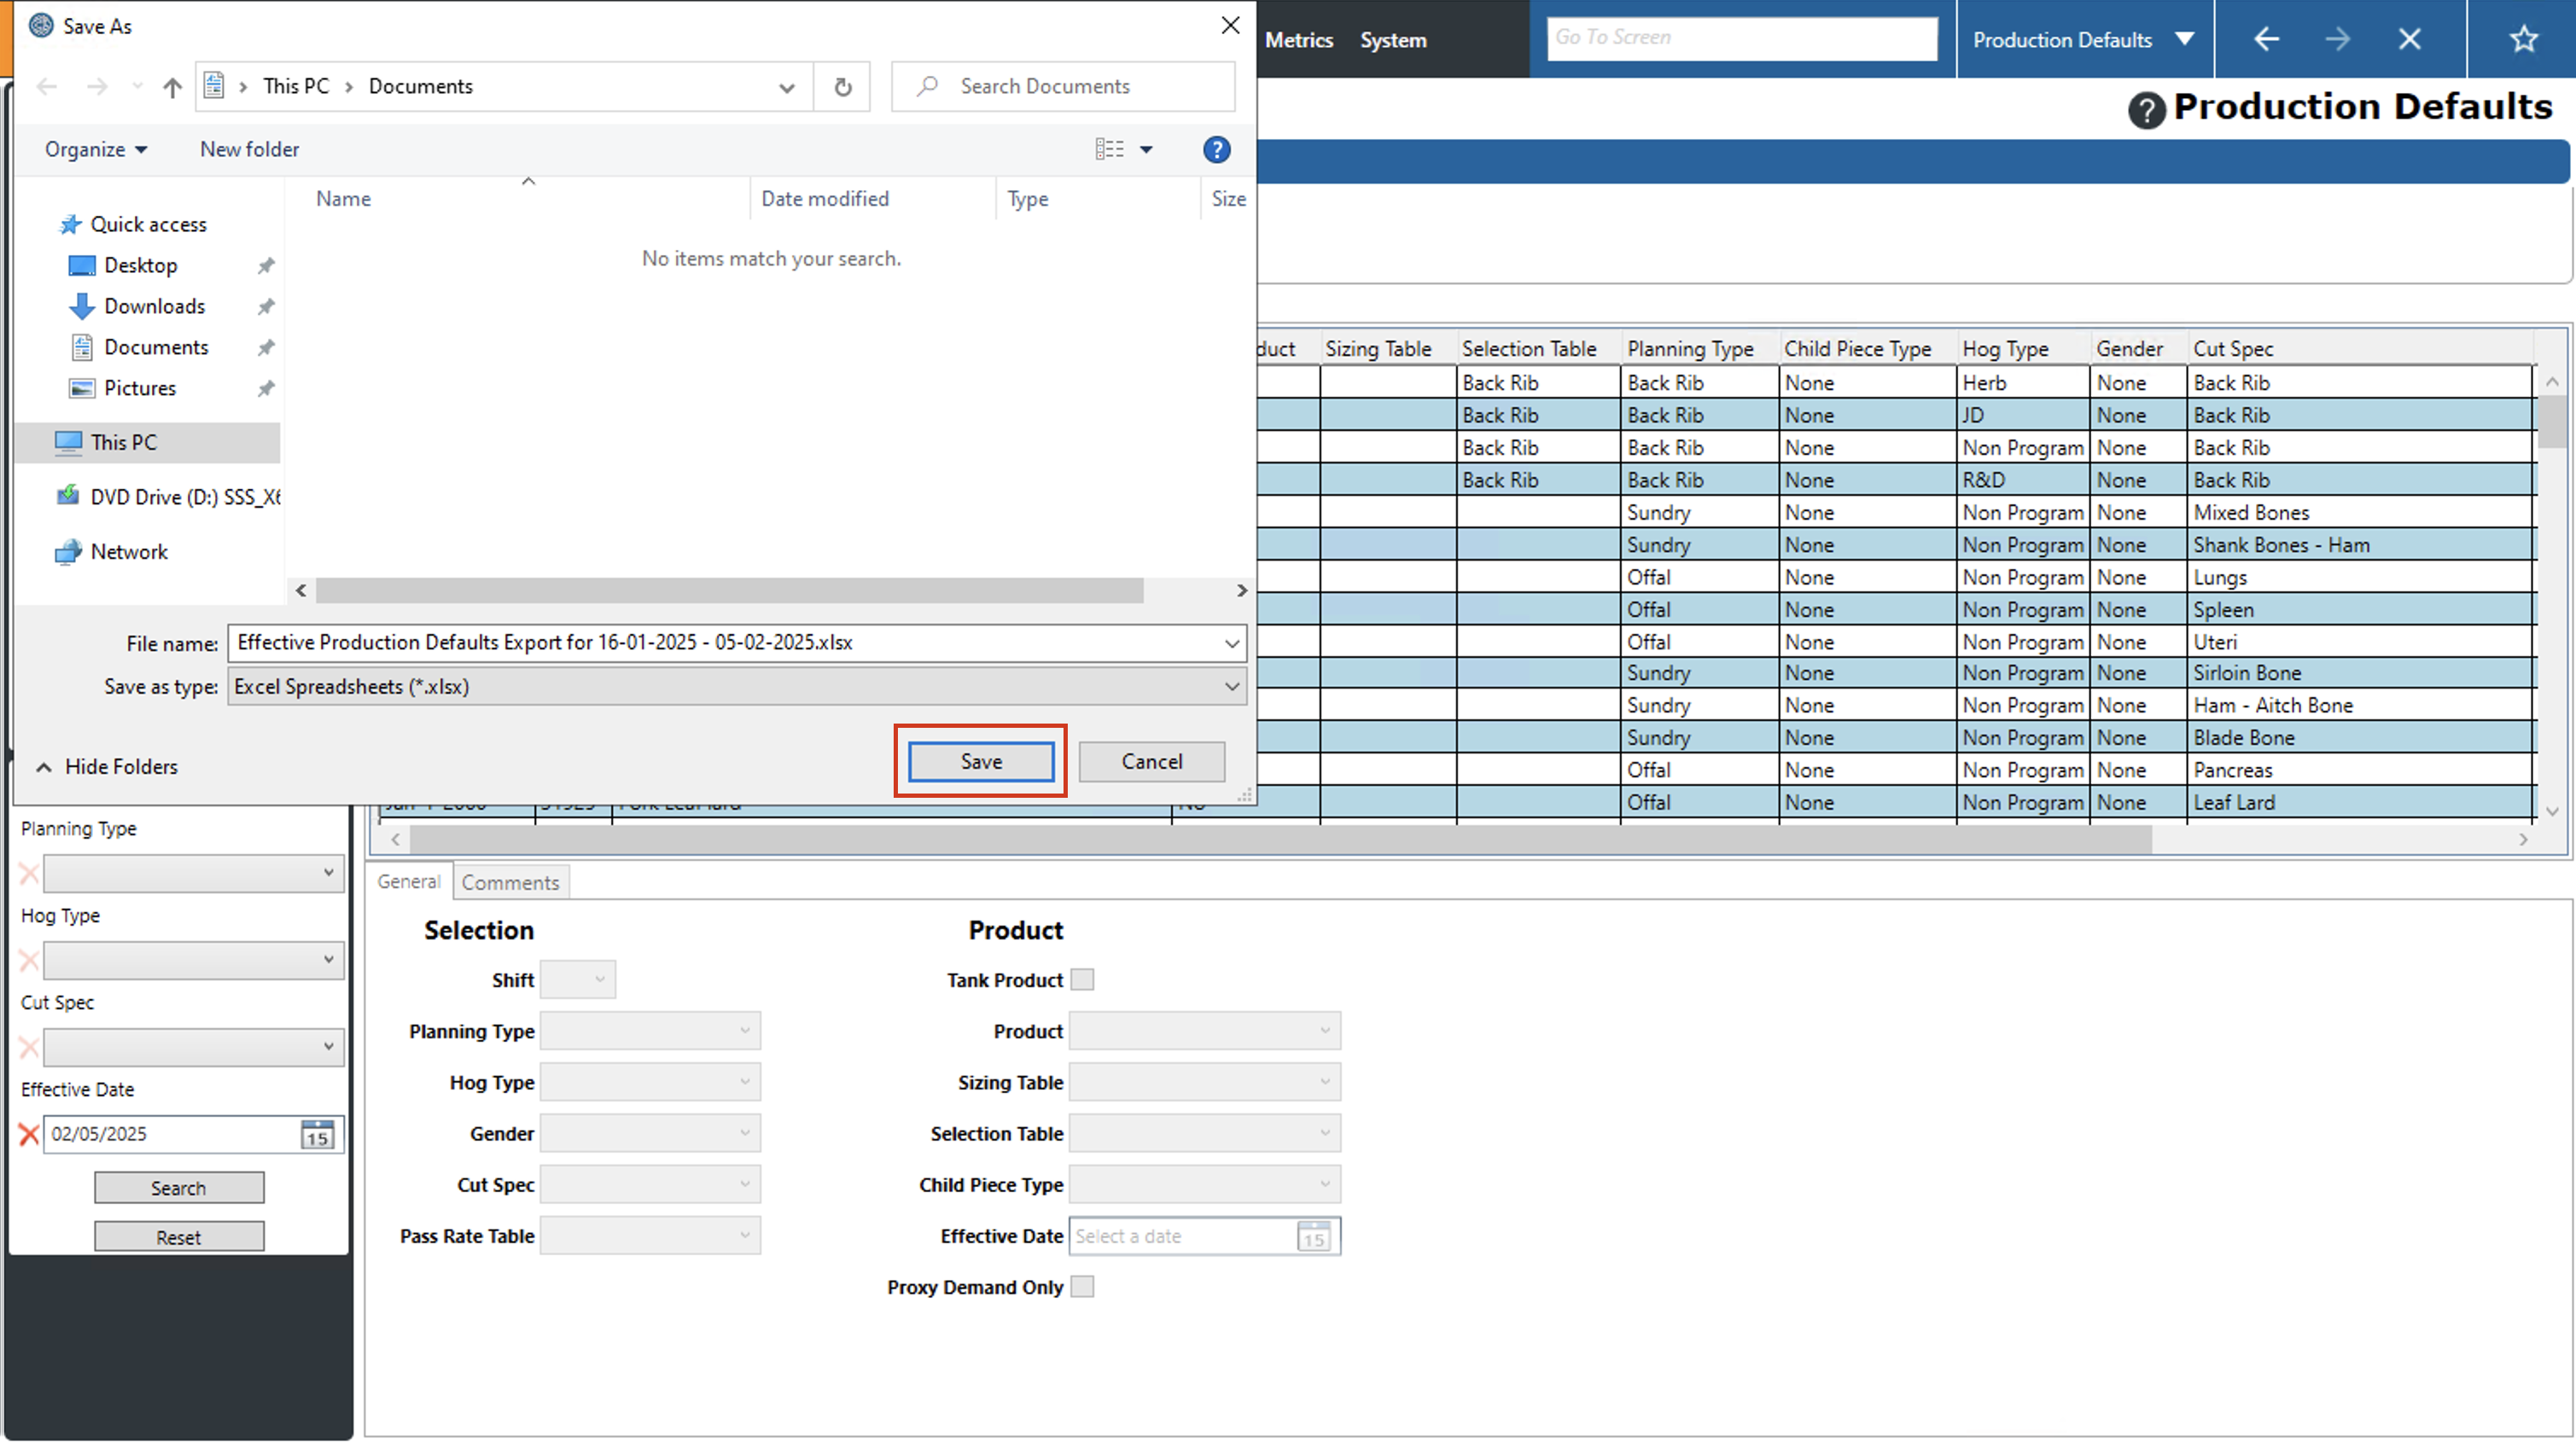
Step 4: A new dialog will appear on your computer, asking where you want to save the file and what the filename should be. By default, it will be saved in your documents folder and the report name will be called "Effective Production Defaults Export for (start date)-(end date)", this can be changed if you want, or you can use the default.
When you're ready to save the report, click "Save". Clicking "Cancel" will exit the dialog and will not save the report. To open the report, navigate to the documents folder on your computer (or whichever folder you saved it to) and open the report from there. Note: The report is in Excel format and Excel will need to be installed on your computer to open it.
When you're ready to save the report, click "Save". Clicking "Cancel" will exit the dialog and will not save the report. To open the report, navigate to the documents folder on your computer (or whichever folder you saved it to) and open the report from there. Note: The report is in Excel format and Excel will need to be installed on your computer to open it.