Daily Kill Floor Tasks
How to Add a Daily Kill Report
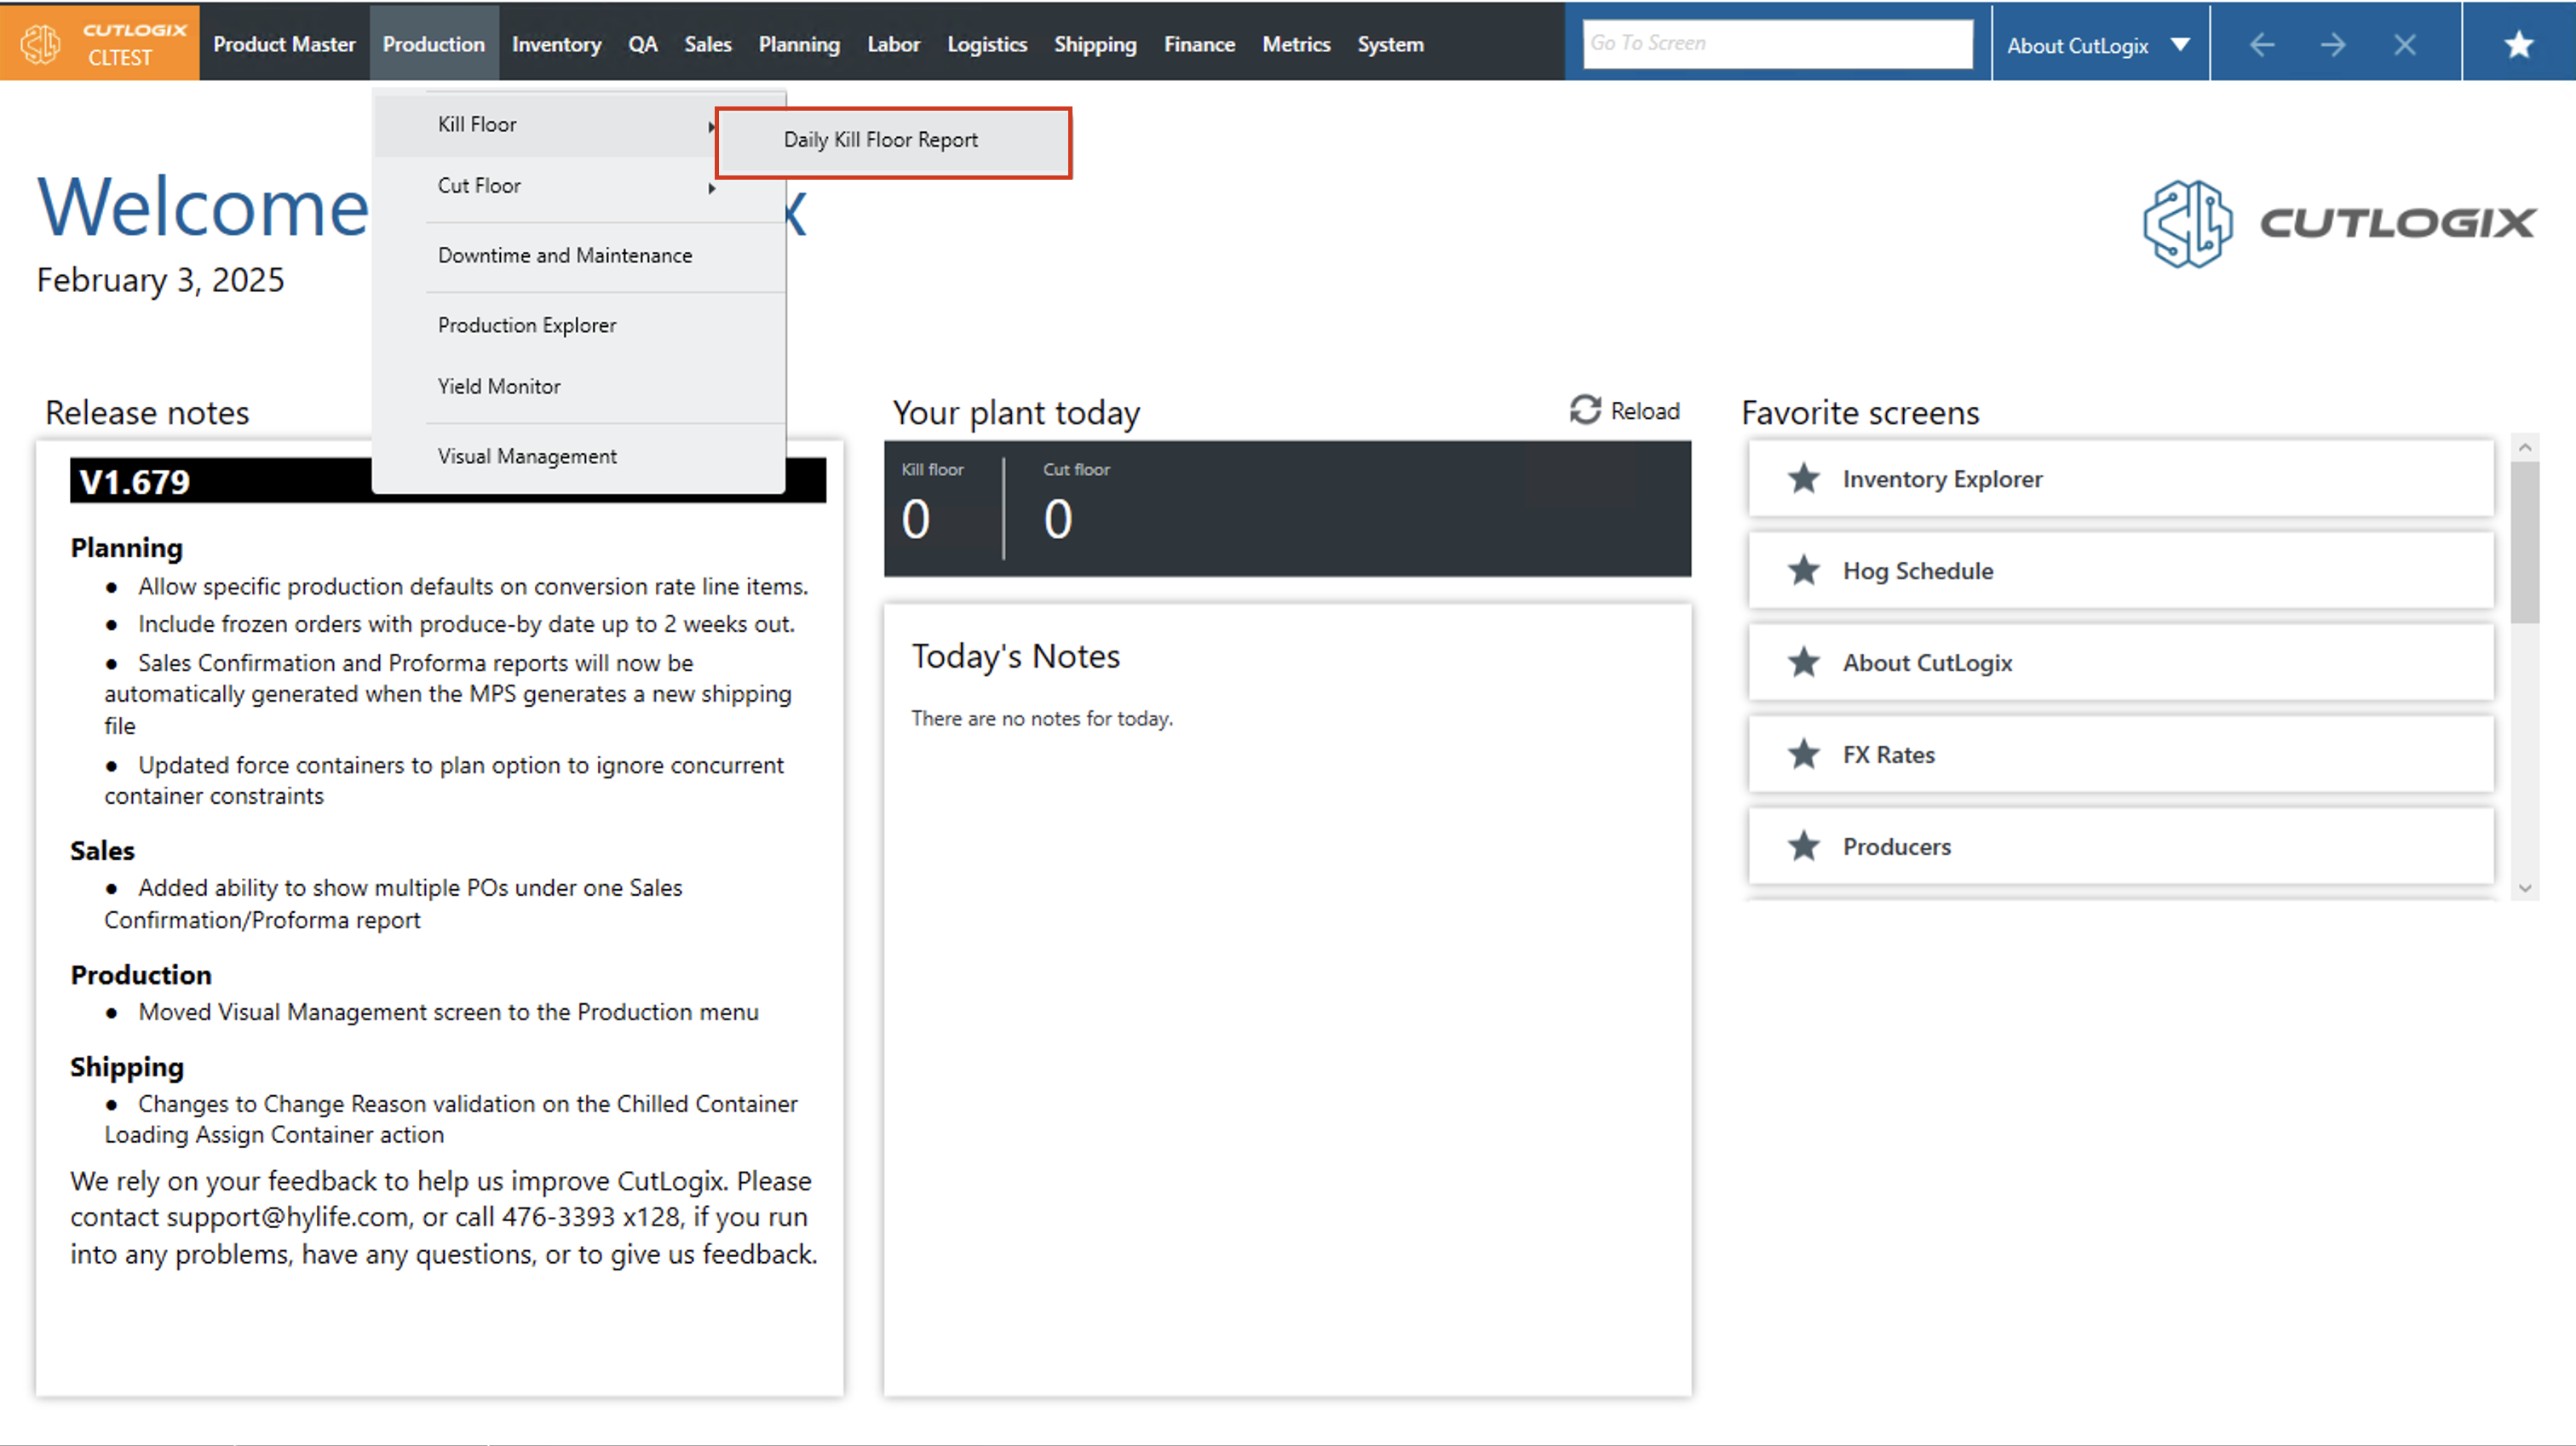
DemoStep 1: Navigate to the "Daily Kill Report" page (Under the Production menu → Kill Floor → Daily Kill Report)

Step 2: Use the datepicker to select the date that you want to add a daily kill report for. Clicking the calendar icon will bring up the date picker.

Step 3: To add a new report, click the "Add" button on the left side actions panel. The add button will only be clickable if there is not an existing daily kill report for the selected day.

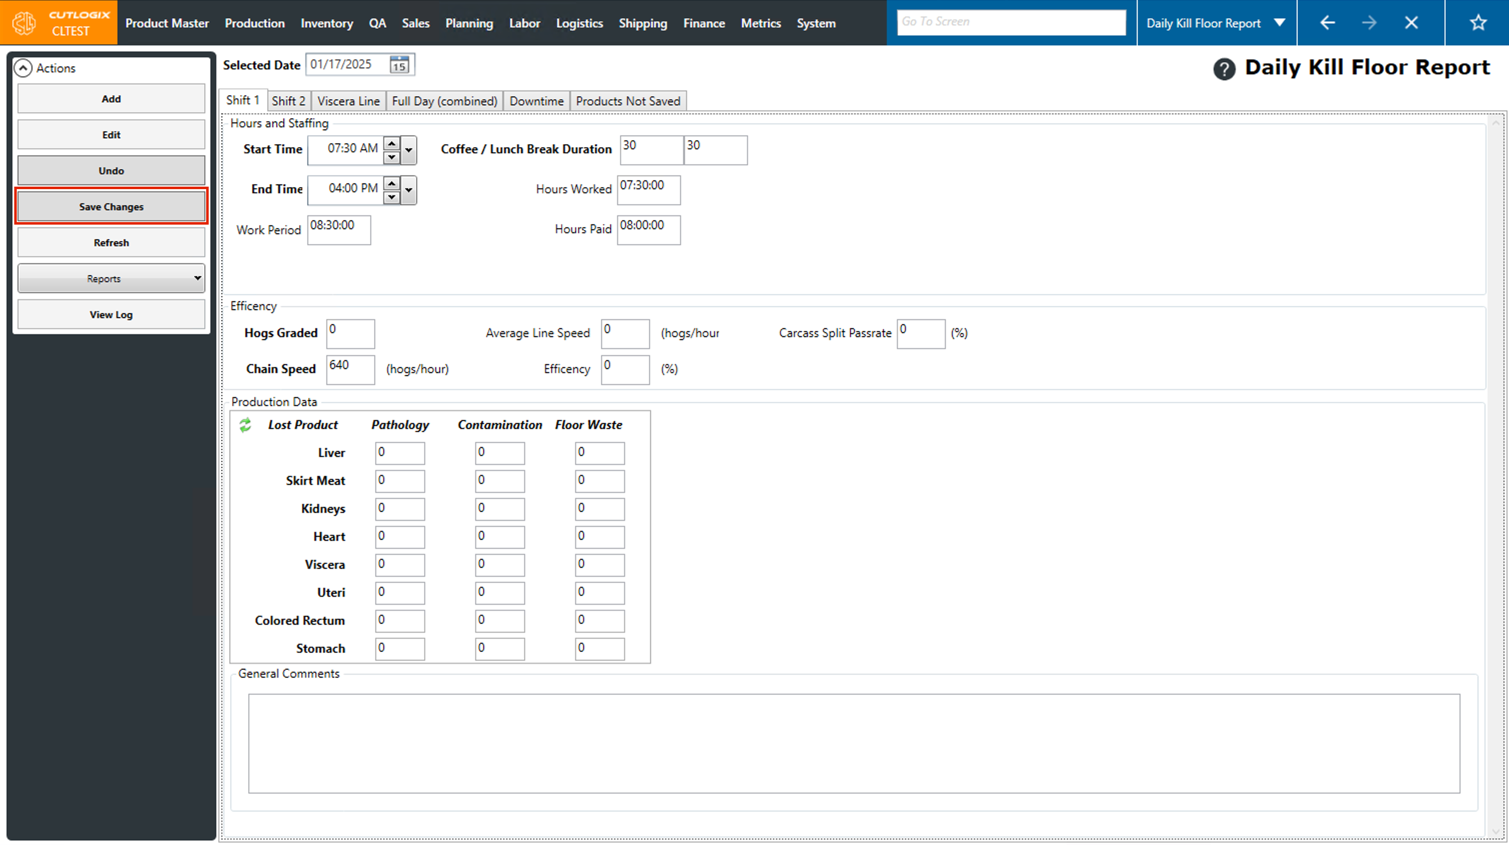
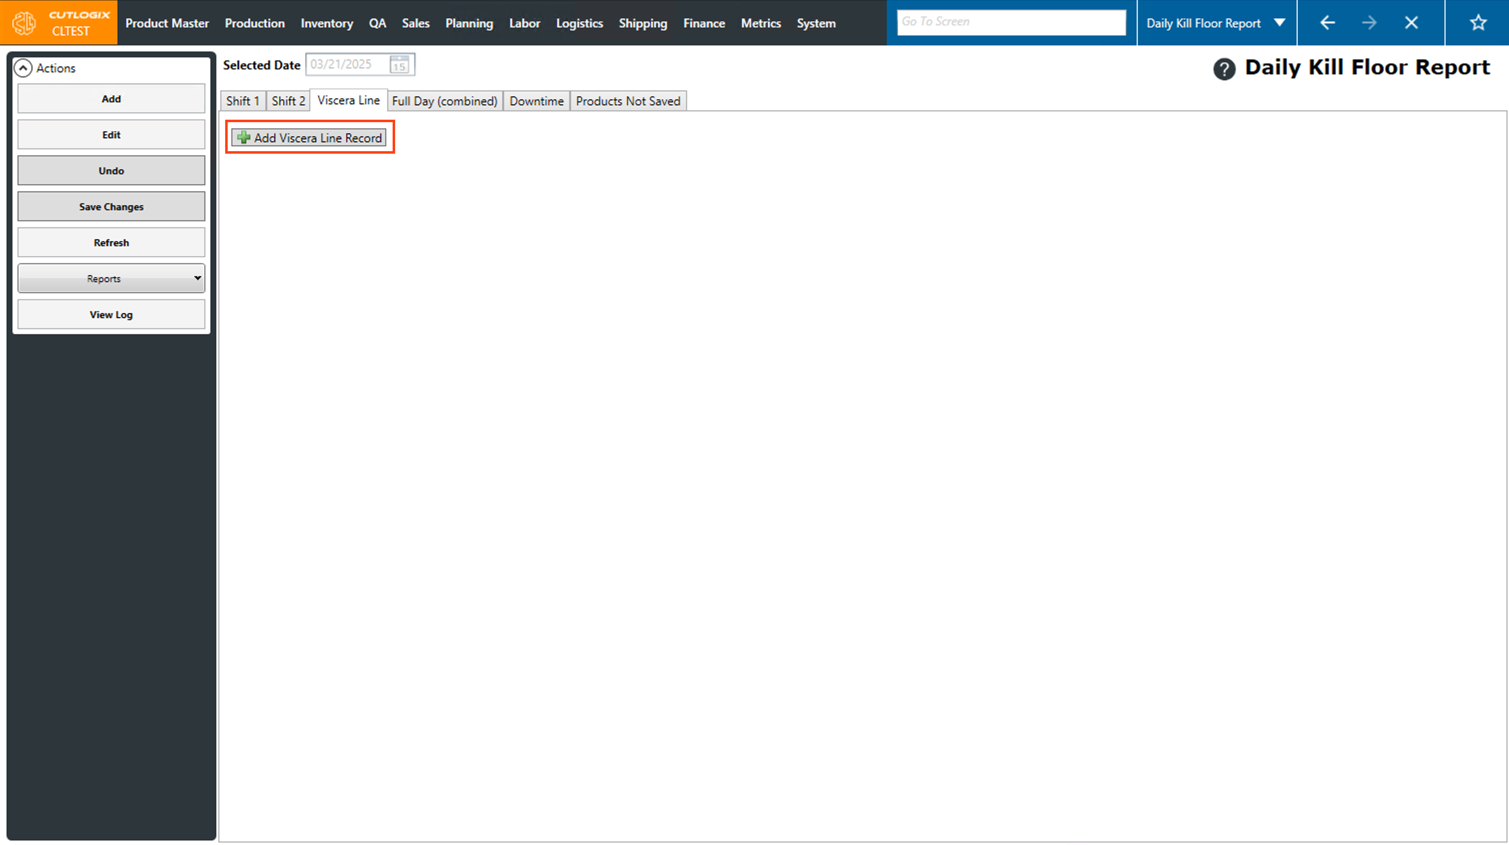
Step 4: When adding a new report, a blank report template will open. There are several tabs on this report (Ex. Shift 1, Shift 2, Full Day Combined, Downtime, etc.) that can have data entered into them. Many of these tabs have default information displayed in them that is taken from other locations in CutLogix. For example, the shift start and end times come from the Planning → Plant Config → Shift Config menu.

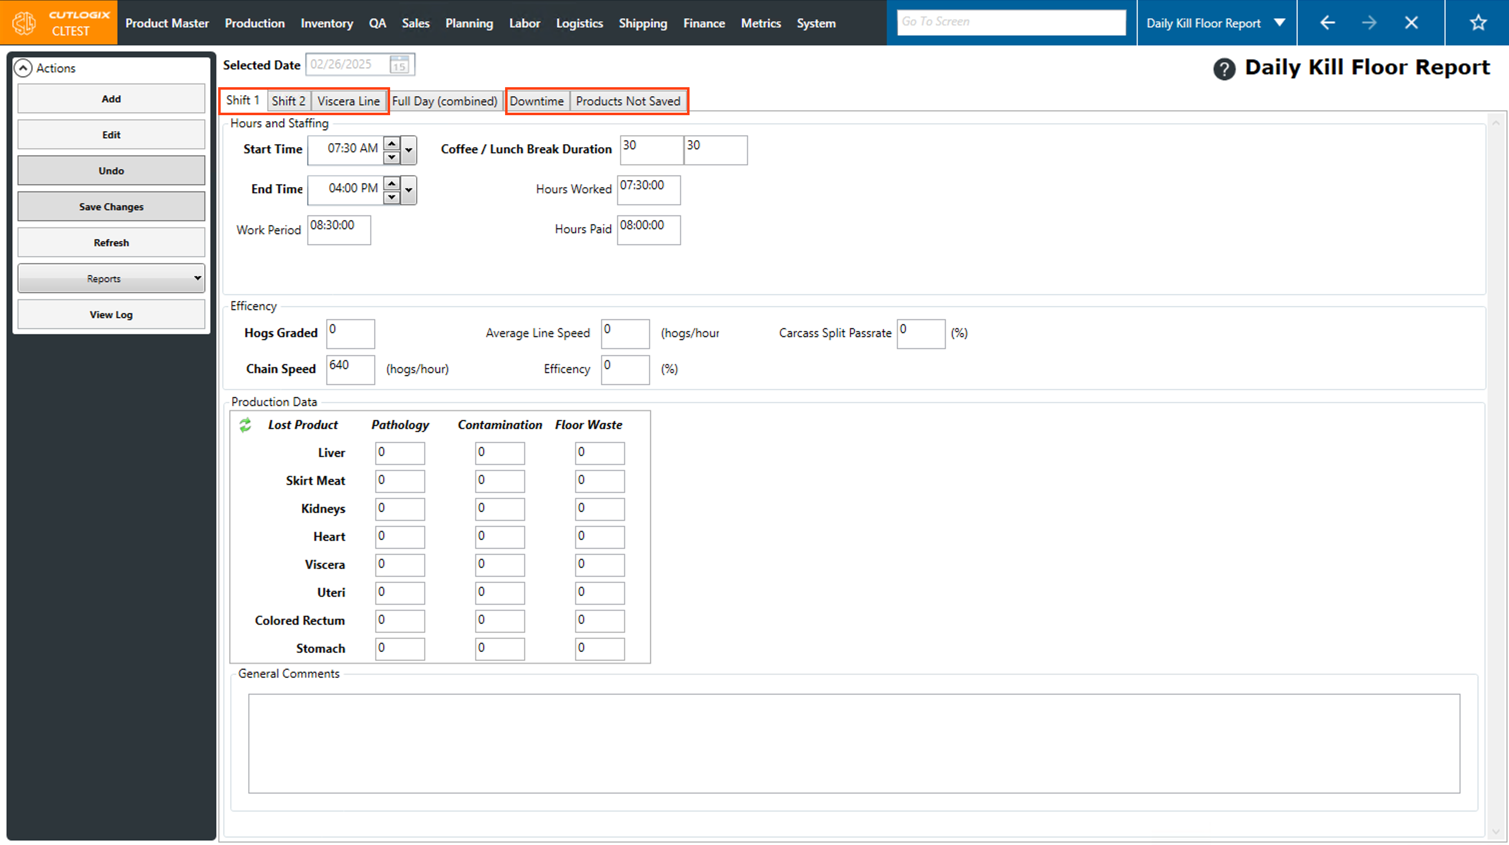
Step 5: The tabs available on this page are as follows:
• Shift 1: The details about shift 1, including hours, staffing and efficiency.
• Shift 2: The details about shift 2, including hours, staffing and efficiency.
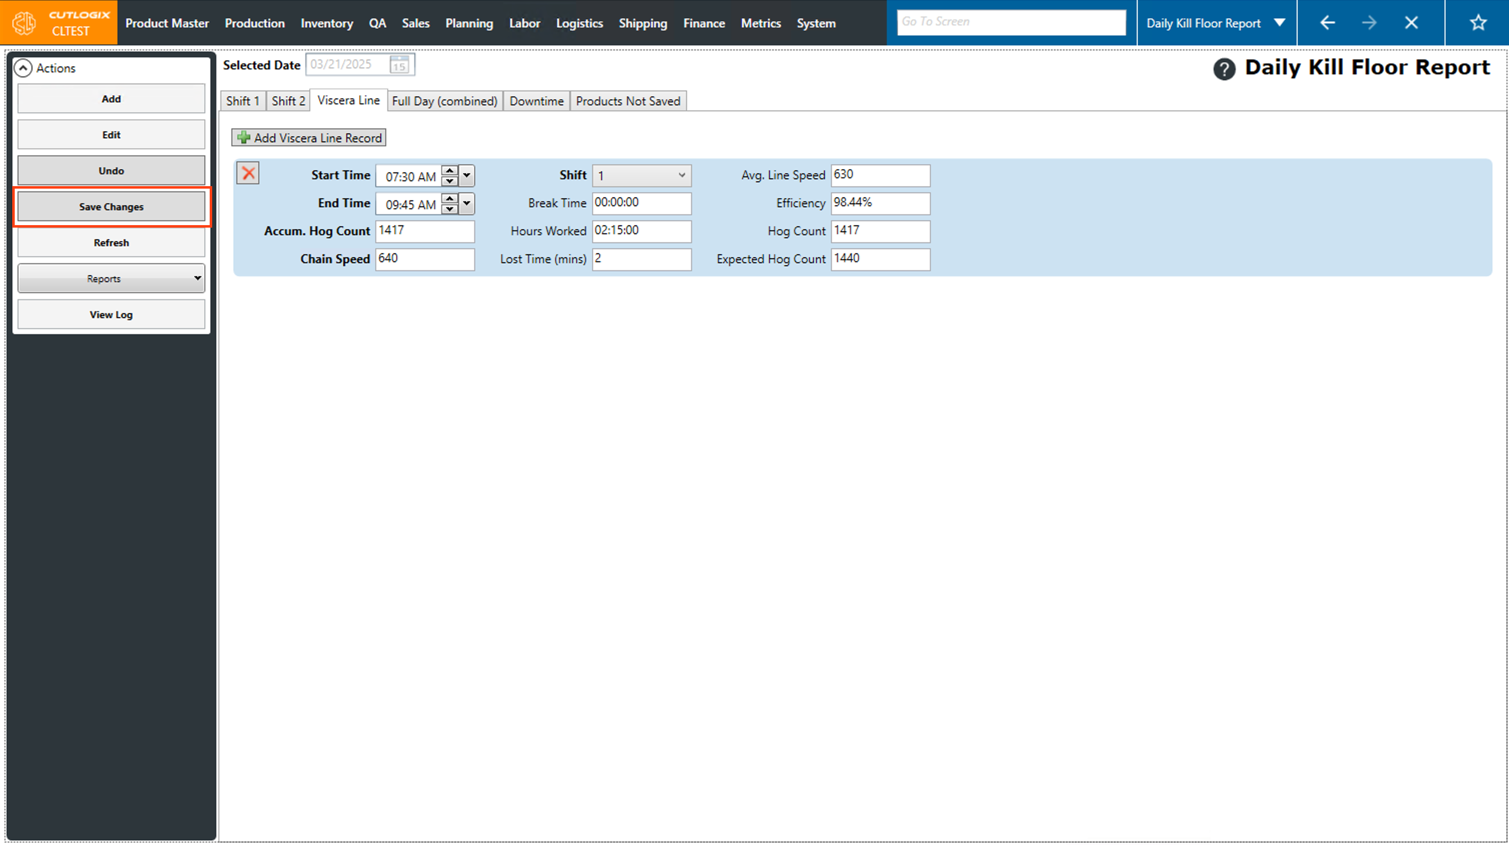
• Viscera Line: Displays each record of when the line is running throughout the day. Each record displays the start and end time, chain speed as well as the actual hog count vs the expected hog count for that time period. Typically, these records are entered manually by supervisors at break times. NOTE: "Accum. Hog Count" is a required field when entering a Viscera Line Record.
• Full Day (Combined): This tab displays the combined details about shift 1 and 2.
• Downtime: Add/Edit downtime records for the selected date.
• Products Not Saved: Add/Edit and View products not saved records for the selected day.
• Shift 1: The details about shift 1, including hours, staffing and efficiency.
• Shift 2: The details about shift 2, including hours, staffing and efficiency.
• Viscera Line: Displays each record of when the line is running throughout the day. Each record displays the start and end time, chain speed as well as the actual hog count vs the expected hog count for that time period. Typically, these records are entered manually by supervisors at break times. NOTE: "Accum. Hog Count" is a required field when entering a Viscera Line Record.
• Full Day (Combined): This tab displays the combined details about shift 1 and 2.
• Downtime: Add/Edit downtime records for the selected date.
• Products Not Saved: Add/Edit and View products not saved records for the selected day.

Step 6: Click "Save Changes" in the Actions panel once all the necessary information has been added for the Daily Kill Floor Report. If you don't want to save the report, clicking "Undo" in the left actions panel will discard any changes.
How to Edit a Daily Kill Report
DemoStep 1: Navigate to the "Daily Kill Report" page (Under the Production menu → Kill Floor → Daily Kill Report)
Step 2: Use the datepicker to select the date that you want to edit the daily kill report for. Clicking the calendar icon will bring up the date picker.
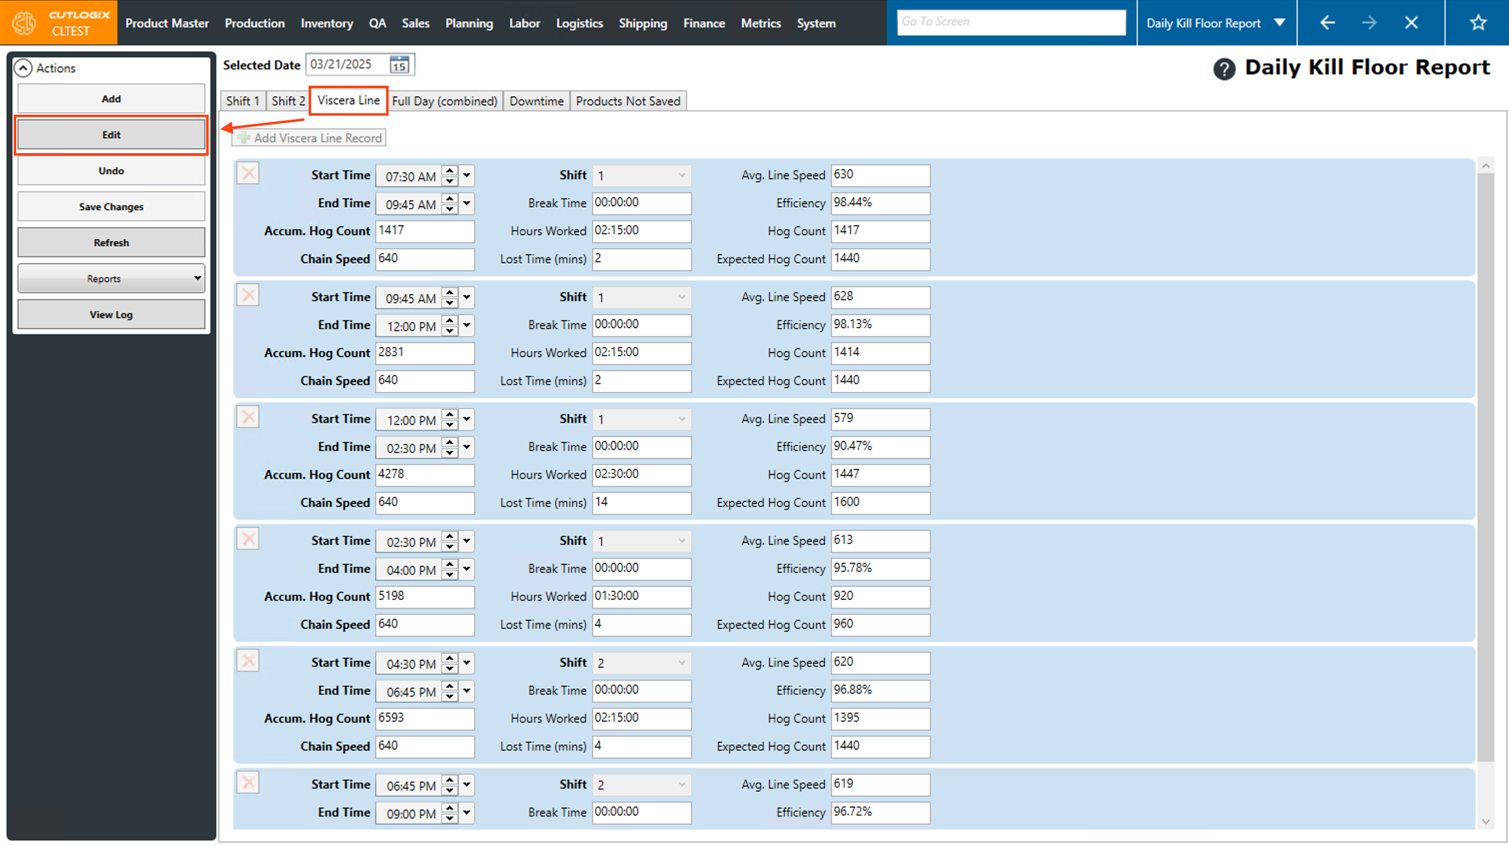
Step 3: The daily kill report for that day will then appear. To begin editing it, click the "Edit" button in the Actions Panel.

Step 4: When editing the report will be populated with that day's data. You can make changes to data in the Shift 1, Shift 2, Viscera Line, Downtime and Products Not Saved tabs.
Step 5: Once you're finished making edits, click the "Save Changes" button in the Actions panel to save the changes with the Daily Kill Floor Report. If you don't want to save your edits to the report, clicking "Undo" in the left actions panel will discard any changes.
How to Navigate to Different Days on the Daily Kill Report
DemoStep 1: Navigate to the "Daily Kill Report" page (Under the Production menu → Kill Floor → Daily Kill Report)
Step 2: When you first open the Daily Kill Report it is set to the current date by default. This can be seen near the top left corner, beside "Selected Date".
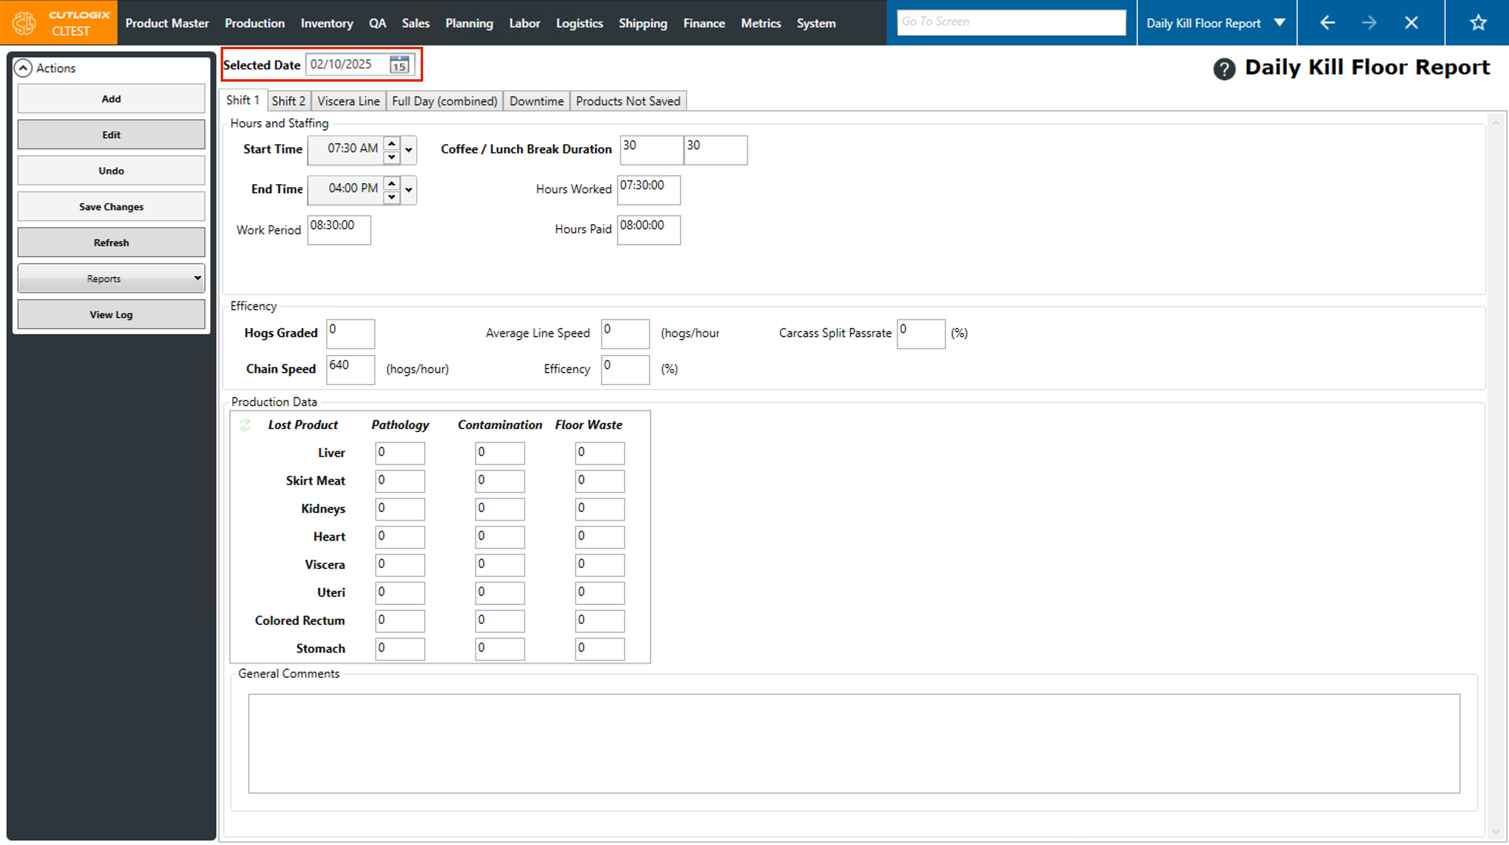
Step 3: If you want to view the Daily Kill Report for a different day, you can click the calendar icon beside the selected date and choose a past date to view the report for. Once selected, the report will open with the data for the selected date.

Step 4: You can also manually enter a date in the "Selected Date" field to view the report for. The date must be entered in MM/DD/YYYY format. Once you've entered a date you can click out of the datepicker or click "Enter" on your keyboard and the report will open for the date that you entered (if one exists).

How to Add Viscera Line Records
DemoStep 1: Open the "Daily Kill Report" page, located under the Production menu → Kill Floor → Daily Kill Report.
Step 2: Use the date picker to choose the day that you want to add a viscera line record to.
NOTE: In order to add a viscera line record, the chosen day must have a daily kill floor report added to it already.
NOTE: In order to add a viscera line record, the chosen day must have a daily kill floor report added to it already.

Step 3: Click on the "Viscera Line" record tab.

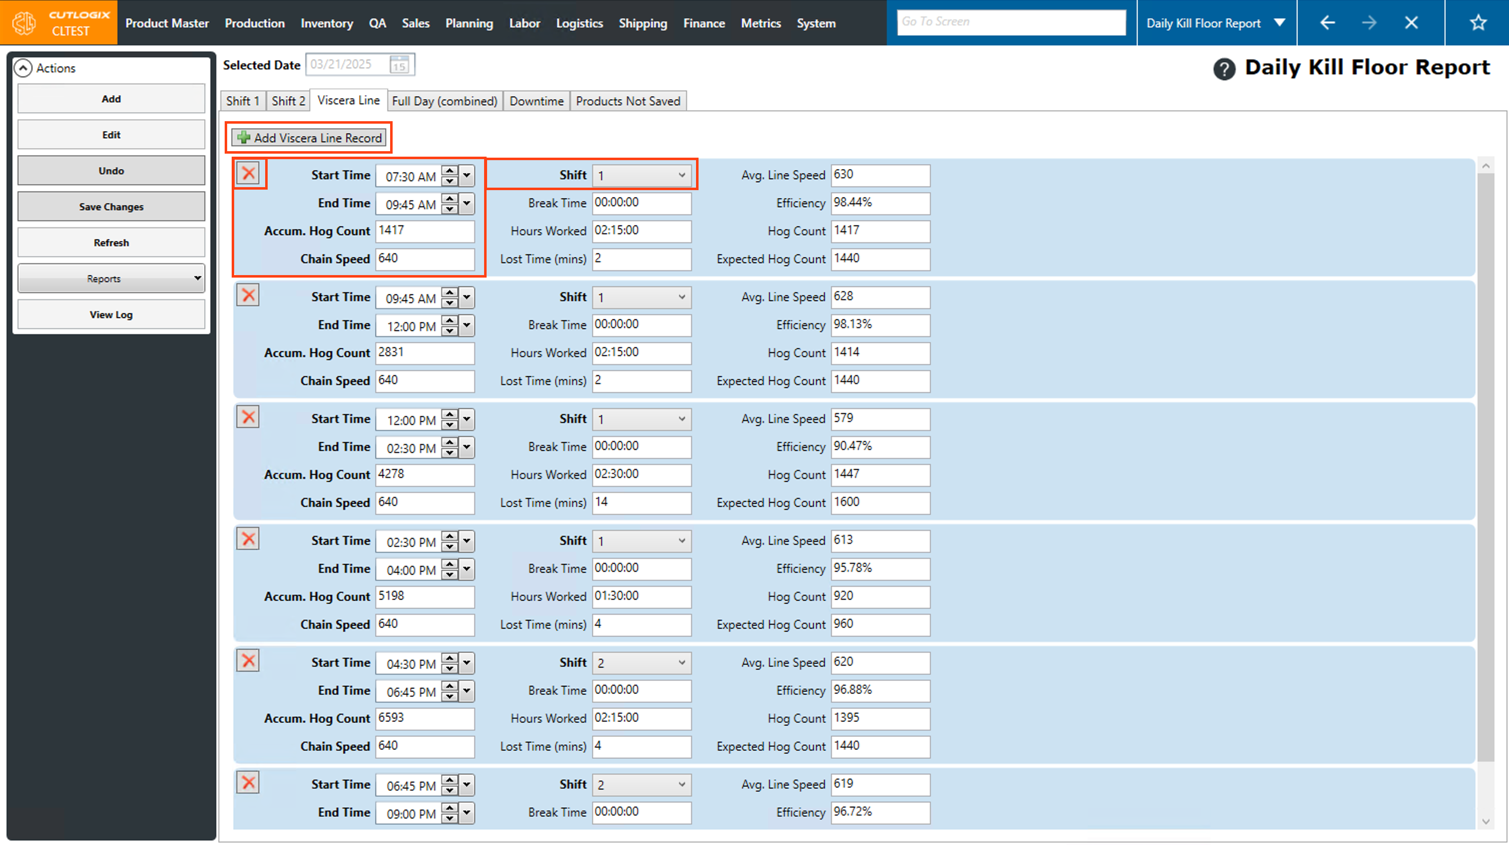
Step 4: Then click the "Edit" button in the Actions Panel to enable editing.

Step 5: Now, click the "Add Viscera Line Record" button.
Step 6: A new viscera line record will appear. It will be pre-populated with information from the shift configuration and several fields will calculate once the Accum. Hog Count is entered.
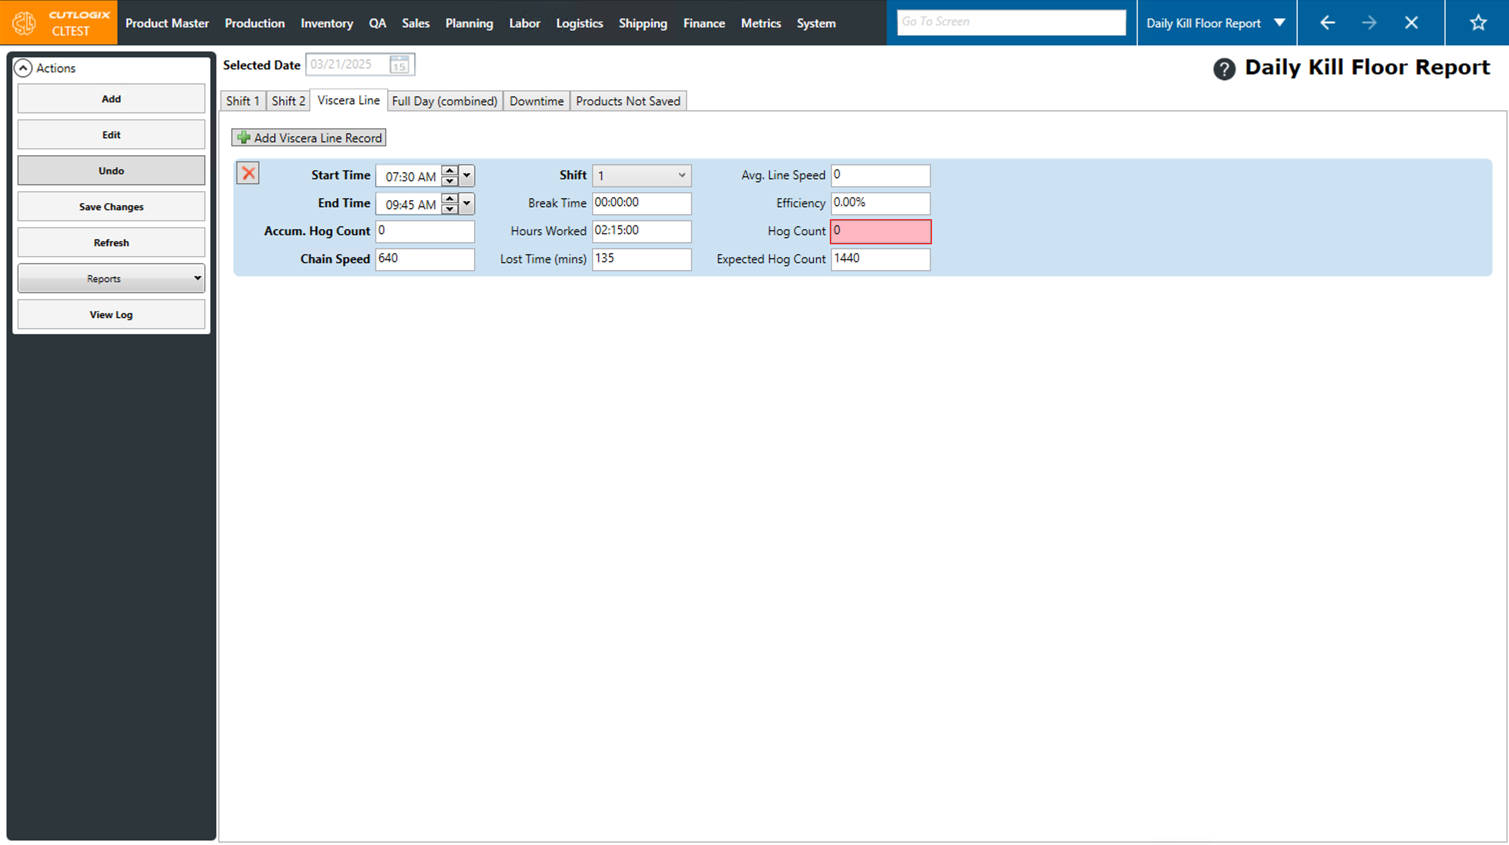
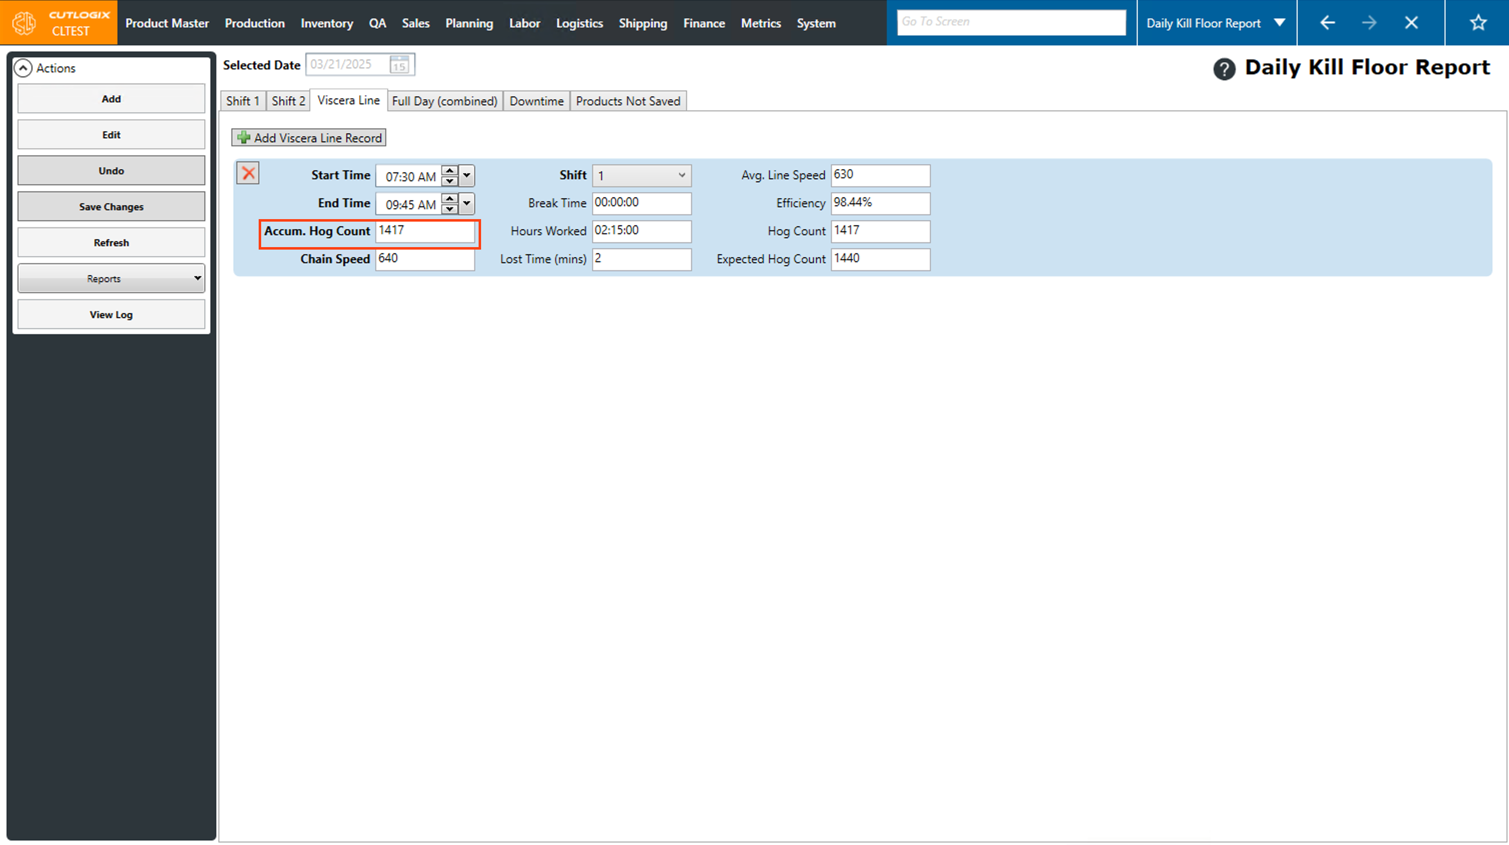
Step 7: Enter the total number of accumulated hogs in the "Accum. Hog Count" field. Once this has been entered, the lost time, efficiency, Avg. Line speed and hog count will be calculated. You can also make changes to other fields on the record, as long as their titles are bolded. All the fields on viscera line records are as follows:
• Start Time: The beginning time of the viscera line record block.
• End Time: The end time of the viscera line record block.
• Accum. Hog Count: The cumulative number of hogs processed over all time blocks up to this point.
• Chain Speed: How quickly hogs are moving through the kill floor, specified in hogs per hour.
• Shift: The shift that the viscera line record occurred on.
• Break Time: The duration of time within the viscera line record that was allocated to breaks.
• Hours Worked: The duration of time worked on the viscera line record. This is calculated as the difference between the start and end time, minus break time.
• Lost Time (min) The amount of time, in minutes that were lost or running behind. This is calculated as the difference between the expected hog count and the hog count, divided by the chain speed, then multiplied by 60 to get the time in minutes.
• Average Line Speed: The average number of hogs processed during this time block.
• Efficiency %: The calculated efficiency of the selected block. This is calculated as the average line speed (ALS) divided by the chain speed (CS).
• Hog Count: The total number of hogs processed on the time block.
• Expected Hog Count: The expected number of hogs to be processed in the time block. (Calculated based on the hours worked and the chain speed.).
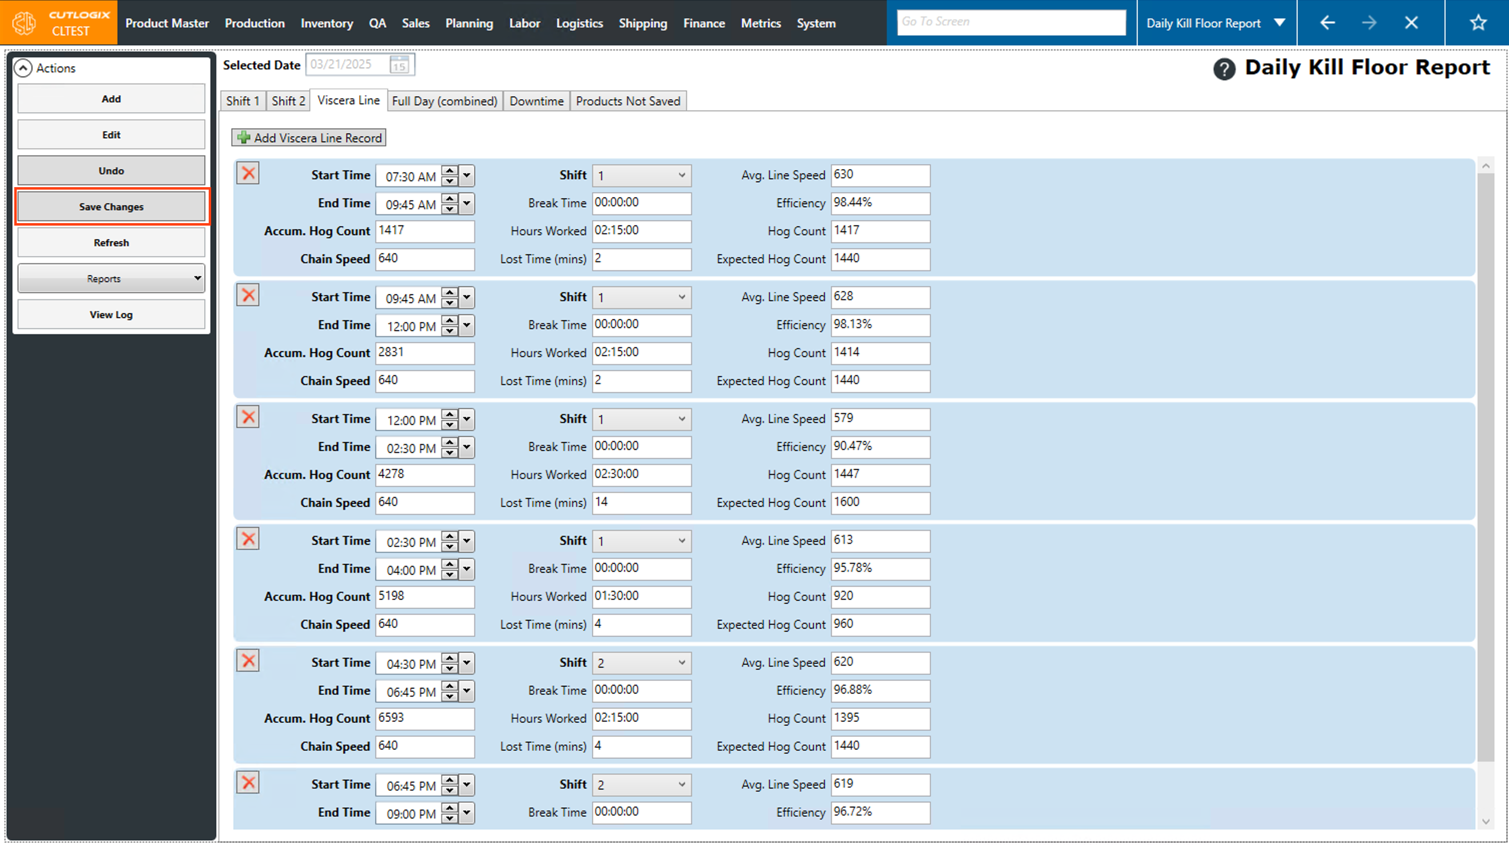
Step 8: Once the viscera line record has been entered, click the "Save Changes" button in the actions panel to save the new viscera line record.
How to Edit Viscera Line Records
DemoStep 1: Open the "Daily Kill Report" page, located under the Production menu → Kill Floor → Daily Kill Report.
Step 2: Use the date picker (calendar icon) to navigate to the day that contains the viscera line record that you want to edit.

Step 3: Click on the "Viscera Line" tab, then click the "Edit" button in the Actions Panel.
Step 4: Now you can make any necessary modifications to existing viscera line records, by changing data in the fields with bold titles. (Fields without bold titles are not editable). You can also add additional records by clicking the "Add Viscera Line Record", and remove existing records by clicking the "X" button beside a record.
Step 5: Once you're finished making changes, click the "Save Changes" button in the Actions Panel to save them. If you don't want to save your changes, clicking the "Undo" button in the Actions Panel will discard them.
How to Add Downtime Records
DemoStep 1: Open the "Daily Kill Report" page (Under the Production menu → Kill Floor → Daily Kill Report) for the date that you want to add a downtime record for.
Step 2: Open the "Downtime" tab, then click on the "Add Downtime Record" button.

Step 3: A dialog will open, called "New Kill Downtime Record". In here you can enter information about the new downtime record. Fields highlighted in red are required and must be entered before the new downtime record can be saved, these fields are as follows:
• Duration: The duration the downtime lasted in minutes.
• Reason 1: The primary reason that downtime occurred, selectable from the dropdown list.
• Reason 2: The secondary reason that downtime occurred, selectable from the dropdown list. This field becomes required after Reason 1 is added.
• Explanation: This is where a comment, explaining the downtime.
There are also some fields that are pre-populated such as the following:
• Production Date: This is automatically set to the production date that the downtime record is being added to. This cannot be modified.
• Start Time & End Time: These both automatically default to the date that the "Add Downtime Record" button was clicked, and can be adjusted according to the appropriate start and end times for the downtime.
• Shift: This defaults to Shift 1 automatically, but can be changed if necessary.
• Location: This defaults to "Kill Floor" and cannot be modified. This is because the downtime record was initially created from the Kill Floor report.
• Process Area: This will default to "Kill Floor" but can be modified if necessary.
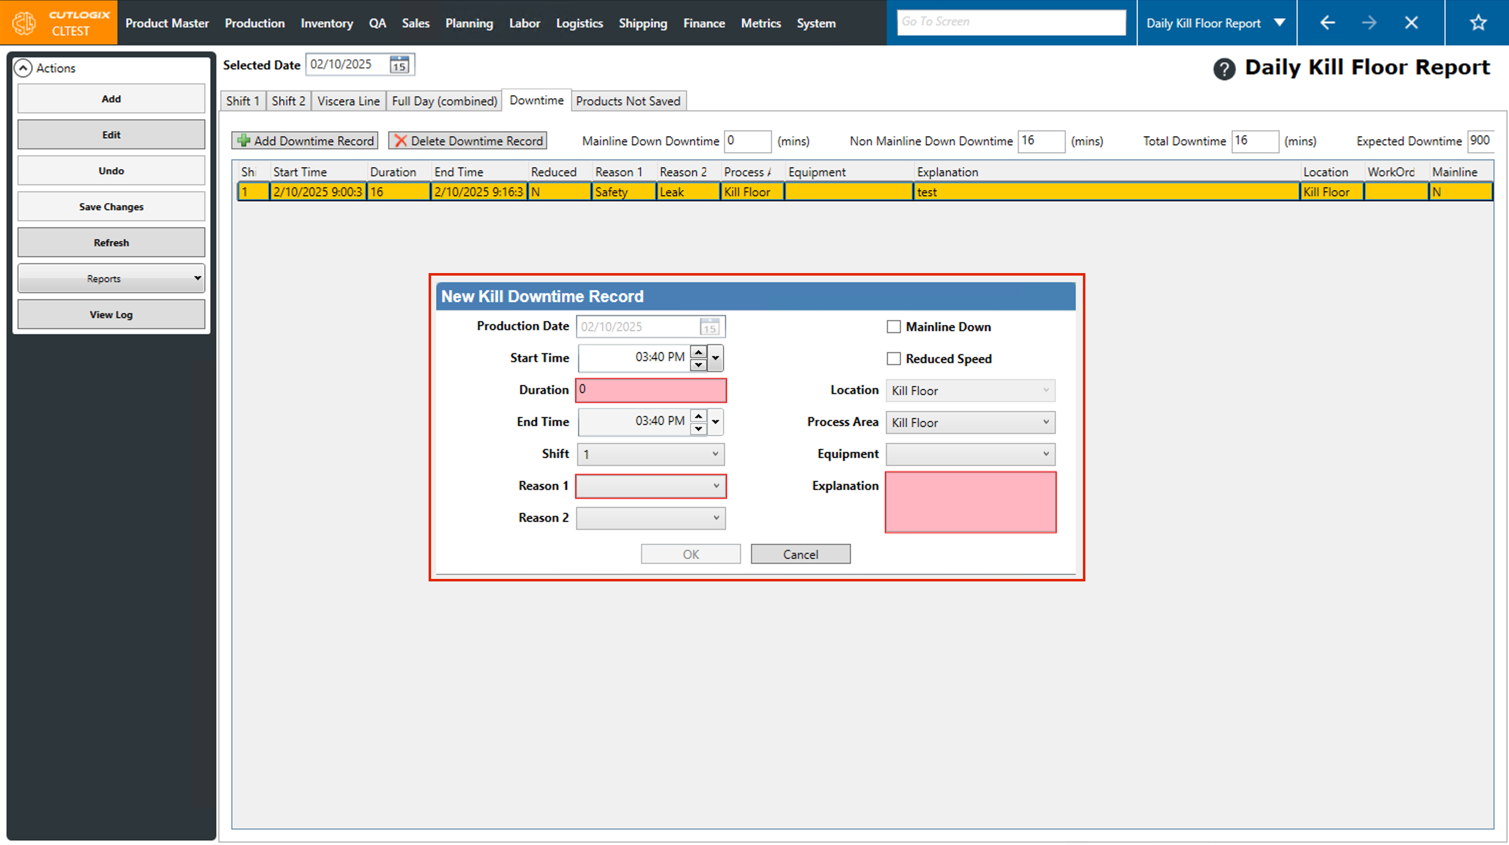
Step 4: Once all the required information has been added, click the "Ok" button to save the downtime record. If you don't want to save the downtime record, clicking "Cancel" will exit out of the dialog and any data entered will be discarded.

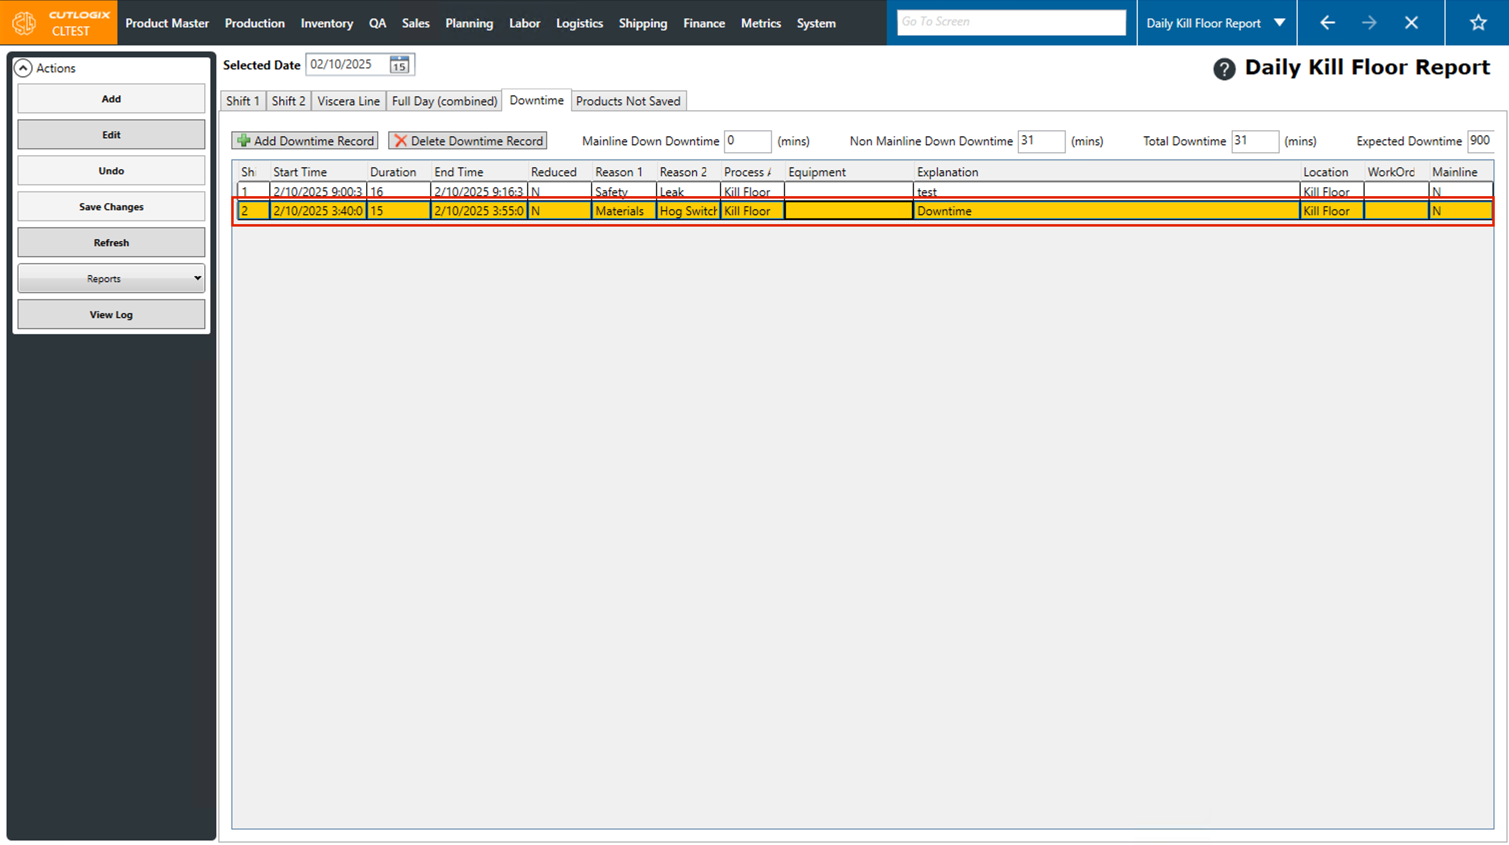
Step 5: After saving, the new downtime record will be added to the list of downtime records, visible on the "Downtime" tab.
How to Delete Downtime Records
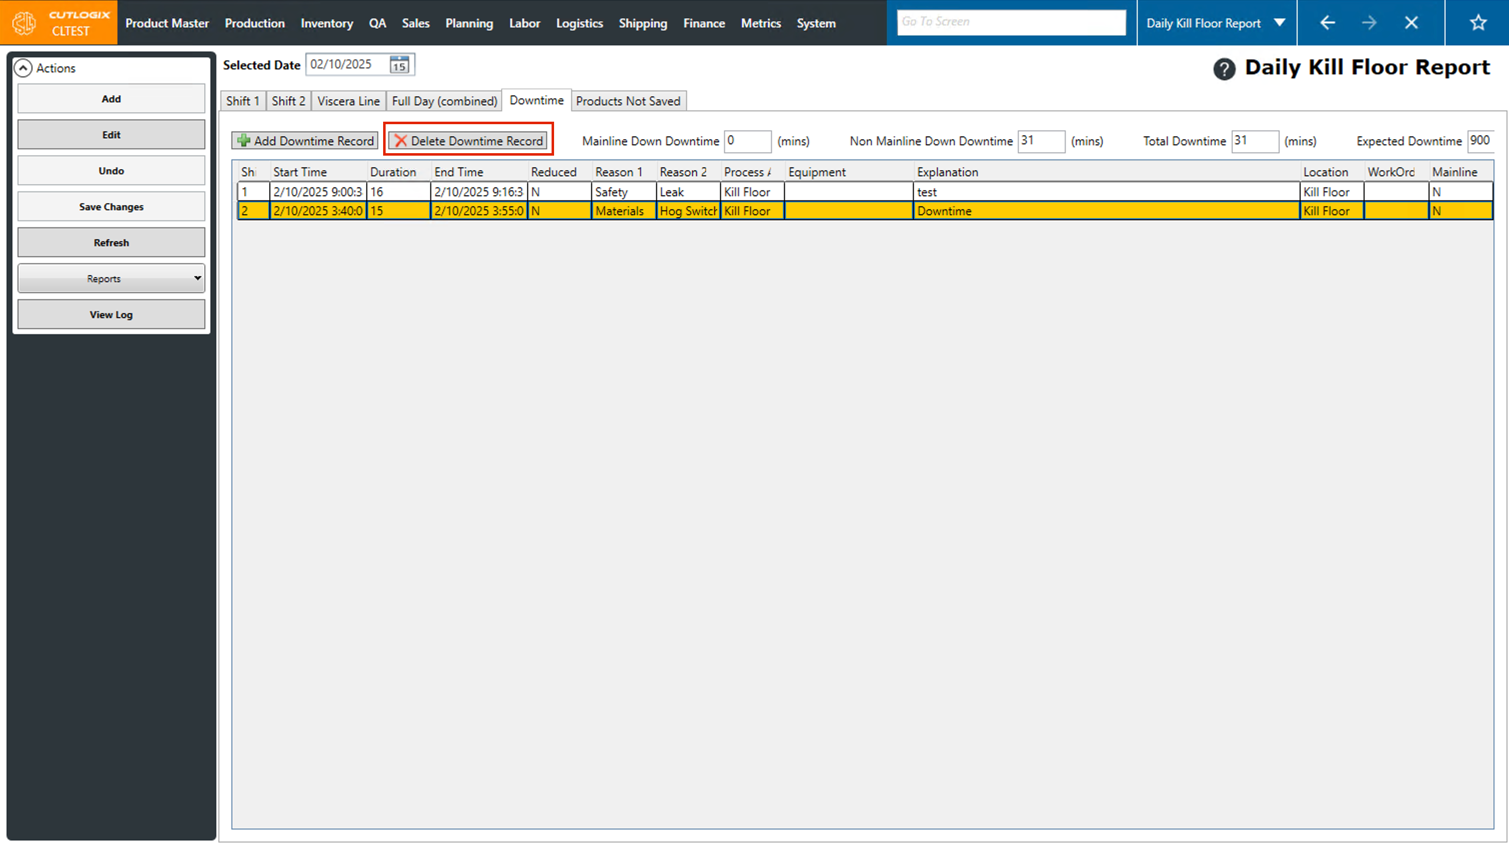
DemoStep 1: Downtime records can be deleted from the same area that they are created. Open the "Daily Kill Report" page (Under the Production menu → Kill Floor → Daily Kill Report) and choose the date that the downtime record you want to delete is on, then click on the "Downtime" tab.
Step 2: Click on the downtime record that you want to delete (once selected it will be highlighted in orange).

Step 3: Click the "Delete Downtime Record" button.
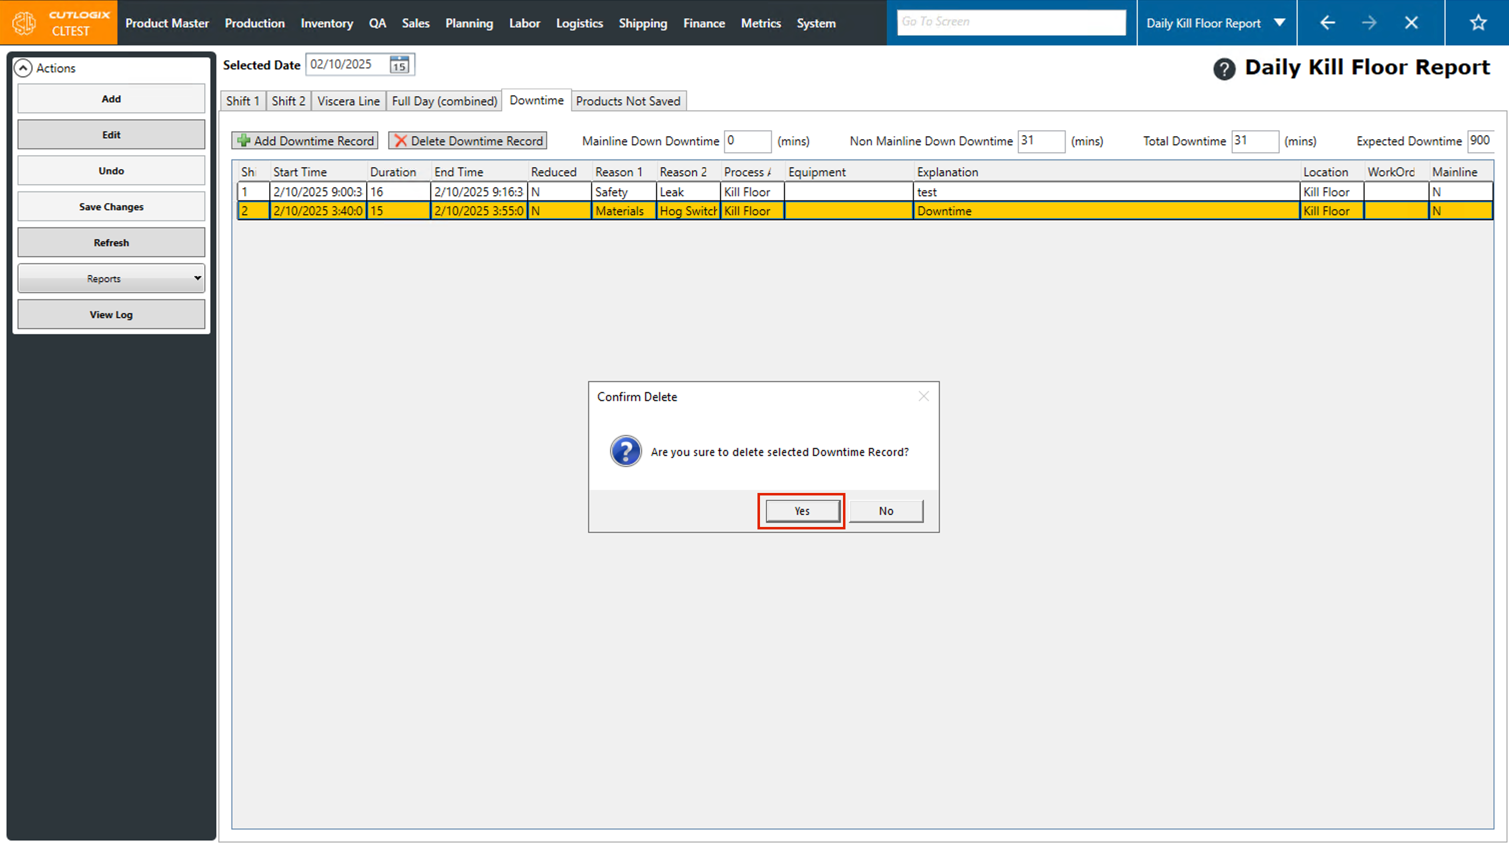
Step 4: A confirmation dialog will appear, asking if you're sure that you want to delete the downtime record. Click "Yes" to complete the deletion of the downtime record. (Note: Clicking no will close the dialog and the downtime record will remain unchanged) Once deleted the record will no longer appear in the list.
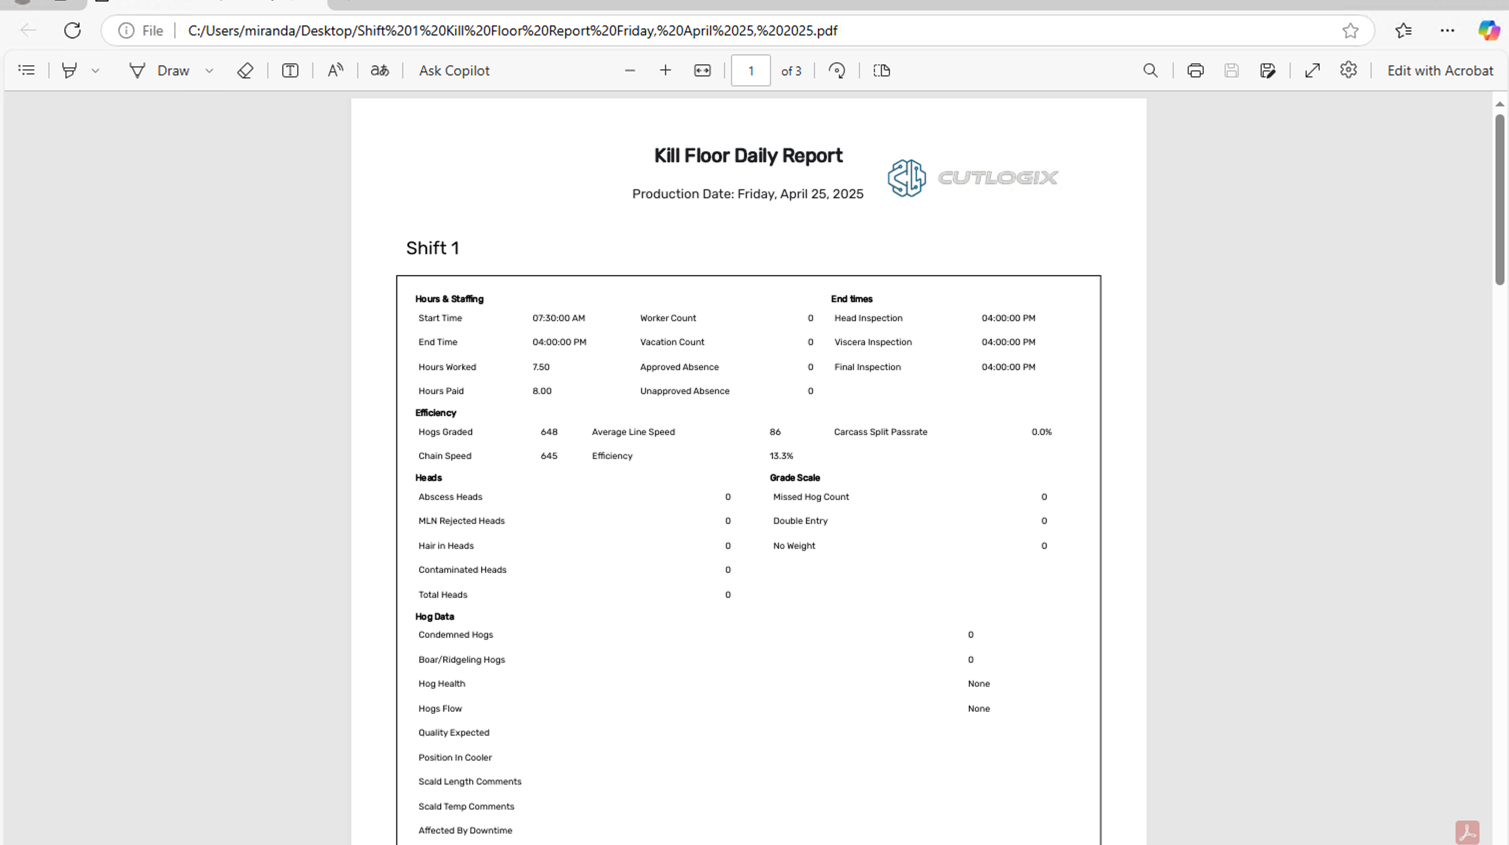
How to View/Print the Daily Kill Floor Report
DemoStep 1: Open the "Daily Kill Report" page (Under the Production menu → Kill Floor → Daily Kill Report) for the date that you want to view the report for. Note that the selected date must have a daily kill floor report added to it in order to view the report and the "Hogs Graded" field on the report must be greater than 0.
Step 2: Click on the "Reports" dropdown list under the Actions Panel.
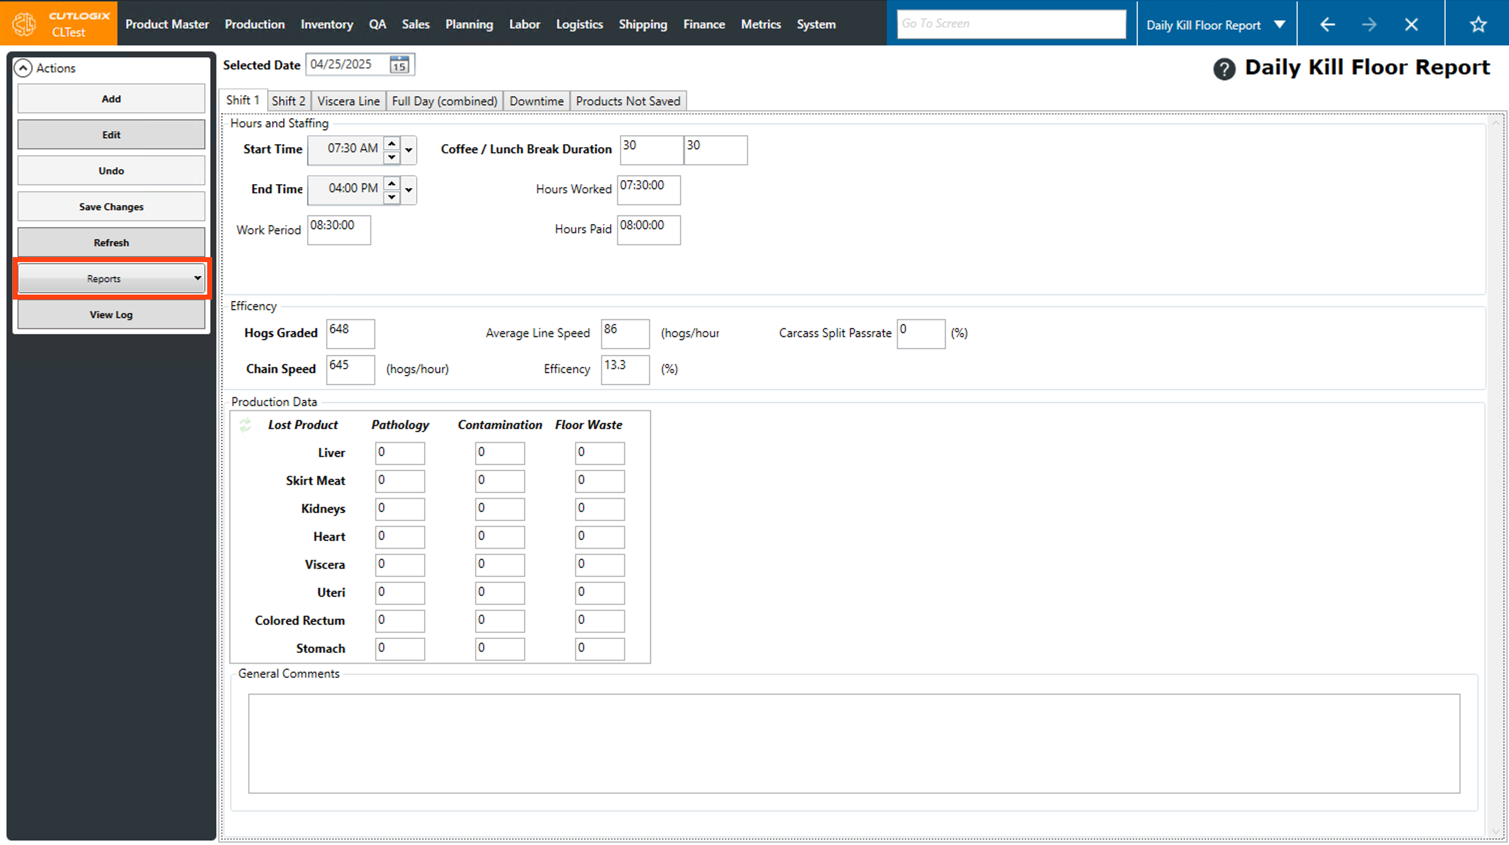
Step 3: In the list of reports that appear, click on the one that you'd like to view. There are 2 options, one for each shift.

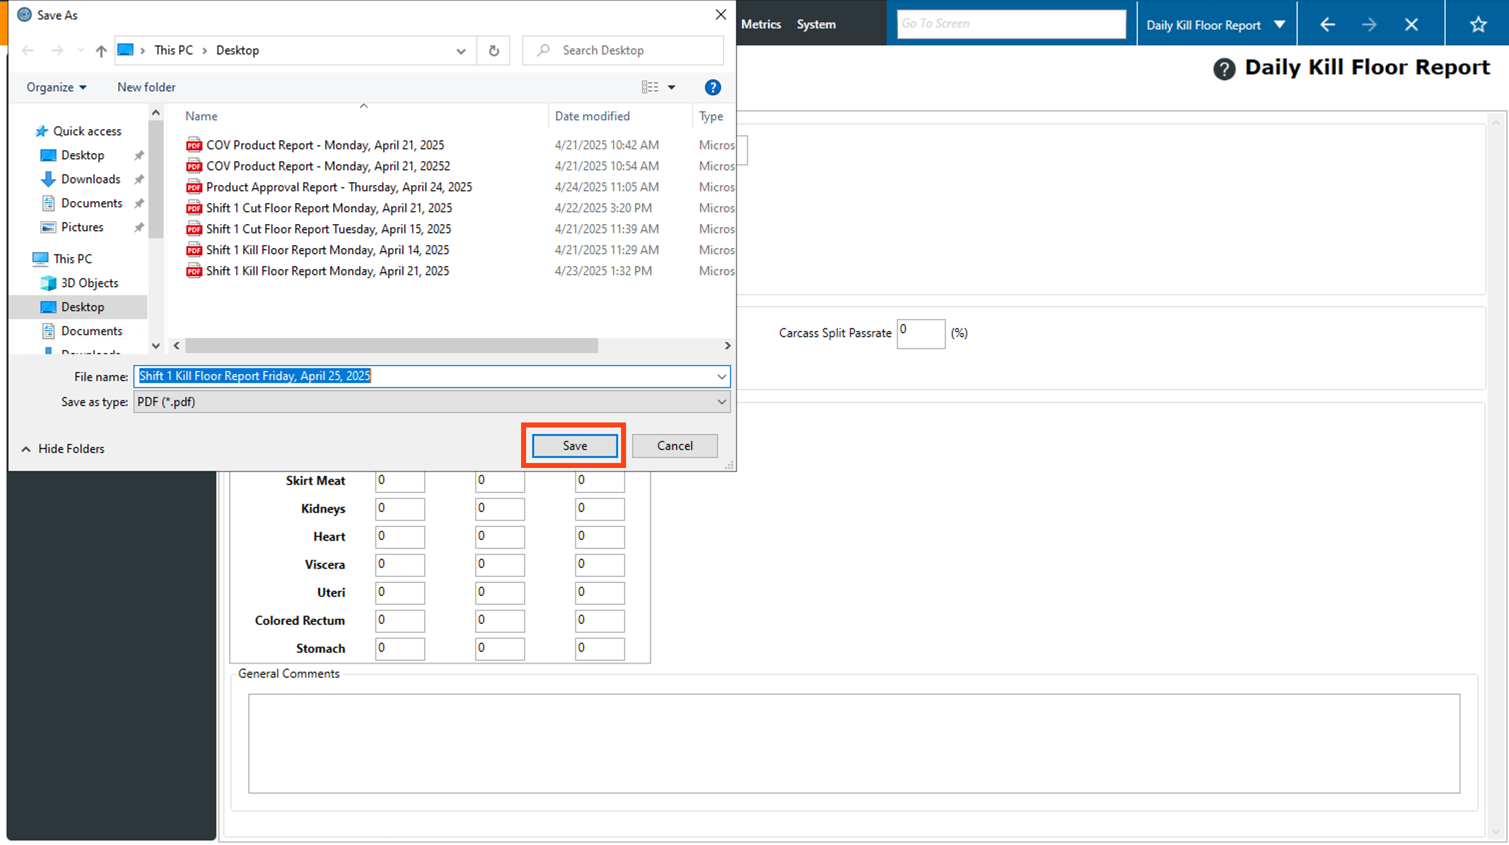
Step 4: A dialog will appear, asking you where you'd like to save the file on your computer. At this point you can change the filename from the default to something else if you want to. Navigate to where you want the file to be saved, then click the "Save" button.
Step 5: The PDF report will then open in your default PDF viewer. If necessary you can also print the report from here. How to do this will vary depending on which PDF viewer you're using.